
Cloisonne Cup – A Noble Chalice
Who has not dreamt of that nobly shaped chalice, enameled all over with immaculate transparents... maybe just one fine gold line winding around its outside... so elegantly understated, so utterly simple... That is poetry. It would neither work nor last. A chalice has to withstand very hard use, and maybe even abuse. It must be carefully planned. That is why I have made this cup a teaching example. [Step by step with illustrations].
9 Minute Read
Who has not dreamt of that nobly shaped chalice, enameled all over with immaculate transparents… maybe just one fine gold line winding around its outside… so elegantly understated, so utterly simple… That is poetry. It would neither work nor last. A chalice has to withstand very hard use, and maybe even abuse. It must be carefully planned. That is why I have made this cup a teaching example.
We use this cup at festive occasions, when everybody takes a sip from it. A nice translation of the Jewish KIDDUSH cup into every family's life.
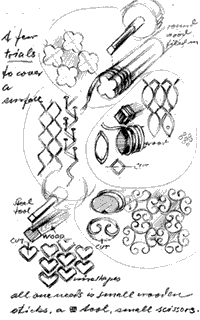
The design is as simple as can be; a very large number of small shapes, easy to fit to the curved surface. I have been thinking of a tree with roots, a trunk and a blossoming crown in which creatures live. Of course you could have that winding line, but it must be broken up into small hairpin-like shapes, all curved to fit safely to the body of the cup. But even then, it would be wise to cover the whole surface with a net of fine cloisonne shapes, touching each other. The Orientals have used this concept for hundreds of years and with good reason.
Anneal the wires well, so they don't stretch during firing. When the cup is assembled of its many parts, be sure never to put any pressure on the enameled parts. A metal rim or bezel, etc., will take care of this problem. If hit, only one or two of the cells will be damaged, and possibly the net of wires would take the impact. Such small defects can be repaired invisibly without refiring. If there is severe damage, the cup can be easily taken apart, repaired, reshaped, fired again, gold-plated and put together again. Our "dream cup" would have cracked all over and been a complete loss.
Counter enamel works fine for 2 or 3 firings. However, it would be a miracle if it remained perfect in the many firings and stonings of a chalice. It would be too much of a risk.

Religious cups must be gold inside (gold plating the inside will do the job). Wine may leave spots on enamel, and on should not drink from enamel if it is not lead-free. Pure, thick gold needs no counter enamel, it holds enamel because it expands similar to it. The better the material, the easier the work. Hagstoz in Philadelphia produces a non-tarnishing 18 carat gold (25% is fine silver; no other metal). It is beautiful to work with. The cloisonne wires remain clean, and transparents are excellent over it except for reds, pink, oranges and some purples. These transparents should be fired over a prefired coat of flux for silver. The same holds true for pure silver, but silver changes shape and size in the furnace. I use only medium to soft enamels with fine silver (that means melting at low to medium heat).
My answer to all these problems is the lining cup, which is inserted into the outer, enameled cup. I will now stop talking and demonstrate with photography and pen. By the way, if you understand this particular construction, you can dream up almost anything safely, whole sculptures if you wish. I have avoided complicated skills, like raising metal, and have kept to a very few essential skills: clean soldering, fitting, and thinking.
The viewer sees only the very skin of a piece. He has no idea how much thought and skill is below this appearance. Fun too.
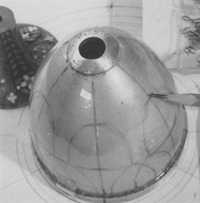
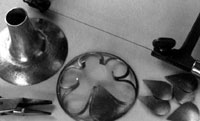
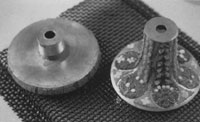
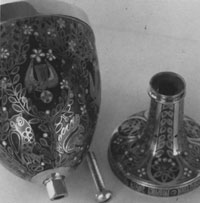
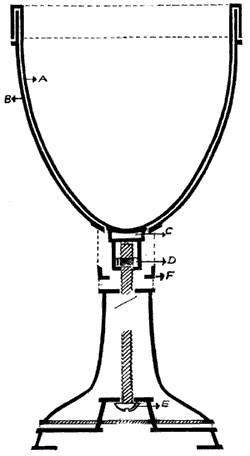 | A. Careful construction drawing is the first step in the making of this cup. Once this is done and clear in our head, we can proceed part by part. Rims, etc., are provided for all spaces to be enameled.A. The INNER CUP, to be polished and gold-plated, holds the NUT HOUSING. B. The OUTER CUP is to be enameled. |
| Here we have the "outer cup," which will be enameled, and the lining cup, which will be polished and goldplated. There are "sketchy" designs, and some technical details you'll find on the scheme drawing. |
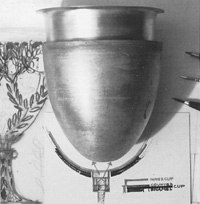
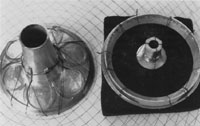
 | The outer cup received a rim on top and a disk at the bottom. The enameling is safe between these. The cup is ready for a coat of flux outside, and counter enamel inside. Do not enamel above the rim |
 | The lining cup receives the rim to be visible above the enamel. It is soldered after very carefully checking the exact width needed to insert the unenameled rim of the enameled cup. |
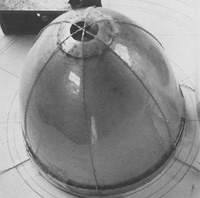 | We can now concentrate on the cloisonne enamel. To divide it into 6 equal sections, the cup is centered over circles drawn on paper and the 6 partitions are marked. After placing and checking the cup on the vertical, I put 6 pieces of thread over the center hole with plastic tape. With a Stabilo pencil, I marked lines along the threads and… |
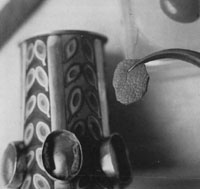
 | …continue drawing the structure for the design of cloisons. I used very simple shapes, glued them with Klyr Fire to the surface, section by section, and filled them right away with enamel - all the way around. Soak the water out of the enamel with a tissue of Kleenex, and then place a drop of Klyr Fire on top of each cell. |
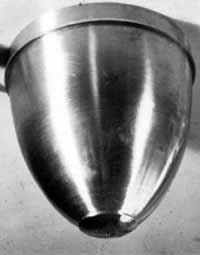
 | The flux underneath permits transparents side by side with opaque enamels. To be able to turn the cup without touching the enamel, I screwed and wired a small trivet as a stop for the rim, and a larger one touching. BUT WITH SOME ELASTICITY for the bottom of the cup and attached to strong wire mesh. When faced with a question like: how to invent a contraption for a special purpose?, it amuses me that my experience always tells me: "Everything is right there - Just open your eyes."After the cloisons were set, filled, and held by Klyr Fire, I thought that I was ready to fire - but, let me confess, my furnace ceiling was not high enough. The cup standing upside down on the wire mesh touched the ceiling of the furnace. I phoned a friend who lived 30 curvy miles away on a hilltop. I told her, "Don't ask questions dear friend! Just turn your furnace on high - I'll be there in 45 minutes!" I placed the unfired cup into something like a safe box, by my side on the floor of my car. The cup and I arrived safely. The furnace was hot, and the cup did not lose a grain of enamel, it came out perfect. So much for Klyr Fire! The following firings were done at the friend's furnace; after stoning all wires out I fired the cup one last time, quick and hot for good color, in the upside down position again. But alas, the enamel in each cell had slid down; just enough to be impossible…There was only one answer. Fire it standing on its round bottom. But how? |
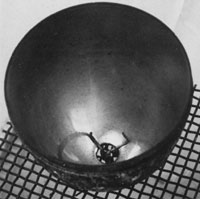 | I put one of those small metal trivets into the cup, and stitched it tightly with iron wire to the wire mesh. It stood. If this sounds a bit unprofessional to some of you - it is the only way to solve a problem with what is at hand. If I had to make 50 cups, I would improve my inventions.When I saw that the cup would stand in the hot furnace, I watched for the moment that the enamel would slide back. It did, and at that moment, I took the cup out. I bathed it in Sparex, stoned lightly to get the even matt surface, waxed it, polished, gold plated, and here you see it. |
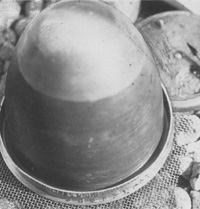
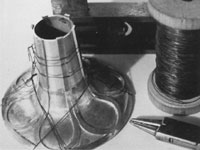
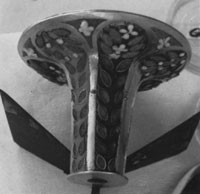
 | And now the foot; it is handmade - not spun, of two parts that are soldered with hard silver solder and shaped over a stake. It could have been raised, but I have aimed this whole project towards those enamelers who do not know too much about metalwork, but wish to widen their abilities. |
 | Over the same stake I raised a second domed shape - cut it out and tied it over the first with iron wires and soldered it to its base. The right of the picture shows the nut housing with the steel nut already in it; and the bottom rim on which the cup will stand. Solder is placed on the inside, where it cannot harm the enamel. |
 | As you can see, the orna- ment does not reach all the way up the foot. I had to add 6 strips of copper by soldering. Where these 6 strips meet the ornament, the seams will show. I knew it. It could not be avoided. You will see the answer. I drilled 6 small holes at the problem seams. |
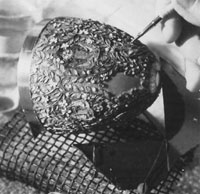
 | The wires are glued with Klyr Fire right on the copper. There isn't any flux underneath as all the enamel on the foot is opaque. However, the inside received a generous sifting of flux, held in place with the same glue. Again I filled all cells at the same time, soaked the water out and put that drop of Klyr Fire on top of each cell. I filled the cloisons just enough to hold the wires in place and avoid oxidation. |
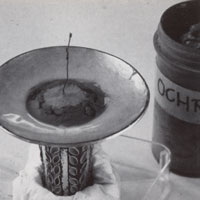 | There were more firings, and with them the danger of the piece warping out of shape just enough so as not to fit. Do remember this little trick: Form a substantial pillow of old iron binding wire and stuff it with moist ochre. A piece of wire should stick out of the middle as a handle. The ochre-wire pillow should be inserted into a hollow of the foot. It is dried well before firing in a hot furnace. It remains a bit crumbly, but holds well enough.. Insert it before each firing; a bit of wet ochre secures it. To soak all moisture out, I inserted the foot upside down into a hole, which in this case was a plastic tape container padded with Kleenex. |
 | Here the foot rests safely while the enamel is applied. A trivet on a clean surface props up the foot in a workable position. |
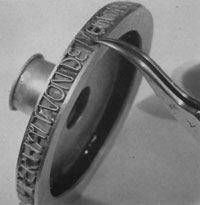 | To enamel the base is about the same as the other parts. See to it that the letters touch the rims, or you might get cracks. It is most important that you apply a good layer of enamel on the inside, especially at the bottom rim! |
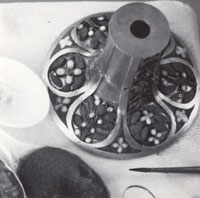
 | All is ready for the final firing: the last layer of enamel is packed above the cloisons, so that there will not be any low spots after stoning. |
 | All is finished, except for hiding the 6 holes in the foot (remember, dear enamelers, this is the way the old masters of the 12th century did it too!) |
 | Six corals are set into curved bezels. The bezels have a strong wire attached to the backside. Each wire with attached bezel is inserted into the 6 holes of the foot. The wires have had threads cut into them to secure the bezels to the foot. Under the flat corals I have laid soft leather to make up for the curvature of the bezels. |
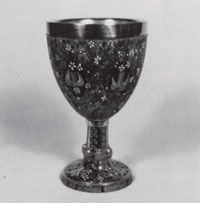 | Here is our cup! The line of poetry on the foot reads in German:TRINKT IHR AUGEN WAS DIE WIMPER HAELT VON DEM GOLD- NEN ÜBERFLUSS DER WELT. In English: |
Related Articles

Teaching Enameling at the International Enamel Studio

The Enamelware of Tibor Kopocs

The Jewelry of Patsy Croft

The Enamelwork of Jamie Bennett


The All-In-One Jewelry Making Solution At Your Fingertips
When you join the Ganoksin community, you get the tools you need to take your work to the next level.
