
Portrait with Enamel Watercolors
My design for a portrait in enamel is based on either a photocopy of a photograph or my sketch of the subject. The work is divided into small sections of various sizes and shapes. Each piece is an almost independent unit. Cutouts made from photocopies of the design are used for cutting the metal, blocking the area, transferring designs and shapes.
8 Minute Read
My design for a portrait in enamel is based on either a photocopy of a photograph or my sketch of the subject. The work is divided into small sections of various sizes and shapes. Each piece is an almost independent unit. Cutouts made from photocopies of the design are used for cutting the metal, blocking the area, transferring designs and shapes, etc.
18 ga copper or fine silver is used for parts that are fired many times. Less complicated sections are made of 20 ga metal and for tiny pieces that will be fired just three to four times, 22 ga or even 24 ga will suffice. I use a frame saw with a 2/0 blade to cut 18 ga metal and a 4/0 or 6/0 for thinner metal and very intricate designs.
The metal is first covered with a laver of masking tape, then a laver of double-faced tape, The third layer is the pattern for cutting. After cutting the metal, the layers can be peeled off together and saved. Should a need arise, the pattern is ready to be placed on a fresh piece of metal and re-cut. Holes are drilled in the metal if it is to be connected with screws or other connecting elements. The metal must be cleaned before it is enameled. Annealing in the kiln cleans fine silver, but I heat the copper in a 1500F kiln till it turns gray green and then clean it with Penny-Brite.
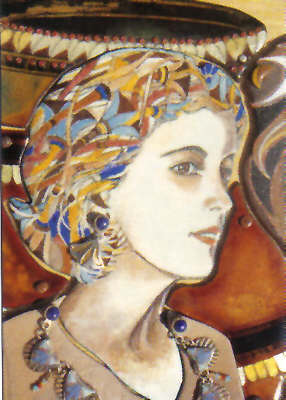 |
| 'Tamar' Plaque: 9″ x 11 ". segments are 5″ x 3" and smaller. 18 ga copper, fine silver foil, fine silver cloisonne wires, enamel watercolors. |
All of my enamels are from Thompson Enamel Inc. I purchase their unleaded 80 mesh enamels and use #533 White Liquid Form enamel as counter enamel on the back of all the segments. This liquid enamel should be the consistency of thin yogurt. It can be poured over the metal or applied with a soft brush. When the counter enamel is dry, I sift enamel on the front.
Sifting the enamel, without any adhesives, through different mesh sifters helps to create a perfect surface for painting. The first sifting of a pale color enamel, like #1202 Off White is done through a 60 mesh sifter over the whole area of the head, followed by a thin layer of #1202 through a 100 mesh sifter. A last sifting of the #1202 through a 200 mesh sifter is over the whole area, with particular attention to the edges. The tiny grains from the 200 mesh cling better to the edges thin the bigger grains and will prevent the edges from burning out.
The piece is fired at 1500OF for about 1 1/2 minutes or until the enamel, inside the kiln, looks even and glossy. Removed from the kiln and cooled, the piece is stoned under water with 150 and 200 Alundum stones to ensure a flat surface. In painting a portrait, mounds and hills in the enamel can distort the expression of the face.
Sometimes I sift #1010 White only on the face and neck using a paper cutout to block the hair section. After removing the paper cutout, I paint the bare copper with Scalex leaving a narrow space between it and the sifted enamel. When the Scalex dries, the piece is fired until the enamel is shiny. When cool, the Scalex and the firescale are removed and the bare copper cleaned.
The hair section is painted with a very thin layer of oil base P-3 Black Underglaze and dried on top of the kiln. When dry, the pattern of the hair is sgraffitoed with a metal or wood scriber. Masking the white enamel of the face with the appropriate paper cutout, I sift 200 mesh granules of transparent enamel over the design of the hair and fire the piece until the enamel is shun, and transparent. P-3 Black Underglaze should always be fired with transparent enamel over it.
At this stage, I turn the piece over and sift over the fired counter enamel the same enamel that was sifted on the front. Using the same enamel on the front and on the back reduces the risk of cracks in the enamel.
The features of the face can be drawn free hand, but sometimes I use a copy of my drawing to transfer the outline of the facial features. I make a carbon paper that will be harmless to the enamel surface: Over the flame of a candle I hold a white china plate at an angle that will allow the flame to cover the plate with black soot. I wipe off the soot with a cotton ball and transfer the soot to the back of the portrait cutout pattern. The lines of the design can be traced by placing the blackened side of the drawing on top of the enamel. The transferred lines will appear on the enamel surface very faintly and will give a hint of the correct positions. The next step is painting with the watercolors.
The watercolors come in powder form. The three kinds that I use are Ceramic Pigments, Overglaze Painting Color and the 400 mesh fines of the enamels. Ceramic Pigments are not enamels and will not fire to perfection without an enamel addition of either PF-1 Painting Flux or 913E Mixing White. When mixed with Painting Flux, the colors retain their intensity whereas when mixed with Mixing White, they become lighter and softer. The ceramic pigment and the Mixing White or the Painting Flux are mixed 1 part pigment to 4 parts of either the white or the flux.
As I mix the colors I add one to two drops of Klyr-Fyre and a few drops of distilled water, just enough to achieve a good consistency for drawing and painting. The mixture should be smooth and silky because lumps do not fire well or fire with a different intensity of color. If these mixtures are kept dust free, they can be used for a few, months. Since some of the enamel watercolors and pigments look very different before and after firing, I have one sampler of the colors mixed with the Painting Flux and another with the Mixing White.
With the outline of the features traced on the enamel, I go over the lines with the enamel watercolor. Dipping a 20/0 brush in the darkest color combination that I have. I tender thin mid delicate lines. The color I use is a mixture of dark brown and dark blue. Drawing with these enamels is not like working with regular watercolor paints. The enamel surface is non-porous, mid if I cross over my painted lines, the lines underneath might disappear. The colors dry very quickly and become powdery, and so I have to be very careful not to drag lumps of powder with my brush. On the other hand, I can improve the drawing with ease. With a moist brush the lines can be refined until they we as thin as a hair. I can shape mid reshape the drawing until I am content.
The piece is fired at 1450-1500F for about I minute and 20 seconds, or until the lines become darker inside the kiln. Before firing again, a fair amount of work can be done. The shadows can be defined, dark values can be enhanced and the lighter areas can be softened. The addition of Klyr-Fyre to the color makes the paint adhere better to the enamel surface and more layers can be added without disturbing the unfired layers below As enamel colors tend to be lighter before the firing and darker after, the shadows and lights over the face and neck may be too contrasting. Lavers of Mixing White will soften the harsh shadows, and at the same time, if I want, I can add skin color to the portrait.
For a skin color over a base coat of #1010 White, I mix the tiniest amount of OC-70 red, OC-32 Yellow, 1715P-Clover Pink and a larger amount of Mixing White. If the base color is Off White, I use browns for skin color, OC-82, OC-83, OC-85, a little 906E Green and OC-95 blue. The lips are drawn with OC-70 Red and OC-71 Orange. A hint of blue will enhance the white of the eyes. Often during the many firings, the lips will need another application of color. A portrait can require 20 or more firings. It is a slow procedure that requires patience.
During the intermediate steps of drawing and painting the portrait, I take care to fire the piece only imperfectly, otherwise by the fourth or fifth firing the lines and colors may have vanished or been distorted. Enamel watercolors are very delicate and do not tolerate high or prolonged firing. Only when I sense that the piece is newly perfect will I paint the whole appropriate areas with a thin layer of the skin color mixture and fire a little longer. Delicate details can be added just before the piece is fired to perfection. I employ various techniques and colors to create the design that surrounds the portrait.
I usually connect the enameled pieces to a wood panel with Silicon II. I also use tiny nails that I make from fine silver or copper to hold the enameled pieces in place. I feel the nails echo mid enhance the design. When all the pieces are glued to the board, these elements are threaded through the previously made holes to the supporting wood panel. They also add mechanical strength to the work. Finding or making a frame that will compliment the work without competing with it is the last step.
In her last year at Art College for teachers in Israel , Ora Kuller as introduced to enameling. In the United States she studied enameling with Judy Danner and jewelry with Becky Brannon. In a workshop with Rebecca Laskin, she learned special enameling techniques. These teachers changed her life as an enamel artist. The magic and beauty of enameling captured her. She gives enameling workshops and works in her Belmont , MA studio, developing her own way of portraying her thoughts and dreams through enameling.
Related Articles

The Enamelware of Radka Urbanova

The Enamelware of Tibor Kopocs

Commercial Enameled Art Projects

Sansone Studio: Ancient Enameling Techniques


The All-In-One Jewelry Making Solution At Your Fingertips
When you join the Ganoksin community, you get the tools you need to take your work to the next level.
