
950 Palladium: Fabrication and Assembly
This article covers methods and techniques for hand fabrication, soldering and assembly for a custom designed 950 palladium and cultured pearl ring.
6 Minute Read
This article covers methods and techniques for hand soldering , fabrication and assembly for a custom designed 950 palladium and cultured pearl ring.
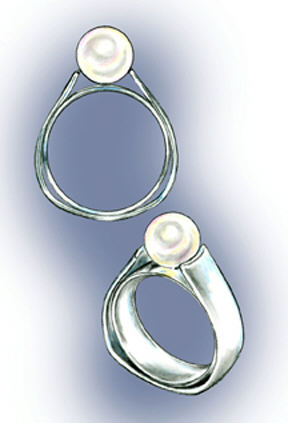
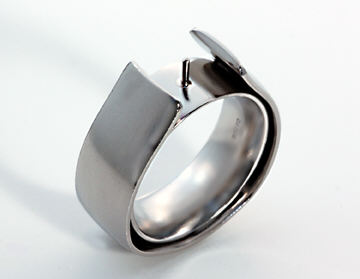
This bold yet minimalist ring design features a 10mm cultured pearl set in a 950 palladium with a wide, rounded inner and outer shank for comfort and surface contrast. The ring was hand fabricated using Hoover & Strong's low dome half-round 950 TruPd palladium wire stock from their palladium product catalog. The finished weight of the ring is 9.2 pennyweights. In platinum, the identical design would have weighed nearly 16 pennyweights.
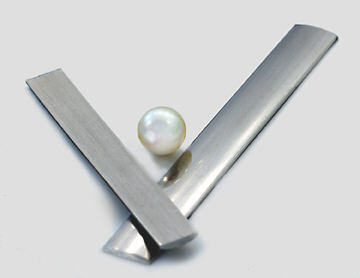 | The 950 palladium low dome half-round wire on the left measures 8mm wide and is 1.7mm deep and will be used for the inner shank with the rounded contour inside the finger hole. The wire on the right measures 10 x 1.5mm and will be used for the outer shank with the rounded contour on the outside. The flat sides of the wires will face and become the joint surfaces. |
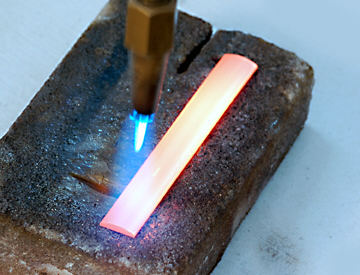 | The large wire was difficult to bend as supplied by Hoover & Strong, so individually they were placed on a platinum soldering block and annealed. Because this wire is wide and heavy, a vented torch tip was used. Tip: The low dome half-round wire was annealed using a natural gas and oxygen torch with a vented tip. The temperature of the wire was brought up to annealing temperature (indicated by a bright orange color) and held for 30 to 45 seconds. Once the wire reaches an annealing temperature, the torch was raised upward away from the wire to hold the temperature. Failure to raise the torch could cause the wire to be overheated. Always use a rated No. 5 or higher welding lens to protect your eyes during palladium annealing or soldering procedures. No firecoat solution or flux is used. |
 | The wires were cooled to room temperature. The inner wire was formed by hand, bending it around a ring mandrel. After making it the proper ring size, an end-to-end joint was created with no open seam. The half-rounded shape formed the inside (finger hole) of the ring and the flat side faced outward. 950 palladium hard solder was used to connect the joint. After soldering, the ring was rounded and then filed flat using a cross-filing technique. Tip: Using hard palladium solder provides the best color match and results in a joint that's not visible when polished and finished. |
 | With the inner shank piece made, the outer portion is formed. The annealed outer shank wire is marked at key bending and forming points with dividers. |
 | Using a ring mandrel and ring forming pliers, the shank is shaped. Thin paper was folded in half and half of the shank outline was traced darkly and cleanly onto the paper. The paper was turned over and the other half carefully traced using the guide from the first half. The opened paper served as a symmetrical guide for forming the outer shank. Because the wire was laid over the guide and matched often throughout the forming process, the result was a symmetrical piece which fit perfectly with the inner shank. |
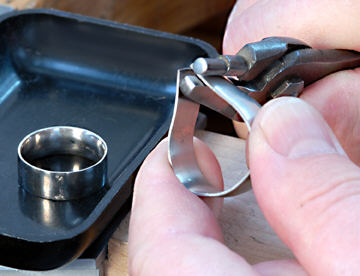
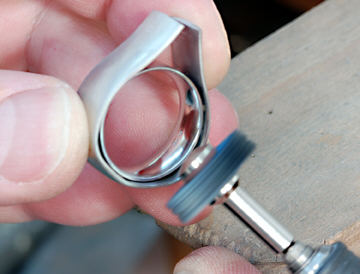
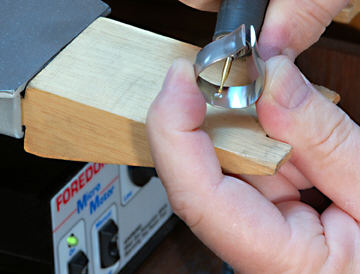 | Next the outer shank will be soldered to the inner shank. The inner shank is placed in the outer shank and the 3 main contact points are marked with an indelible ink marker. A small ball bur and a high-speed Micromotor are used to create depressions inside the outer shank to melt easy palladium solder into. Tip: The Foredom Micromotor has moderately good torque at medium to high operating speeds. A cut or groove can easily be controlled and positioned in metal. Due to the high operating speed, a lubricated bur will not grab or wander. |
 | After the outer shank portion of the ring was shaped, it was pre-finished to an fine abrasive finish. The piece was placed on the soldering block and easy flowing TruPd solder was melted into the divot. |
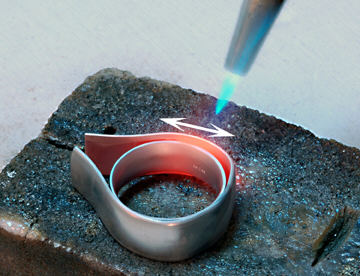 | After the ring cooled to room temperature, the inner and outer pieces were fit and final adjustments made. There was good contact and tension between the pieces and they were soldered using the easy solder that was pre-melted into the depressions at three points of contact. A vented torch tip was used because of the volume and weight of the pieces. Tip: No firecoat solution or flux is used for soldering palladium to palladium. For this palladium soldering application, a large vented tip and direct soldering techniques were used. The heat from the torch was directed to the heavier outer portion of the shank and the platinum block immediately in front of the ring. The heat radiated inward and the solder that was melted into the depression was flown at the connection between the two shank pieces. |
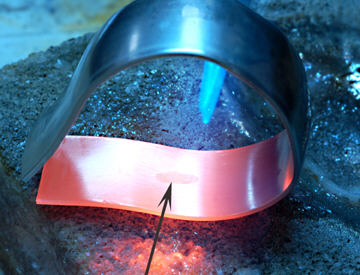
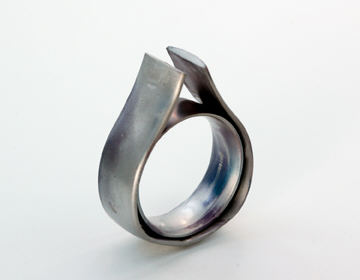 | During this part of the soldering procedure, the ring lost its pre-finished luster and picked up a slight blue-purple surface discoloration. The surface discoloration (shown in this image) is easily removed by heating it on the platinum soldering block with a neutral flame. With mild heat, the discoloration is instantly removed. Tip: Mildly heating palladium with a neutral flame (equal parts of gas and oxygen will quickly remove the surface discoloration. It can also be removed mechanically with fine abrasives such as 3M's radial bristle discs. |
 | To bring back the pre-finished luster, 3M's Radial Bristle Disc's were used. There are 6 color coded grits in this system and the middle grit (blue) and 2 finer wheels were used to restore the ring to its pre-finished luster. |
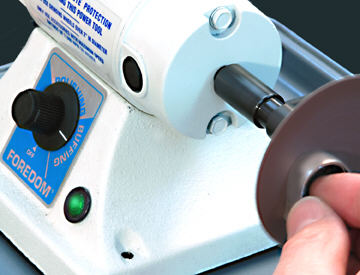 | For an evenly flat surface on each side of the ring, a Foredom Bench Lathe was used with 3M's 3 inch discs of Diamond Polishing Cloth. Progressive grits were used from medium to ultra-fine. Abrasive wheels were used to remove tool marks and to refine the shape. |
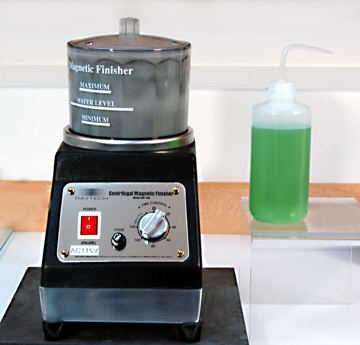 | After the pre-finishing, the ring was placed in a magnetic finisher. Water was filled to the water level indicator line on the side of the bowl and about 10 drops of Stuller's MF610 burnishing compound (the green liquid in the squirt bottle next to the finisher) were used. The piece was tumbled for 20 minutes. |
 | The tumbling procedure brightens the entire ring including the areas difficult to access. The finish left by the magnetic finisher is bright with ultra fine percussion marks. It's now ready for polishing. |
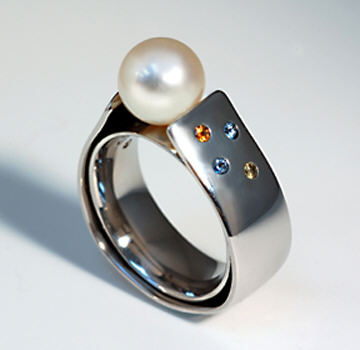 | Prior to flush setting the 2.5mm round Montana Sapphires, the ring was polished in 2 steps. The first step included using Bendicks Rouge (available from C. R. Hill in Berkley, MI) and a treated yellow stitched buff. This amazing white rouge works as a one step polishing compound for palladium. It has moderate cutting capabilities while delivering a bright finished luster. The second step of polishing this ring included using Foredom's platinum white compound which produced a deep, true bright white luster on the palladium. |
Palladium Frequently Asked Questions
Our store recently began carrying 950 palladium jewelry products. I have platinum jewelry repair and manufacturing experience but haven't worked with palladium. What should I be aware of?
- A special workbench for palladium is not required but cleanliness is. Keep your bench clean and free of debris from gold and platinum projects.
- I advise using palladium specific files, sanding abrasives and polishing materials.
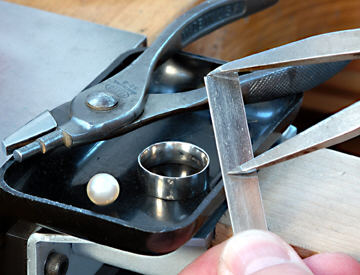
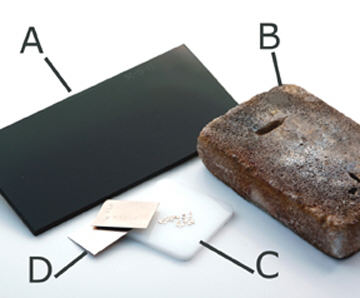
- When soldering palladium, such as rejoining a ring after sizing, use rated protective lenses to protect your eyes. I recommend a welding lens rated No. 5 or darker (A).
- Use a platinum soldering block (B) or tweezers with tungsten tips to hold and support the work while soldering.
- No firecoating, no flux and no pickling are required when soldering palladium to palladium.
- As is the case when soldering gold, palladium loses its polished luster in the process but it's easily restored by using fine abrasive wheels.
- The process of pre-finishing and polishing palladium may require an extra step or two as compared to gold and a few less steps as compared to platinum.
Photographs by Mark B. Mann, Design by Lainie Mann
This article was first published in Jewelers Circular Keystone magazine.
Palladium Alliance International (PAI) was founded in 2006 and is dedicated to providing palladium related sales and technical manufacturing information to the industry and consumers.
Related Articles

950 Palladium: Superior White Color

Basic Bead Setting Techniques

950 Palladium: Making a 3-Stone Ring

950 Palladium: 22K Granulation Wedding Band


The All-In-One Jewelry Making Solution At Your Fingertips
When you join the Ganoksin community, you get the tools you need to take your work to the next level.
