Steps for Graver Preparation
Gravers are small cutting tools used for stone setting, texturing, de-burring and applying decorative embellishments and traditional hand engraving. Steps required to prepare new gravers include mounting, sizing, shaping, sharpening and proper storage. Gravers are among the most useful tools at a jeweler's bench. Failure to properly prepare and maintain gravers not only presents a hazard, but also affects quality of work, proper technique and time efficiency. Here are some steps for preparing gravers for utilization with hand techniques.
3 Minute Read
Gravers are small cutting tools used for stone setting, texturing, de-burring and applying decorative embellishments and traditional hand engraving. Steps required to prepare new gravers include mounting, sizing, shaping, sharpening and proper storage.
Gravers are among the most useful tools at a jeweler's bench. Failure to properly prepare and maintain gravers not only presents a hazard, but also affects quality of work, proper technique and time efficiency.
Here are some steps for preparing gravers for utilization with hand techniques:
Steps for Graver Preparation | |
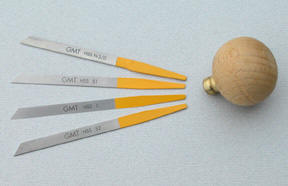 | Gravers are available in a variety of shapes. Most commonly used by bench jeweler generalists are the onglette (point), flat bottom, round, knife and liner shapes. Each shape is supplied in six or more sizes for a variety of applications. There are also several handle shapes and sizes available on the market. For this demonstration of graver preparation, a common round ball handle is used. |
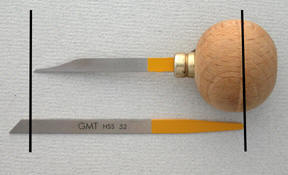
 | Gravers are not ready for use as supplied. Preparation includes modification and mounting and sharpening. This photo reveals three critical details of a graver. This one is a GMT (brand name). The identification further reveals that it's made of high-speed steel (HSS) and is a size 3/0 onglette shape. The shape of the graver is visualized at its point. |
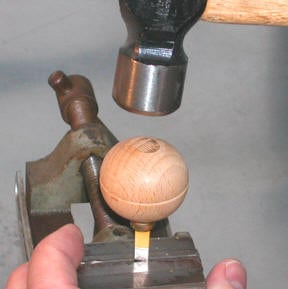 | The first step in mounting the graver is to reduce the size of the tang using a standard bench grinder. I also grind a point on the end of the tang to facilitate mounting. Approximately a 3/16-inch hole is drilled into the round ball handle about 60% of its depth. Place the graver into a bench vice and using a hammer, pound the handle into place. |
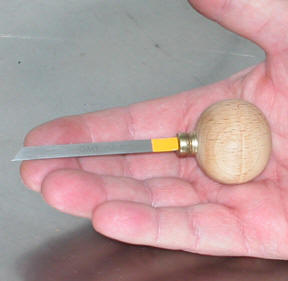 | After it's mounted, place the graver assembly into the palm of your hand. Mark the graver just beyond the tip of your finger. |
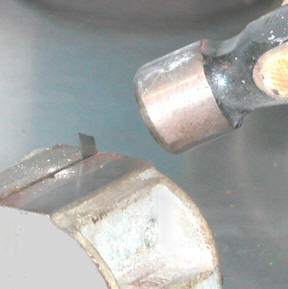 | Place the graver assembly into the vice, exposing the tip that's to be removed. Using a hammer, break the tip of the graver off. For this step, MAKE SURE TO WEAR safety glasses and strike the tip in a direction away from yourself. Do not do this in a room with other people. |
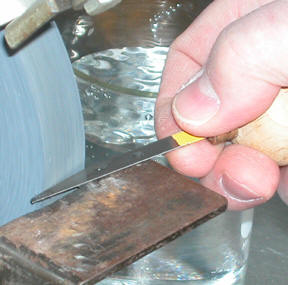 | To reduce the area that requires sharpening and polishing (the cutting end), grind away about an inch of the length portion above the point. Periodically dip the graver in water to keep it cool during this step. Overheating it will cause loss of tool temper and point strength. |
 | I complete the shaping of the point at the bench using a heatless grinding wheel. For the last step of shaping, I grind about a 45 to 60-degree angle on the tip of the graver to prepare for the sharpening process. |
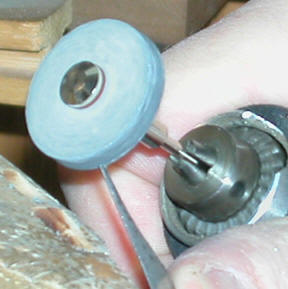
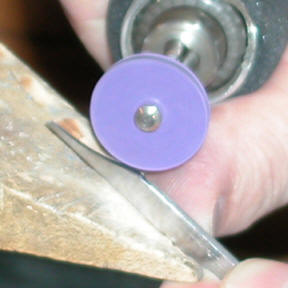 | Use a Foredom medium ceramic polishing wheel for removing the grinding marks and rags of metal from the area ground. These wheels can be used at 28,000 rpm so they are ideal for use with the Foredom Micro Motor, which delivers a top rpm of 45,000. Most flexible shafts provide a top speed of only 15,000 to 18,000 rpm. |
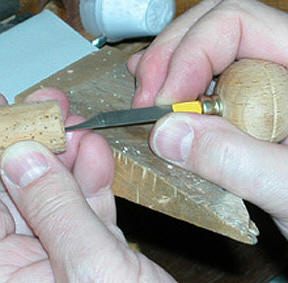
 | For sharpening, I use a combination India bench stone to create a precise 45 to 60 degree angle. Next, a natural Arkansas stone is used to create the final cutting edge. Oil should be used to lubricate the surface of the stone to facilitate the sharpening process. After each step of the sharpening, force by hand the tip of the graver into a small piece of hardwood (like your bench pin) to remove the flashing of metal. |
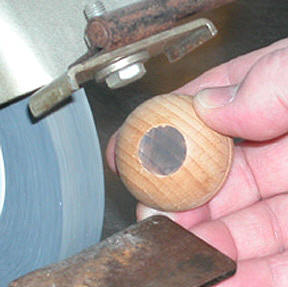 | For easy identification after the graver is mounted, grind a small flat portion on the back of the ball handle. Let the grinding process "burn" the surface of the wood making it dark. |
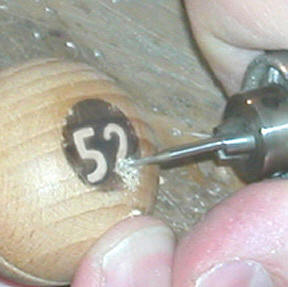 | Use a small ball bur and scribe the number of the graver into the burnt flat portion of the ball handle. |
 | Always keep your gravers sharp. A dull graver, or one prepared with an improper cutting point can be dangerous. It will slip off of the work surface and could potentially gouge you or another unintended target. If you store your gravers in a drawer, always store them with protection over the point. In this photo, a cork from a wine bottle is used. |
 | This photo shows a finished round bottom graver (top) and a new one (bottom). Preparing gravers requires time, which you will more than compensate for when you use your properly prepared tools. |
High-speed steel gravers, such as the GMT gravers featured in this demonstration hold a cutting edge considerably longer than those of carbon steel gravers. The cost of high-speed steel is slightly higher but well worth the investment.
Related Articles

Bud Bur Tool

Foredom Redesigned Series SR Flexible Shaft

How to Modify Tools for Carving Wax

Make Your Own Wax Tools


The All-In-One Jewelry Making Solution At Your Fingertips
When you join the Ganoksin community, you get the tools you need to take your work to the next level.