I have soldered sterling silver on and off for many years, but have
recently began working with copper. No problems soldering a copper
ring, but trying to solder a thick 5mm round wire bangle has become a
nightmare. I’m using paste flux EziWeld 602 with hard silver solder
wire. I have cleaned the copper join with sandpaper and then 0000
Steel Wool, so it is very clean and has a good join. The solder is
balling up and dropping off. I use a Little Smith’s Torch - gas and
oxygen mix. Is there a trick to soldering such thick copper?
My guess, and it is only a guess, is that I think steel wool comes
out of the package with a thin coating of oil to keep it from
rusting. In most situations, where the steel wool is used with water
and detergent, this is no problem as the amount of oil is very small
and the detergent removes it quickly. Perhaps if you degreased
either the workpiece after cleaning, or the steel wool before using
it, - acetone would do the trick I think - then you would not be
transferring the oil to your workpiece where it can cause the
problem you describe.
Or, if this size and mass of copper is larger than what you are
accustomed to soldering, perhaps you need a larger torch or larger
tip. When pushing the size limit I sometimes use two torches - I fix
the workpiece in place and improvise a rig so that one of my
Bernzomatic type torches just sits where it can play on the
workpiece near, but not right on, the solder joint. The "rig"
usually nothing more complicated than bracing the torch in place
with some firebricks or similar chunky objects. Its additional heat
eliminates a heat sink which would otherwise be there sucking heat
away from the joint out into the rest of the workpiece. Then you can
go at the joint itself with the “active” torch. I believe copper
will oxidize faster than silver when heated so you need to work
quickly or maybe use a different flux. Working with copper I often
use a powdered “brazing flux” I got at a welding shop about a
zillion years ago. Preheat the metal a bit until it is hot enough so
the powdered flux sticks to it when sprinkled on the hot surface
then go at it. I am no expert on the relative qualities of fluxes.
Lorraine- You’re doing everything right except you need a bigger
flame.
Heat the whole piece with a larger softish flame and then when the
paste flux tells you it’s ready add more oxy to your flame making it
tighter and hotter and then concentrate your flame on the seam.
In metals that suck up a lot of heat like silver and copper It’s
important to heat the whole thing and to not just concentrate on the
solder. If you overheat the solder it will burn and leave pits in
your seam.
I like to add my solder at the last possible moment rather than pre
place it before heating. I also “read” my flux. When it goes from
paste to bubbling up to a smooth liquid it’s telling me when it’s
time to add solder and concentrate my heat on the seam. I like using
paste flux on gold as well as silver and copper. It stands up to
higher heat than the liquid and it’s easier for me to see how hot the
metal is. The only time I don’t use it is when I’m working with
platinum or palladium.
Lorraine. We solder a lot of copper. Per my brother, try using a
cooler torch, possibly a single stage torch (EZ, Preto- lite,
plumbers torch etc.) and a different flux. Plain borax and water or
alcohol may work. Search the orchid archives as this topic has been
discussed a lot in the past. Use “soldering copper, orchid” as your
search terms. Good luck. Rob
Lorraine. I just tried soldering two pieces of 4 gauge copper end to
end with medium solder and Handi Flux. It took a lot of heat, which
makes sense considering the mass of metal and heat conductivity of
copper, but worked well. I used a meco propane/O2 torch. Keep
trying. Rob
The trick is to get the Cu hot enough for the solder to flow. This
metal conducts heat so well that soldering a bangle becomes a
problem. I solder silver pieces to the surface of Cu cuffs. The only
way I can accomplish this is to build a little ‘oven’ with slices of
fire brick. Then turn up the heat!!! The oven holds the heat and
allows the entire piece of Cu to get hot enough for solder to flow.
In the case of a bangle, I believe I would form the wire in a long
thin oval. Place the join center front in your oven and flux. Then
slobber on the solder - you may have to use easy solder with the
lowest flow temp.
After the joint is soldered, the metal will be quite soft, so
shaping the round bangle should be no trouble.
Good luck on this.
Judy in Kansas, where it was a very windy night with many broken
tree limbs. No injuries. except to the trees.
I guess I do it all wrong. I use a butane torch when on the road
like right now. I leave all my big torches and tanks at home in
Florida.
I found a butane torch that is what i call the monster torch. It is
a Lenk LPT 500. I’m not connected with the company and they sure as
hell don’t know me. It’s made for plumbers to solder copper pipe
together.Compared to the jewelry type butane, this is the Godzilla of
butane. One draw back to a redesign they did a few years back is to
add a lever you have to hold while igniting it, then switch it on to
hold the flame while soldering. My original one doesn’t have that. It
is turn on the gas and press type. I do big items with it within
reason, to delicate Russian filigree. In fact I won’t do the filigree
with anything else. OK back to the subject.
I hardly ever use silver solder on copper. Two sources I have for
copper solder. One is Rio’s copper bearing solder. no flux needed (I
know it can turn grey) I’ve worked with this so much that I can get
around the problem of greyness. Charge your pickle with a bit of
copper, (this is not contaminating it with steel) then have it good
and warm before pickling the piece. It will only take about 30
seconds if it is nicely warm. The other source is a woman I know who
makes paste copper solder. She can also make powdered copper solder.
Both of those will work quicker than the wire or sheet type solders
when melting. I’ve used her paste and experimented with doing Russian
filigree with copper. It works, but I want to see how it holds up
over time and usage. I’m not convinced I like the fine wires to be
copper just yet.
I’ve soldered many copper bangles. My butane does the work just
fine.
Like others you concentrate the heat opposite the seam until ready
to solder then move to the joint with the heat.
Lorraine, I suspect your copper is not hot enough, so that the torch
heat and not the copper heat is melting your silver solder. Copper
that thick radiates a lot of heat. you’d benefit by building a
little “furnace” around the area, either from fire brick pieces or
inside your annealing pan. Don’t heat the solder directly. just
circle around it, heating the copper only.
You may be better off using that black flux (I don’t know what
EziWeld 602 is) and a hammered piece of brazing rod as your solder,
i. e., something with a higher melting point (and also, IMHO, a
better color). Whatever you use, it will take a lot of heat to get
that copper up to the appropriate temperature.
Now there have been lots of replies and help but they all miss the
point, theres a much easier way to solder up round heavy bangles no
matter what the metal. as your a trier ill break one of my rules AND
HELP YOU.
As every one has said you need the right sized torch, youll have to
go to a welding supply place and buy a proper engineers torch that
uses oxy and propane. dont mess about with amateur kit torches.
now the next bit of kit.
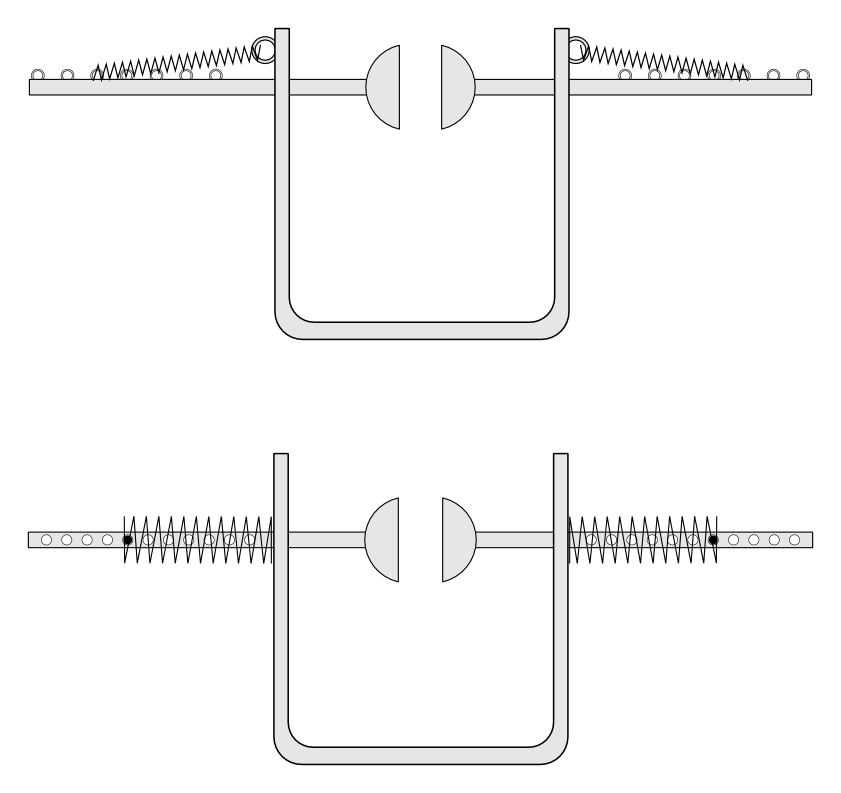
you need to make a jig in the shape of a “U”, from wood will do, ive
egineered mine out of metal, out of some 2in by 2in not less !!. some
6 in high with 6 to 8in in between the 2 "U"uprights.
1in down from the top you drill a 1/4in hole from the side inwards.
in both uprights.
through these holes you put a just smaller than 1/4in rod with a say
a 1/2in concave copper cup fixed to it.
through the rod on the outside of the “U” is a hole into which you
hook 2 suitable springs which pull the rods inwards till the 2 cups
touch in the middle of the “U”. these are hooked over a couple of
screw eyes in the side of the wood.
So what you have made is a spring loaded jig to hold the bangle
whilst you solder it, but theres more which is just a important you
dont apply the solder after heating, you put it inbetween the 2 ends
of the bangle!! as a paillion.!! flux all over, heat and the spring
tensions pushes the bangle ends together making a perfect joint. Done
thousands like this. you change the springs for lighter bones for
lighter bangles and also use this jig to solder up rings made from
multi strand wire.
I used to solder a lot of quarter inch copper rods for flatware and
sculpture, and often work with 1/2" bars as well. The trick for me
was to liberally flux the copper with white paste flux - a thick
coating. Go in with a big flame, sometimes with an oxy/acetylene
torch, blast the copper with heat till the flux is clear, add solder
and keep the heat on the copper till the solder melts.
As I say to my students, get in there, blast it with heat, get the
solder to flow and get out. Copper is a heat hog - the more heat,
the better. I’ll use 2 acetylene torchs when I’m soldering large or
thick for it’s more heat distribution. since I have 4 torches, it’s
easy to use multiple torchs at once to deal with copper.
As I recall, it took 4 torchs and 2 people to anneal a 14" raised
copperbowl in 16g for all the school had was acetylene/air torchs.
Joy (also known as the lady with two torches in hands)
I keep reading this thread and seeing lots of comments about flux so
here is my 2 cents. When soldering copper, I like to use ‘Frips
Fabulous Flux’ or’Prip’s Flux’ to coat the copper first. It seems, in
my experience, that fire scale will travel under the flux to your
joint, if it has a place on the copper that is not covered in flux
first. Gently heat your metal and spray a thin layer of flux onto it
so it dries. Do this until themetal is uniformly covered. Keep in
mind the other advise on the thread about heating large pieces of
course, and then solder your joint. This link will take you to the
handout I made showing the instructions for mixing these.
Ted, your soldering jig sounds interesting. I’m not sure I have
completely understood the mechanism. A picture would help a lot. And
the sharing of your invention is most appreciated!
What an ingenious bangle holding jig creation! Your inventiveness
inspires me to contemplate the art of “holding” at a whole new level.
(.right now I am only at the leaning, propping, clamping, pinning,
binding level.)
I love jig ideas. One of my idols is a machinist-turned- jeweler. He
inherited his father’s machine shop. I tell him I would like my
ashes scattered there. He makes jigs for everything. He revises tools
and equipment. He has no fear of tool steel, motors, etc! If he
cannot buy it, he makes it. If he does not like what he buys, he
revises it. One of his hydraulic presses was too slow, so he just
rigged it with a different hydraulic. He made his rotary tumbler
bases. I am in awe of him!
Ted, your soldering jig sounds interesting. I'm not sure I have
completely understood the mechanism. A picture would help a lot.
And the sharing of your invention is most appreciated!
I’ve taken the liberty of drawing up a couple of rough sketches of
this jig. I’ve drawn it with two ways of attaching the spring.
One uses a spring attached to rings on the yoke and presser bars,
the several attachment rings on the bars allows the tension of the
spring to be adjusted.
The other uses a spring which slips over the presser bars and is
held by a rod passed through adjustment holes drilled through the
presser bars.
Thanks for drawing up in principle my jig for everyone to see…
I have had several other replies some of who will need your drawings
to clarify, as they didnt follow my description.
so all you other enquiriers LOOK at Elliot’s drawings to design
/make your adaption of my jig.
Now, there are several things you all need to include in your
making.
the bangle needs to be sprung past its contact solder joint so
the,
the paillion of solder is held by the bangle tension, not the
springs of the jig.
the rods being parallel need to slide easily in the 2 uprights of
the “U”. thats why I advised 2in thick wood. My first jig had the
top of the 2 sides of the U bent over some 2in apart with some brass
tube through them so the rods were able to slide back and forth under
the spring load, but stay parallel.
4.What strength springs will depend on the bangle thickness. ie,
some of my bangles are some 1/2in thick and need strong springs to
push the butt ends together as the paillion melts and solders the
ends together, and hold together till the solder sets. Only then take
your tongs to remove the bangle from the jig and put into your pickle
pot to thermally knock off the flux residues.
Also the jig is clamped to the soldering bench with a c clamp.
you need your 2 hands to put the bangle inbetween the cups,
especially as you may have lots of bangles to solder up. You also
have to suit the brazing alloy and torch to the bangle weight and
material.
How you fit the springs to the rods and uprights is not
important. What is is the spring load being right for the bangle.
Thats common sense and leave up to all you jig makers/users.
Another soldering brazing jig i use is to hold the “omega” shaped
button loop that I solder on the back of my minted buttons.
thats in fact a hinged denture articulator. Simple to copy If anyone
is interested ill write up a description.
Somehow I missed Elliot’s drawing of Ted’s jig. I’ve searched orchid
and still can’t find it. Can anyone provide that link again? Thanks
for all the great info. Orchid roools.