
Torch Firing Enameling
Torch firing is a wonderful way to experience enameling in all of it stages. I see it as an extension to kiln fired enamels and not a replacement since the results are very different. It requires working from instinct with a sensitive observation of cause and effect. The torch oxidizes and blends the pigments, creates patterns and causes chemical reactions that do not occur with kiln firing. Firing times are intuitive and the temperature is controlled by the length of the flame. The torch fires with a cascade of heat, allowing for control over heat placement throughout the piece. Solder seams and delicate colors (soft enamels) thus can be avoided while areas needing high heat can be hit directly.
12 Minute Read
Torch firing is a wonderful way to experience enameling in all of it stages. I see it as an extension to kiln fired enamels and not a replacement since the results are very different. It requires working from instinct with a sensitive observation of cause and effect. The torch oxidizes and blends the pigments, creates patterns and causes chemical reactions that do not occur with kiln firing. Firing times are intuitive and the temperature is controlled by the length of the flame. The torch fires with a cascade of heat, allowing for control over heat placement throughout the piece. Solder seams and delicate colors (soft enamels) thus can be avoided while areas needing high heat can be hit directly.
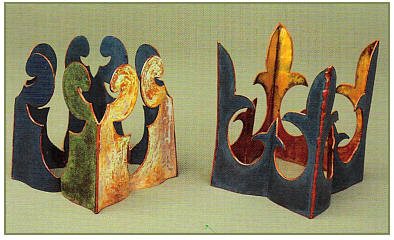 |
| Wedding Crown 4x3x3″ Torch fired enamel, copper Deborah Lozier |
This flexibility requires active participation to not overbear delicate areas and to adequately heat the harder enamels. The torch, creating an active heat, causes the enamel to move while the fuel oxidizes the pigments and in turn mixes with the oxides contained in the metal. In thin applications, transparents will shimmer and opaques will take on varying degrees of translucency with glaze-like qualities. In thicker applications, they will become stronger and appear like stone inlay. The more direct contact with the flame, the more exaggerated these effects become.
Heating the piece from underneath creates effects closer to kiln firing, but also limits size potentials. The workable size depends on the heat available from the torch instead of the perimeter of the kiln. I always experiment with the direct flame in mind since color variables differ greatly. Torch firing does have its limits, but also offers possibilities that give a spontaneous and open approach to a historically reserved discipline.
Tools And Materials
Eyewear is the most important element for safety. I use Auralens glasses, made for glass blowers, and can be ordered with a prescription. They cost around $180, but provide protection from ultraviolet light, infrared light and sodium flare while allowing good visibility. I use them even for soldering. I also wear leather gloves, an apron and close-fitting natural fiber clothing (no polyester, no sandals). My firing station is equipped with a roof mounted ventilator to remove fumes. No flammable items, such as papers or cloths, are near the firing area.
A good beginning torch set-up is a Smith or Presto-lite acetylene atmosphere regulated torch. Get the B tank not the little mc. The #2 torch will be used the most, but buy as many different tip sizes as you can afford. Oxygen/acetylene is too hot. The little butane hand torches are not hot enough, but if you own them, try them. My top torch recommendation is natural gas and oxygen if you are experienced at using torches. I have two torches with a variety of tips: the National Hand Torch and the Unecon Hand Torch. The Unecon has an automatic shut-off lever. The tips are interchangeable. They can both be used with propane and oxygen. They were bought from Wale Apparatus Company, a glassworking supplier. Smith also makes a nice set-up.
The basic #1 to #5 silversmithing tips are good for jewelry scale pieces. For larger scale pieces I use Wale's hush tip that comes in three sizes. These tips create a bushy rather than a focused flame and they are good for heating a general area. Smith offers a tip, called a high heat tip, which should offer similar results.
Many of my firings require two torches. I use an automatic striker to fight the torch with one hand. When two torches are being used, the torch hook and automatic shut-off lever become important. For safe two torch firings, I have bench hooks to hold the torches. Having two large torches going with the ability to turn one of them off quickly is safer. Obviously, limit yourself to one torch until you are experienced before trying to use two at once. Until then, use an assistant to handle the second torch.
The firing station is fairly simple. I use a tripod, a ring stand, a rotating annealing pan, three -point-open- bottom trivets, and open weave stainless steel screens. The screen of IS ga to 20 ga wire and woven at least 1/4 " apart is available from many suppliers. I modify soup cans to create trivet stands and use an annealing pan so I can rotate the piece during firing. I use large steel bolts and washers to raise up the tiny trivets when I am firing rings. Steel rods can be bent into holders and stands for odd shaped pieces. The stainless steel screen, on a tripod or ring stand, works for smaller pieces that are not enameled on the back, such as an earring or pin. I attach 18-20 ga steel binding wire to create a simple, non-stick lift for small pieces enameled on all sides. Very small pieces can be held directly with a pair of holding tweezers if the pieces have a secure appendage to grasp. I also use props sold for cooking over campfires and home barbecues along "with a variety of household items that I alter to meet the need. The firing solutions are an important part of the designing process and require constant modifications.
I use all Thompson's unleaded enamels except for their five C-grade transparents, which cast a gray blue haze across the surface unless they are only fired from underneath. Leaded enamels are unsuitable because the lead tends to rise to the surface as a gray haze. I originally used just the 80 mesh, but I now screen the 80 mesh enamels to have the 325 mesh for painting and intricate champleve, and the 200 mesh for a more even sifting. Many of the liquid enamels are appropriate for torch firing but respond best to a natural gas and oxygen torch set-up. Their fine grains and thin applications make them susceptible to oxidation and burning away.
Any metal that can be enameled in a kiln can also be torch fired. I prefer working with copper or fine silver. Copper has a lively color personality of its own and a high melting point, which allows flexibility for heat placement. I do not wash the enamels, but I do try to keep the work area clean. The application tools and procedures arc basically the same as kiln firing, I clean the base metal, use enamel adhesive for sifting and wet techniques, allow the piece to dry and then apply heat. All the techniques can be incorporated, realizing that torch firing creates different color qualities. Beautiful abstract surfaces can be achieved. The uneven heat and contaminates in the fuel will not produce the pure color and density found in contemporary cloisonn6 work. Plique-a-jour is not an option as there is not enough metal surface area. With the torch, the enamel and oxides move with the heat, which causes lines to blend and colors to flow.
Firing And Design
The main difference in designing for torch firing lies in creating areas for direct torch access. In its powdered state, the enamel will burn with direct contact with the flame. For color clarity and proper fusing, the enamel initially requires indirect heat from the metal. This means there must always be an available area of bare metal or previously fired enamel to start the torch firing process. If the entire surface of a piece is to be enameled, it must be treated as if it has a front and a back or an inside and an outside, then fired in succession, always leaving a place for the initial torch heat.
For example, if I am firing a bowl, I first apply enamel to the inside of the bowl and direct the flame to the bare metal on the outside. For the next firing, I apply enamel to the outside and direct the flame onto the fired enamel on the inside. I continue to rotate the applications and firings until the piece is complete. I usually do this loosely, with two or three firings in a row on the inside, then moving on to the outside for a few firings. I rinse the piece in water between firings and do not pickle it unless there is an unenameled area from a previous firing that I want free of oxides for a transparent layer.
I plan applying the hard enamels first and in areas that will receive a lot of direct heat while the softer enamels are built up slowly or placed in sheltered areas of the design. Most colors will change with each heating. Many colors improve with increased firings. It takes experience to learn which ones. Color quality will be best if pieces are fired rather quickly. This requires an active and mindful maximize-the -heat technique somewhat similar to soldering. The fusing will follow the heat. The heat will be greatest any time the torch can be placed perpendicular to the surface. I use a bushy flame as for annealing. After the enamel is applied and dry, I begin fusing by heating either a bare metal area or a previously fired enamel layer. With a relaxed spiral rhythm, I gather the heat in an area to start the fusing process. Once an area begins to respond, I focus the heat on that area and then expand it by spiraling the flame throughout the piece. On something small, the response will happen quickly and easily. I can choose to finish the fusion from underneath, or decide to transfer the flame onto the enamel surface to finish the firing.
Large hollow forms will require: two torches, a more acute observation of the fusing taking place and flame contact over the entire surface of the work. Once the fusion begins, I move one of the torches to follow the fusion as it spreads and use the other torch to retain an overall constant temperature. At any scale, a consistent temperature is desired - not too hot, not too cool. Be your own thermostat by moving the torch flame away from the piece periodically so that overheating does not occur.
Heating is also dependent on other variables, including the shape of the piece, the gauge of the metal and the type of trivet or stand it is resting on. A 24 ga pair of earrings, resting on a 16 ga wire screen, will fire easily, using a small to medium soldering flame, in a minute or two. In contrast, an 18 ga bowl resting on a trivet may take more than five minutes with two torches going.
Complete heating is a problem with hollow forms, especially those with a large enclosed volume, and causes some size restrictions. I use a temporary covering for the initial phase of firing to help contain the heat. A tin can with a small window cut out for viewing, resolves the problem for small hollow forms, and a structure can easily be fabricated out of ductwork parts or stainless steel sheet for larger work. Once the enamel begins to fuse, I remove the cover with tongs for complete torch access. When two torches are being used, the torch hook and automatic shut-off lever become important. The tools and firing set-up must be carefully maintained and respected for safe operations. Safety should always come first. The number of firings is piece specific and subjective. More firings usually allow for color depth and intrigue. On an average, I fire pieces 8 to 12 times to orchestrate harmony in the color ranges. As I said before, you need to experiment. There are a few opaques and transparents that are not compatible due to the differences in expansion and contraction. The different fuels create color differences that are more pronounced when the flame has direct contact with the enamel. Transparents will shimmer and clear with intense heat; opaques oxidize more noticeably and many require more thoughtful planning. A clean yellow or orange can be hard to achieve, but if you apply these colors in areas protected from the direct flame, adding oxides to pump up the pigment content, or apply them at the end of the firing sequences it will help. Transparents layered over opaques can protect the opaques from adverse effects and usually improve the intensity and depth of all colors.
The thickness of the layers also affects the color quality. The Thompson #533 liquid white, when hit with a direct flame, creates an incredible rusty orange and beige surface, while this same heat on a thin layer of green or yellow turns dark and unappealing. As the layers are built up, this effect lessens. The copper can also have a first layer of flux to keep the metal oxides from interacting and darkening the color. Keep in mind that transparents tend to become more brilliant with increased firings, even if no fresh enamel is applied, and opaques will weather and fade. You need to plan ahead once you have learned the traits and needs of the individual enamel colors so that colors needing high heat can receive it and those needing a delicate touch can be in protected areas or receive a final light heating. I keep notes of my observations and find them an essential tool.
I solder pieces to construct an object and then enamel it. Torch firing the enamel, when done carefully, can protect the seams from opening. I usually use hard solder and occasionally medium solder. Since solder will flow when heated to its specific temperature, it is necessary to pay attention to the seams and resist applying too much heat to them. If I choose to apply enamel next to a soldered seam, I direct the heat to the seam last and gently pull the torch back to a cooler point of the flame and stop firing just as the enamel is fused, but not a second longer. A lap seam will fare better than a butt seam because it provides more surface area for the solder and allows a little movement without failing. Edges can be rolled over seams or rivets can be added to strengthen them. Many forms can be easily constructed using box making techniques or die forming, all creating very durable connections.
I design appendages with extra surface area for the solder or design them into the body of the piece. I never rest the weight of a piece on an added element during the firing because that would risk pulling the seam apart. I rarely solder after enameling. I have now begun to weld seams for large pieces rather than solder them. The welded seam can be covered with enamel. The seam is not as crisp. Tack welding can also be used with soldering to secure a long seam and maintain a crisp joint line.
Final Thoughts
I listen to the material's natural potential and set up the work to encourage these natural tendencies to happen and with more predictability. There is control, but I leave a wide margin for error and do allow some of the errors to remain. My working methods are based on the assumption that an accident that can be recreated turns into a technique. The space between the action and the reaction is where discoveries are made, and I work with open eyes to be ready for their arrival.
Related Articles
Layering Over Sgraffitoed Liquid
How to Add a Dichroic Effect to Your Enamels
The Enamel Material

Enameling in Kecskemet


The All-In-One Jewelry Making Solution At Your Fingertips
When you join the Ganoksin community, you get the tools you need to take your work to the next level.
