
Modified Split Mandrel to Bezel-Set Round Stones
This jewelry bench tip is a follow-up to "Modified Split Mandrel for Finishing Round Bezels," which showed you how to modify a standard split mandrel to make an effective holding device to finish several fabricated bezels of the same dimensions. The same split mandrel can also be adapted into an efficient tool for setting multiple round faceted stones into those bezels.
2 Minute Read
This jewelry bench tip is the second part of two and shows how to use a modified mandrel to bezel-set round stones and other round faceted stones.
This jewelry bench tip is a follow-up to "Modified Split Mandrel for Finishing Round Bezels," which showed you how to modify a standard split mandrel to make an effective holding device to finish several fabricated bezels of the same dimensions. The same split mandrel can also be adapted into an efficient tool for setting multiple round faceted stones into those bezels.
Secure the modified split mandrel in a ring clamp. Insert a 3.5 mm ball bur into the No. 30 hand piece of a flex shaft and burr a hollow into the top center of the mandrel, cutting to a depth of about 2.0 mm. Follow with a 2.5 mm ball bur, centering and burring to a total depth of around 3.0 mm. You will create a void that provides clearance for the pavilion and culet of each stone to be set.
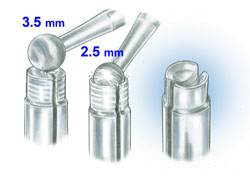 |
| Further modification of the split mandrel for setting is required. Using two ball burs, create a clearance for the pavilion during setting. |
The total depth of the bezel must be at least 4.0 mm to accommodate the depth of the stone when set. Choose a finished bezel and position it on the mandrel. Secure the mandrel in a ring clamp. Measure the stone to be set and select the proper size setting bur. You will be cutting the depth of the bearing so that the top of the bezel flange is no less than 50 percent of the crown height. Cut the bearing and check the fit of the stone to make sure it is level and at the correct depth for setting.
Remove the mandrel and bezel from the ring clamp and tighten it in the hand piece on your flexible shaft. While spinning the hand piece, use a file to bevel and reduce the thickness of the bezel flange. Clean any debris from the bezel and place a small amount of wax in the bearing to help hold the stone during the setting process. Pack and level the stone.
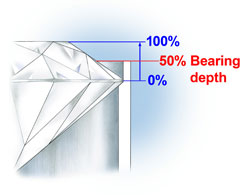 |
| The depth of the bearing should be 50 percent or more, depending on the cut and proportions of the stone. |
The bezel contact should be no less than 10 percent of the crown distance, which is the dimension along the surface of the crown from girdle (0%) to table (100%). Rotate the hand piece as you use a burnisher to apply pressure to the beveled edge of the flange, pushing the metal over the stone. Look closely to make sure there is complete 360 degree contact against the crown.
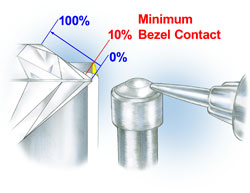 |
| The amount of metal burnished over the crown should be 10 percent or more of the crown distance. |
The completed bezels are ready to become a part of your fine jewelry creations. If the stones you use can take heat, the bezels can be soldered into jewelry by the traditional torch method. If they are vulnerable to heat, use a laser welder to set the bezels in place.
Watch video:
Related Articles

Customized Stone Laser Shield for Jewelry Making
How to Modify Wooden Ring Clamps

Customized Light Box & Bench Shelf

Customized Loose Head Holder


The All-In-One Jewelry Making Solution At Your Fingertips
When you join the Ganoksin community, you get the tools you need to take your work to the next level.
