
Testing Precious Metals and Alloys
The purpose of precious metal testing is to determine, first, whether a given sample is precious or base, and, second, to determine what proportion of an alloy is precious. Sophisticated equipment is used in a precious metal laboratory to determine content and purity values with great precision, but our attention here is given to methods a working goldsmith can use in the studio to determine metal content to a practical degree of accuracy..
10 Minute Read
Metals commonly used in the metalsmith's studio can be divided into two groups. Colored metals would include pure gold, most gold alloys, copper, and non-precious alloys such as brass or bronze. The category of white metals includes pure silver, silver alloys, white golds, platinum, platinum group metals and their alloys; white non-precious metals such as tin, lead or cadmium and their alloys.
The purpose of precious metal testing is to determine, first, whether a given sample is precious or base, and, second, to determine what proportion of an alloy is precious. Sophisticated equipment is used in a precious metal laboratory to determine content and purity values with great precision, but our attention here is given to methods a working goldsmith can use in the studio to determine metal content to a practical degree of accuracy.
Touchstone Testing
It is important from the outset to carefully consider the concentration of acids used for testing. Testing acids available from commercial suppliers as pre-mixed preparations are preferred because acid solutions mixed in the studio are subject to inaccuracies that will effect the veracity of the results (table 4.3). The proper bottle for storing acid is equipped with a ground glass stopper that fits snugly into the neck of the small clear glass bottle that contains the acid. The stopper is often fitted with a thin applicator rod that is used to apply acid to a sample. (Figure 4.9).
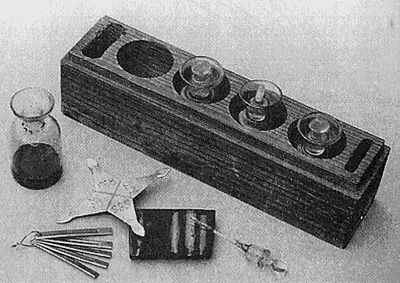 |
Figure 4.9 - Equipment for precious metal testing. Testing acids, testing stone, testing needle, testing star. |
The Testing Stone
Black Lydian slate has proven itself to be the best material for a testing stone because it possesses all the characteristics required of a good testing stone: it is uniformly matte black, has a homogenous, non-porous structure and is harder than the metals being tested. And it is resistant to acids, which means it won't disappear after a few uses. Despite many years of attempts, it has not yet proven possible to develop an artificial material with these ideal characteristics.
After a few uses the stone will retain streaks from previous experiments, making further use difficult. To remove these, rub the surface with charcoal and water. The cleaned and dried stone is then very thinly rubbed with a fine oil to keep its surface smooth and tractable.
Testing Needles
Testing needles are simply samples of gold alloys of known value attached to larger pieces of an inexpensive metal to make them easier to handle. In practice, a typical size for a needle is in about 6 centimeters long, and they are generally made of brass. These are often linked onto a ring for ease in storage. An alternate style uses a star made of brass in which each tip is coated with a different alloy.
The range of alloy samples needed will depend on the kind of work that comes to the shop and the degree of accuracy required. With a small range of testing needles, for instance, it might be possible to determine a given sample as being "better than 10k but less pure than 18k." By using a more complete metals test kit, the alloy could be determined to a closer tolerance.
It's possible to make testing needles in the studio as long as you are certain of the alloys being used to make the needles or stars. And of course it's possible to replace the needles with actual jewelry objects or bits of sheet and wire stock of a known karat.
Streak Test with Au 585. Behavior of Testing Acid.
| Reaction on Streak | Possible Alloy | Further Evidence |
| Dissolves without residue. | a) gold alloy less than Au 300 b) silver-copper alloy with less than Ag 500 c) base metal alloy | a) gold test with Au 333 testing acid b) test for silver |
| Brown color on the streak, a brown residue. | gold alloy with less than Au 500 | quantitative test |
| No attack | gold alloy with more than Au 500 | quantitative test |
Colored Metals and Alloys
The first step is to determine whether the alloy in question contains any gold at all. To do this, select an unobtrusive spot on the object and use a file or scraper to remove any plating that might be on the piece. Using the glass stopper or a small plastic rod, apply a drop of nitric acid to the scratch and observe the reaction. If there is no apparent change, the piece is probably solid gold. A green streak on an otherwise unaffected surface indicates a gold plated object made of base metal. If the entire area subjected to acid turns green, the piece consists entirely of base metal.
To determine the relative proportion of gold in an alloy, rub the exposed area (where any possible plating has been removed) along a touchstone to create a streak roughly 5 mm wide and 20 mm long. Dab this golden streak with concentrated nitric acid (the Au 585 testing acid) and after waiting about 5 seconds, check the reaction against the table shown here. Where exposed to nitric acid, gold is not attacked, but silver is converted to gray-colored silver nitrate AgNO3 and copper reacts to become to greenish copper nitrate Cu(NO3)2.
Because this test is effective only on alloys that contain over 50% gold, the test must be repeated on another place in the streak with diluted nitric acid (the Au 333 testing acid). This is particularly indicated when the first test colored the streak brown or dissolved it altogether. The results of this exposure to the milder acid are then compared with the information in table 4.5.
If the gold content is less than 50% (Au 500) the additional metals that make up the alloy are dissolved while the undissolved gold is left behind as a brown residue. If the alloy doesn't contain any gold, the components are completely converted to nitrates, a reaction that is usually accompanied by active bubbling of the acid. Because copper is almost always a significant component of colored alloys, the remaining solution usually takes on the blue-green color of cupric nitrate. The Au 333 testing acid is so diluted that alloys containing less than 30% gold remain unattacked by the acid. The touchstone test can reveal alloy values from pure gold (Au 1000) down to Au 160; below this proportion of gold, reaction vessel testing must be used.
This test is used if an alloy has reacted like a non-precious alloy in the streak test (creates a green or blue green reaction) and yet is still suspected of having a small gold content.
The test depends upon the solubility of the addition metals and the stability of gold in warmed, concentrated nitric acid. A piece of the questionable alloy weighing about a half a gram is dissolved in heated nitric acid in an active ventilation device. Non-precious metals and silver are converted to nitrates, but any gold that may be present is deposited as a dark brown powder on the bottom of the vessel. This is then separated from the solution by filtration, washed with distilled water and dried out on filter paper. If the powder takes on a metallic shine when rubbed with a steel burnisher, there is probably some gold in the residue.
| Reaction on Streak | Possible Alloy | Further Evidence |
| Dissolves without residue. | a) gold alloy less than Au 160 b) silver-copper alloy with less than Ag 500 c) base metal alloy | a) reagent glass test b) test for silver |
| Brown coloring on the streak, a brownish residue. | gold alloy with Au 160 to Au 500 | quantitative test |
| No attack | gold alloy with more than Au 300 | quantitative test |
Quantitative Gold Test
The tests just described are qualitative: they determine whether or not there is gold present in an alloy. The approximate quantity or proportion of gold must be determined next. The first step uses the touchstone method to approximate the purity of an alloy, which makes the next step a little easier.
The sample being tested is again rubbed onto a touchstone as before. On the basis of the reaction to the test acids it should be possible to make an educated guess about the possible purity or karat of the sample. Using test needles or pieces of gold or jewelry of a known alloy, make a streak parallel to the sample streak. Paint a swath of testing acid at right angles across the two streaks and carefully observe the reaction of the metals to the acid. If they behave differently, select another testing needle to create another streak, again near to and parallel with the original streak of the piece being tested. Continue in this way, always subjecting both a known and an unknown streak to the same exposure of the same acid. When the reaction of the two streaks is identical you will have determined the karat of the sample. With sufficient experience it is possible to obtain results with a tolerance of 50 parts per thousand, or 5%.
The touchstone test is restricted to alloys that are between Au 200 and Au 800; alloys that are more pure than 80% or less pure than 20% cannot be accurately measured through this method and will require assay (technical analysis) for accuracy.
The following examples should help to better understand the procedure.
Example 1
The qualitative test indicates a gold alloy with between 160-300 parts per thousand gold. A streak is made on the stone with each of Au 333, Au 250 and Au 200 needles, together with the questionable alloy. The Au 333 testing acid is spread at right angles over the streaks. It is immediately apparent that the Au 200 streak is attacked and changes color while the Au 333 streak remains unchanged. The streak made by the sample shows a brown color, as does the Au 250 streak. From this information it is reasonable to conclude that sample has about the same fine gold content as the last testing needle, and is about 25% pure.
Example 2
The qualitative test produced a result of more than 500 parts per thousand gold content. Streaks are made on the stone with known samples of Au 585, Au 666 and Au 750 alongside a streak made by the alloy being tested. The four lines are then daubed with the Au 750 testing acid. In this case, the Au 585 streak will be attacked first, then a few seconds later the Au 666 streak will begin to discolor. The Au 750 streak will remain unchanged. Because the sample alloy remains unchanged, it is safe to conclude that its fine gold content is around 750 parts per thousand or higher. To obtain a more precise analysis it is necessary to have the sample assayed.
Testing for Fine Gold
As mentioned above, if early tests or intuition leads to the suspicion that a sample is composed of pure gold, an alternate test must be used to confirm purity. The first step is to melt a small amount of the unknown sample without any flux. If the metal is pure it will reveal a sea green color during melting and even after cooling it will remain untarnished. If the surface of the melted and cooled ball has a brown film, this indicates the presence of impurities. If the sample passes this early test, it is successively subjected to the following tests:
About one gram of thinly rolled out test material is dissolved in about 6 ml of Aqua Regia. The solution is brought to a boil. There should not be any yellow-white silver chloride fakes present.
- The solution is diluted with 20-30 ml distilled water.
- 5 grams of hydrazine hydrochloride N2H5Cl is added and the is solution stirred. All the gold precipitates out as a brown sediment on the bottom of the vessel until the remaining solution is as clear as water.
- Some of the clear liquid is removed and combined with ammonia (ammonium hydroxide). If the solution turns blue, this indicates the presence of copper. If fakes form, this indicates the presence of lead, though this might also suggest that bismuth, iron, or aluminum may be present.
- If the sample being tested has withstood the test this far by neither discoloring the solution or precipitating as fakes, a couple drops of ammonium sulfide are added to the liquid. If there is still no precipitation, the sample is almost certainly pure gold.
Related Articles

Optimising Gold Alloys for Manufacturing
The New MJSA/WGC White Gold Color Index
Gold Jewellery Tarnishing

A New Platinum Sterling Silver


The All-In-One Jewelry Making Solution At Your Fingertips
When you join the Ganoksin community, you get the tools you need to take your work to the next level.
