
Set Up Your Torch
OK. You have just brought home your first acetylene tank and are ready to attach your new acetylene/air torch. This is the day you have dreamed of -- soldering at home, in your workshop -- yet there is that nagging doubt in the back of your head. You have heard horror stories of tanks, fires and explosions. Oh, why did you think you would ever be able to have a full jewelry studio at home? The instruction manual is full of hard core information that seems geared toward experienced welders -- you do not even know how to put the thing together, and even if you do figure it out, you fear you will blow up your home and the entire neighborhood.
11 Minute Read
It is critical to fully read and understand these instructions and all literature that accompanies a torch system. All torches are not the same. Be sure you understand specifics for your particular model before proceeding. Call the manufacturer for guidance, or ask the vendor at the supply house to demonstrate the connections for you. If you are still unsure, DO NOT set up the torch yourself. You are responsible for your own safety.
We recommend having an experienced torch user with you for calm moral support and assistance during your first setup. This person need not be a metalsmith - a plumber, welder or auto-body tech skilled in metalwork will be knowledgeable, confident and familiar with many torch connections.
Editor's note:
OK. You have just brought home your first acetylene tank and are ready to attach your new acetylene/air torch. This is the day you have dreamed of — soldering at home, in your workshop — yet there is that nagging doubt in the back of your head. You've heard horror stories of tanks, fires and explosions. Oh, why did you think you would ever be able to have a full jewelry studio at home? The instruction manual is full of hard core information that seems geared toward experienced welders — you don't even know how to put the thing together, and even if you do figure it out, you fear you will blow up your home and the entire neighborhood.
Stop! Be comforted in the knowledge that thousands of jewelers have had acetylene tanks in their homes, and have safely lived to tell about it and the joys of making jewelry in their own home studio. With common sense and some safety rules, you and your tank can co-exist harmoniously.
Don't be afraid of the torch and tank. Respect them and care for them, checking for leaks frequently. Never take them for granted and always think ahead when using the torch. Make sure the tank is either chained to the legs of a sturdy table, or in a tank holder, especially if there are children or pets in the house. Keep it in a well-ventilated area. And, never use a suspect torch or hose or work with suspect connections.
Most jewelers use a "B" tank, which is approximately 23 inches tall. Acetylene tanks should be transported from the local welding supply in an upright position -to keep the gas inside stable - and secured so they do not fall over or roll around. It is best to transport them in the open back of a pickup truck — not in an enclosed automobile.
If the tank should fall over in transit, inspect the stem for damage, and then leave the tank upright for several hours before connecting it. If there is a wide difference in temperature between the tank yard at the supplier and the place where you will set up the torch, it's also a good idea to let the tank "rest" in its new home for several hours or overnight.
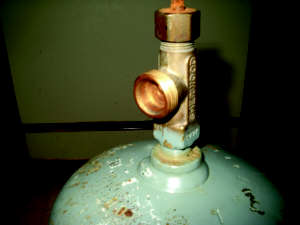 | Tanks come with either a bare tank stem or a hand valve for turning them on and off. If there are children in the house, it is safer to have the bare tank stem and to use a tank key for these operations. Do not leave the key on an unsupervised tank. Store it with your tools for safekeeping. |
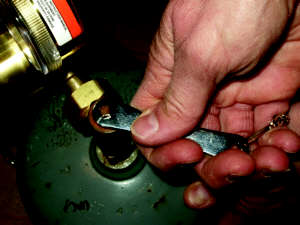
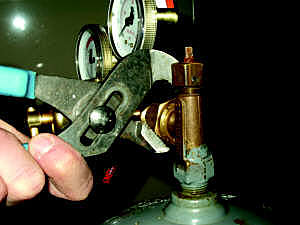
 | It is important to use only a tank key and not a set of pliers for opening and closing the tank stem. Pliers can round out the corners of the stem and damage it. Tank keys are inexpensive, so buy two, just in case.Locate your tank in a well-ventilated area. |
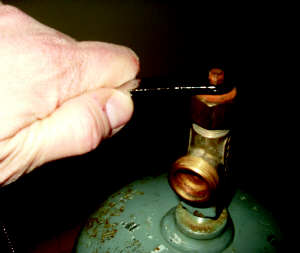 | To assemble the tank/torch system, take off the plastic cap protecting the regulator connection threads and open the tank stem with the tank key for just a second, counter-clockwise, and then close it. If the tank is full, there will be a loud "whoosh" sound. This will blow out any dirt or dust from the tank stem. Save the plastic cap for protecting the threads when you trade in the empty tank.Position the tank so the tank valve is on your left. |
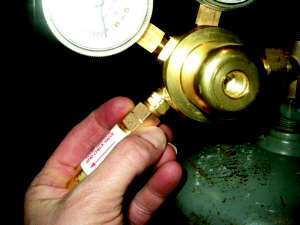
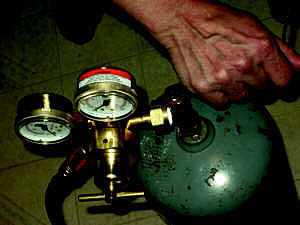
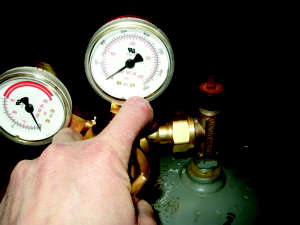 | Attach the regulator to the tank valve — this can be tricky, and needs a steady, firm hand. Firmly push the regulator into the valve opening, and turn the regulator nut clockwise, toward you. |
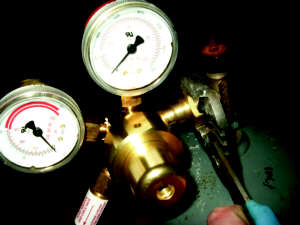 | Tighten the regulator nut with an adjustable or universal wrench. This requires some strength, but be careful not to overtighten and potentially damage the threads on the regulator. If you can wiggle the gauges back and forth, you have not tightened the regulator nut enough. |
 | If you are using a regulator-mounted flashback arrestor, connect it to the regulator at the hose valve. Fuel fittings are left-threaded and tighten to the left - that's counter-clockwise.Although arrestors are not essential for the "B" tank, some jewelers prefer the peace of mind they provide. You may need to spend more time adjusting the regulator pressure for a stronger flame if you decide to use them. Attach the red hose brass coupling to the hose valve at the regulator (or regulator-mounted flashback arrestor.) |
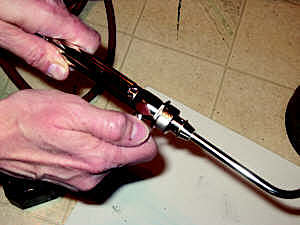
 | Attach the torch head to the torch handle by pushing the head in as far as it will go and turning it slightly.Tighten the torch head nut. Do this by hand — you will be changing torch heads as needed. |
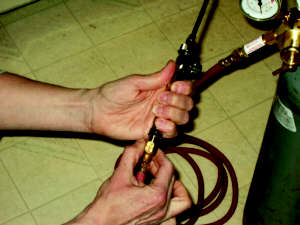 | If you are using a torch-mounted flashback arrestor, connect it to the torch handle. Remember, these are reverse threads, and must be attached counter-clockwise. Snug with a wrench. Attach the other end of the hose to the torch handle (or torch-mounted flashback arrestor.) |
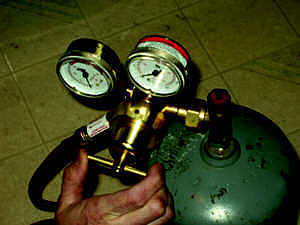 | Screw the T-shaped regulator adjustment knob into the dimple under the gauge faces, turning clockwise. Insert it approximately halfway into the regulator. |
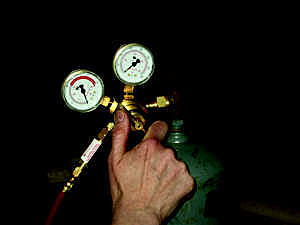
 | Stand to the side and slowly turn on the tank by turning the tank key counter-clockwise about a quarter of a turn. There is never a need to open your tank any more than half a turn, at the most. The regulator gauge or gauges will register how much pressure there is in the tank, which is also a measure of how full the tank is, and control the rate of the gas flow.If you have one gauge, it will automatically jump to about 1600 on your gauge. This means your tank is full. If you have two gauges, one will register the delivery pressure, and the other gauge will register supply pressure. |
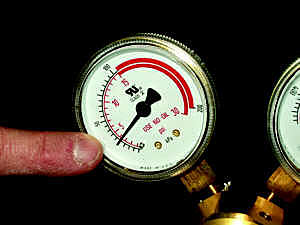 | Turn on the torch hand piece, and set the left hand gauge using the regulator adjustment knob so the gas gauge reads between 3 and 4 — this is the correct pressure for most soldering operations. |
 | Turn off the torch hand piece. |
 | With the gauges set, bubble test all of the connections with either commercial leak detection fluid, or a solution of water and liquid detergent. Liberally paint all connections with a clean paintbrush. Look at every connection closely over a period of several minutes. If any bubbles form, turn off the tank with the tank key and tighten the leaking connection. |
 | After tightening a leaking connection, blot it dry with a clean tissue and turn the tank back on. Reapply leak detection solution. Keep checking and tightening until no bubbles appear.If you still see bubbles or smell a garlic smell, which is acetylene, DO NOT light the torch. Turn the tank off. Open a window. If the leaky connection is at the regulator threads, remove the regulator and use Teflon tape to wrap the tank threads- never more than two wraps are needed. Reattach the regulator. After repeatedly testing and tightening a leaky connection, if you still have bubbles, it may be a faulty tank. Turn it off with the key, disconnect the regulator, hose and torch and move the tank outdoors. Call or return the tank to the dealer. |
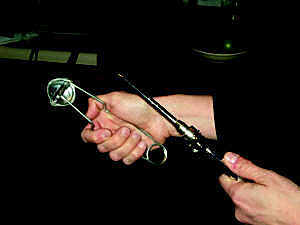 | If there are no bubbles and you do not smell acetylene, and your gauges are steady, you are ready to use the torch. Always use a striker — never a cigarette lighter or matches — to light a torch.There will be a slight "pop" as gas enters the torch when you light it, and also when you turn it off. The "pop" is a safety feature which ensures that extra gas remaining in the torch handle is burned off. |
 | When you have finished using the torch, turn off the flame, while listening for the "pop."If you are through soldering for the day, or will be leaving the studio for a while, turn off the tank by turning the tank key clockwise. Open the torch hand piece knob to release any pressure on the hose. The gauges will slowly fall to zero. Close the torch hand piece knob. |
 | Release any remaining pressure with the regulator adjusting knob. Verify a zero reading on both gauges. That's all there is to it. Soon, using and setting up your tank will become comfortable.Good luck, and enjoy your new torch. |
Torch Setup Checklist
- Full acetylene tank
- Regulator and knob
- Tank key
- Adjustable wrench or universal wrench
- Fuel hose
- Striker
- Leak detection fluid
- Torch and torch heads
- Teflon tape
- Instruction manual
- Fireproof surface
- Fire extinguisher
Torch 101
There are many options when choosing fuel gases and torch systems. These directions are tailored to a one-tank, one-hose, ambient air/acetylene torch -one of the most basic systems available.
When purchasing a torch system, you'll need to choose a fuel gas and determine whether you'll use ambient air, compressed air or oxygen with your chosen gas. The equipment needed for each fuel combination is specifically manufactured for that fuel, and is not interchangeable from fuel combination to fuel combination. Some gases perform better for different metals. If you choose a combined fuel and oxygen system, you will have two tanks, regulators and supply hoses.
Other fuel combinations include: acetylene/oxygen, propane, propane/oxygen, hydrogen, MAPP gas, and butane.
Check local regulations and manufacturers' information when deciding on a torch system.
The regulator reduces the pressurized gas in the cylinder to suitable lower working pressures. It should be rated for the same pressure as the cylinder used - you can find the rating on the back of the regulator. The gauges monitor the fuel delivery and supply. Acetylene should never be delivered at more than 15 psi or it may become unstable. Do not let the gauge needle move into the red warning zone of the left gauge.
Tips
There are two costs associated with gas tanks - the cost of the canister (tank), and the cost of the gas. Don't become too attached to a clean, shiny, new empty gas tank if you've bought one. You must take the empty tank to a welding supply company, plumbing supplier or gas dealer to be filled. Typically, you trade an empty tank for a full one, and it might be years or never before you get your "own" tank back. An alternative is to rent a tank.
One of the best investments you can make is the purchase of a "universal" wrench. These range in price from $10-$15 and are worth every cent, because they accommodate most hose and tank fittings.
Flashback arrestors can be torch or regulator mounted. They are not the same as check valves. Check valves stop reverse flow of gas, flashback arrestors extinguish a flashback flame. Some arrestors combine these functions. Most jewelers who use a "B" tanks forgo them because the tank pressure is not excessive; most manufacturers strongly recommend them.
Teflon tape, used in plumbing connections, can be used on the tank threads to protect them and allow for easier tightening of the regulator — one to two wraps is sufficient. However, tape should NEVER be used to compensate for faulty threads.
Always verify that tank valve threads are undamaged at the supply house by removing the plastic cap to inspect them. Take a tank key with you to verify that the stem will turn and is undamaged.
With a permanent marker, write "on" and draw an arrow on your tank key pointing counterclockwise to help you remember. It also helps to form a habit of not removing the key from the stem until you have verified that the tank is off.
Be Safe with Gas
Store tanks upright; secure them to a wall or in a tank carrier to avoid potential damage to the valve or tank stem or create a dangerous release of compressed gas if the tank falls.
Always light a torch with a striker. There is a possibility for a torch flame to flow into the fuel reservoir of a cigarette lighter, causing it to explode. Matches will typically be blown out by the pressure of the gas coming out of the torch head.
Always turn off the gas at the tank stem with the tank key after daily use.
Bleed the lines after shutting off the tank stem to release pressure in the hose and on the regulator. Valve pressure should drop to zero on a resting tank.
Always verify connections are sound when changing tanks, torches, hoses or the regulator. Use a leak-detection solution and take the time to be safe.
Sniff the air before soldering. If you smell fuel, open a window and disconnect the torch.
If you have a faulty tank, move it outdoors and call the supplier to pick it up. It's not wise to transport a leaking tank.
Related Articles

Perfectly Fit Bezel

Resizing Damaged Rings
Special Repair Work

Soldering Parts Using Pourable Soldering Jig


The All-In-One Jewelry Making Solution At Your Fingertips
When you join the Ganoksin community, you get the tools you need to take your work to the next level.
