Photographic Equipment for Jewelry and Small Objects
We are assuming you have a 35 mm camera. You will need a ‘single lens reflex’ (SLR) camera with a ‘through the lens’ metering system (TTL). This type of camera allows you to see through the viewfinder what will be recorded on the film. It also allows you take reflected light meter readings from your object through the camera lens. My favorite is a.
19 Minute Read
In this article we are enumerating the different photographic equipment needed for jewelry making and small object photography as written by Charles Lewton-Brain - © Brain Press Publications.
Cameras
We are assuming you have a 35 mm camera. You will need a 'single lens reflex' (SLR) camera with a 'through the lens' metering system (TTL). This type of camera allows you to see through the viewfinder what will be recorded on the film. It also allows you take reflected light meter readings from your object through the camera lens. My favorite is a manual Nikon camera: I have a Nikon F2. There's also an FM2. An F3 is supposed to be good too.
I think it is important to have a manual camera, because if you have a camera that's all automatic, a couple of things happen. One is that the camera lies to you (the camera thinks it sees the correct light reading for your photograph, and it is wrong) and you may end up with bad shots. The second is that I have the impression that automatic cameras may be a little bit easier to break if you drop them \. With many manual cameras, you can actually drop them on the floor, and most of the time they survive - not that you want to drop them on the floor, but sometimes such things happen. If getting an automatic camera, make sure it has a manual mode that lets you have full control over the f-stop used, time of exposure and ISO setting (some new automatics set the ISO when you load them by reading the bar code on the film canister).
Manual cameras are getting harder to find, so this means looking in the used market. You can pick up a used F2, F3 or FM2, probably for about 300 to 350 dollars if you look. Other cameras are acceptable as well. I suggest you ask a number of photographers what camera they like and why before making a decision, that is of course if you don't just get a Nikon F2 like I have.
Bobby Hanson (a photographer, artist, author and blacksmith) says that many other types of cameras do not center the image properly when taking vertically-oriented (called portrait orientation) shots. You see the object centered through the viewfinder when you take the picture and when you get it back after developing it is slightly off to one side. He suggests that you look through the viewfinder and draw just inside the visible area on paper with a magic marker, thus making a frame around the edge of the view while looking through the camera. Number each side of the drawn frame (1, 2, 3, 4). When you get the slide back, take the slide mount apart and see which edge was lost. Then mark the camera with tape or an arrow to remind you to compensate by having the object slightly off to one side whenever you want to center it in a vertical shot. I had not known about this problem and Hanson explained that a Nikon F2 centers objects properly and accurately and that was why I had never come across this particular problem.
Viewfinders may also vary in the accuracy of what you see. The Nikon F2 and F3 show you exactly what you will get, other cameras may show you slightly more or less than what you end up with; you will have to test to find out. In addition, the slide mount crops a certain amount of your image area so you will have to be aware of this in evaluating what the differences and similarities were between your experience of the image through the viewfinder and what you actually got projected on a screen at the end.
I also suggest that if you come across a second F2 body or another of the same camera body which you have that you buy it as a backup for parts. As digital cameras come on stream the manual repairs will get rather expensive and if you have a camera body to cannibalize parts from you'll be better off.
The best professional-quality photography of objects is normally done using larger format cameras than our 35 mm (small format) cameras. Large format cameras produce larger transparencies (a standard slide is a 35 mm transparency). Sizes range from a Pentax 2″ x 2″ (6×6 cm) (pleasant because the camera works similarly to a normal 35 mm camera), 4″ x 5″ (6 x 7cm) and even larger. Such cameras are expensive and are generally seen as a professional's tool. Their advantage lies in the much greater quality of detail available with them. Magazines, if given a choice, will always choose a larger format transparency to work from although most will work quite happily with a 35 mm slide. If they are particularly sticky they will ask you to have a 4″ x 5″ transparency made of an object that you sent them a 35 mm slide of. This is pretty rare, however, and usually a 35 mm slide is acceptable for publication.
Digital cameras are coming quickly and offer more flexibility in some ways (if you have the computer to deal with them and currently primarily if you intend the images to be viewed on a computer screen). I believe, however, that slides will be around for a while yet and therefore recommend that you stick with standard film cameras for some time to come (by 2003 the digital route will make more sense). With a digital camera the additional costs of hardware and software or service center overhead are currently higher than a standard film and slide route. If you need digital images in the meantime you can have slides scanned inexpensively and saved on disc. In the system dealt with here I am trying to keep everything as inexpensive as possible and at this point digital and the resulting hardware and software requirements to deal with it are just too darned expensive.
Note that 'wet' photography (what we do now) will become an art form and of higher value with time as it becomes rarer, just as engraving, etching and lithography have done since being displaced as vehicles for commercial mass-media image production.
Keep your camera clean and dust-free. I religiously bag my camera tightly in a plastic bag clipped tight with a clothespin when I am not using it (watch out for condensation issues depending on your humidity - it is dry where I live).
The Remote Shutter Release and Timer
I strongly recommend the use of a remote shutter release cable. The reason for this has to do with avoiding vibration. Pressing the camera's shutter release button with a finger can cause too much vibration on a long exposure. A remote shutter release avoids this problem and only costs a few dollars.
Another way of avoiding vibration which I often use is to engage the time release lever on the camera. One cocks the shutter, pulls the timer lever down and activates it. By the time the shutter is released and the picture is taken, any vibration from handling the camera has settled down and you will be able to take an unblurred photograph.
The Lens: a 50 mm Macro
The lens I recommend is a fifty millimeter macro lens. A 'macro' lens means that it blows things up (enlarges them), so you can get really close shots. Although you can obtain combination telephoto lenses that are say, 80 macro or so which allows you to use them a bit like a telescope to enlarge far-off objects and also to use them to take close-up pictures, only the 50 millimeter macro allows you to jam your head against the back of the camera body to look through the viewfinder and at the same time touch the object or manipulate the lighting on it. All of the other lenses require you to set up a tripod about three feet or further away from the object, which means that you're continually walking back and forth from the object to the camera, and you can't see what's happening through the lens while you manipulate the object's position or the lighting on it, which wears one down quickly-so, I recommend a fifty millimeter macro. Cost on a used one currently runs about $125.00 (1997).
50 mm macro lenses come 'one to two,' which means that when you are as close up as is possible with the lens, the object you are taking the picture of will be one half its real (measured) size on the film surface itself. If you have an object which is 1″ across then the largest it will be on the actual slide is half an inch. What this means is that for rings and smaller objects the 'one to two' macro is near its functional limit. If you get a one to one converter for the macro lens, then you can have it the same size on the slide as it is in real life which gives you the opportunity to do more close-up work. I don't have a one to one converter, and most of the time - 99 percent of the time-it's not an issue for me. For really tiny objects you might want to invest in one.
It is important to maintain your equipment. Always have some lens cleaning tissue and the appropriate lens cleaning fluid from a camera shop around to wipe off smudges and dust. Keep equipment bagged and dust free when not in use.
There are a number of other choices for enlarging objects to obtain a reasonably good close-up of an object on a slide or photograph.
Extension Tubes
Extension tubes are tubes that go between the lens and the body of the camera which allow you to obtain close-ups. They extend the lens away from the camera and thus enlarge the image seen through them. Their major advantage is that they are cheap; the drawback is that there's a light drop off. One of the problems that we have in taking close-up pictures is that we need a lot of light in order to have more of the object in focus (see 'depth of field' later) and so any light that we lose interferes with what we're doing. There's a trade off here - cost versus the best conditions for taking close - up photographs. I had extension tubes for several years when I started taking my own photographs and they served their purpose, but there definitely came a time when they just weren't good enough for what I wanted to do.
Close - Up Rings
Another option is close - up rings, which are like lenses that screw onto the front of the camera lens to allow you to enlarge objects. They come in combinations that allow you to get different degrees of enlargement. Close - up rings are also quite cheap - in fact they're a very inexpensive alternative and they may be a good way to start. Having said that, in general the more you pay for them the better the quality you will get. The problem with close - up rings is that one tends to experience distortion near the edges of the image. This may not matter to you immediately, but it may be something that you want to think about. My recommendation - if you can afford a 50 mm macro you should get one, if not then save up for one while you use your less expensive close - up rings or extension tubes.
UV Filter
It is wise to have a UV (ultraviolet light) filter screwed onto the front of your camera lens. While it does filter out ultraviolet light, its primary function for our purposes is to keep the actual lens undamaged, so that if you drop the camera, the filter gets broken, but the real lens doesn't. It also keeps dust away from the delicate lens surface inside it and when you smudge it with a greasy finger it is easier to clean than an actual lens. For all intents and purposes it's a protective device for your lens.
Polarizing Filter
A polarizing filter can be used on a camera to reduce glare from an object. Metals and certain ceramics are among candidates for polarizing filter use. I don't personally use one because I work with light placement to eliminate glare and hot spots on my object but it sounds like a reasonable idea for certain objects. The filter can be turned to various positions to eliminate various degrees of glare. Lights too can be filtered by polarizing films to reduce or even eliminate glare from an object (Collins, p 65). Polarizing filters over the lights may provide more control over specular reflections than just a camera filter (Bomback, pp 164 - 168). However, in my opinion some reflections are often what gives drama and life to the object. Another problem is that polarizing filters cut down on the light reaching the film and thus require longer exposures or larger f-stops which can affect the depth of field (the amount of the object in focus).
Lens Shade
It can be useful to have a lens shade for some situations to avoid flare and light spots in the lens. Dan Gordon, a photographer and educator in Calgary explains that flare can also mean a loss of contrast and saturation even if the flare is not visible as a hot spot. Because of how our photo - booth is lit flare is not much of a problem.
Polaroid Camera Backs
Most professional photographers have an interchangeable back for the camera which allows them to take Polaroid pictures using the same view they will then record on film. This allows them to check composition, shadow and contrast so that, before they commit to taking the actual picture, they will take a Polaroid shot with the camera, using the set - up exactly the way they want to do it, look at the Polaroid and make their final decision. Usually they will use black and white Polaroid film for this. There's another photographer I met who not only has a Polaroid camera back but he has a back that digitizes the image which goes over a modem so that his customers in Japan or elsewhere can see what he's doing with the shot at the same time as he is setting it up. They are able to see what the lens does on a TV screen and can make comments during the shoot. I don't currently have a Polaroid camera back - perhaps one of these days.
Spot Meters
Professional photographers use a spot meter (called an incident light meter) to decide on the camera exposure and f-stop settings to use. A spot meter is a hand - held instrument that you place on or just in front of the object that you wish to take the light meter reading of. It measures and records the amount of light falling onto it and it gives the setting combinations that one can use to take the photograph. Then you choose the f-stop on the camera you wish to use (this choice has to do with how much of the object you want in focus) and you set your camera accordingly. I don't feel that a spot meter is useful for very small objects, particularly when one has used a number of mirrors to modulate the surface of the object with small hot - spots and fill reflections. I feel it is just not accurate enough. The through the lens (TTL) metering system on your SLR camera will suffice. You therefore don't need an incident light meter unless you are shooting larger objects. I don't use a spot meter for our photo - booth system. You are probably glad to read that the last few items I've described are all ones I seem to be able to do without.
Center Weighted Metering (Reflective Metering)
Most through the lens metering (TTL) cameras are center weighted, which means that the camera light meter takes its reading from a circular area at the center of what you see through the lens. The meter reads the amount of light reflected back from the surface to the lens. Usually the metering area is somewhat larger than the focusing circle that you can see at the center of the viewfinder. As you swing the camera around to look at the object and shooting surface, the meter reading will change and with some practice you will develop a feel for where the camera is metering from. Try pointing the focusing circle at a bright spot on the object, at a dark area, and so on to get a feel for how the meter responds to lighting conditions on the object. In general you are trying for the most average choice for the lighting conditions on your object. This is why one tries to avoid extremes in lighting on an object.
Check your camera manual to see how your camera meter actually reads, whether it is center weighted, reads across the entire view or from a concentrated spot reading. How it reads will determine how you use it to take light readings from an object.
Gray Cards
Professional photographers often use a gray card to determine a reflective light meter reading. A gray card is theoretically designed to give you the average of the light that's coming back. Gray cards are available at photo stores. One can use a Color - Aid® 18% gray paper instead. You slide the gray card down, just in front of your object, preferably parallel to the plane of the film (the camera back) and take the meter reading from it with the through the lens reflective metering system.
Most of the time a gray card reading will be pretty good. Me, personally, I'm not sure how much I trust it. I tend to use the gray card every time as a check, against what I thought the meter reading should be. I will also turn to a gray card when I am unsure of what the meter reading should be.
When using one realize that if you tilt the card slightly you will change the lighting conditions coming back to the camera so, again, try for average, hold it for the quality of light you think is coming back to the camera from the object itself, generally parallel to the camera back.
Gray cards can be cut to smaller sizes for small objects. They should however fill all of the camera's view when taking a light meter reading off them.
Let's say that we didn't have a gray card around. It turns out that the palm of your hand is about the same tonal range as a gray card, so if you have nothing else, you can place the palm of your hand in front of the object instead of a gray card, and that will give you a reasonable meter reading.
Tripods
You've got a decent camera of some kind, and now you need a tripod.
A tripod is a piece of equipment that it is worth spending some money on. I recommend getting a used one (let your camera shop know you are looking for a good one). Bogen and Manfrotto are both good brands. I buy mine at auctions and from my local 'bargain finder' newspaper.
The photo - booth's tripod should be sturdy, heavy and easy to use. Most important: it should be designed so that when you release the legs they drop under their own weight. You do not want to have to do any resetting, fiddling around or any time - consuming messing with it. This is because there are times when your face is jammed against the back of the camera, you are looking for a particular angle and you literally stand up, looking for the angle you want, find it and then release the tripod legs. When they hit the floor you lock them in place, still with your face on the camera back looking through the viewfinder. You should therefore be able to lock and unlock the legs easily without looking at them. Sturdiness, ease of use and speed in resetting parts while in use are all advisable. Don't get too light a tripod; because it is for a studio situation stability is more important than portability.
Note that in practice one rarely tries to use the central vertical pillar of a tripod upon which the camera is mounted. While it may extend upwards with a crank and it seems like an easy way to raise the camera's position it can shake more than if one uses the tripod's legs to do so. Because exposure times tend to be long with close - up work this shake can result in poor images. If your photo system is in a basement on a solid floor this is less of a problem but passing trucks and floor vibration can still cause problems. One might as well minimize it by not extending the central pillar upwards more than necessary.
It is also a good idea to have a tripod that has a central pillar which allows one to mount the camera on the bottom of the pillar as well as the top. This allows you to place the camera on the bottom of the pillar between the tripod's legs, facing down, in order to use the tripod as a copy stand for flat work. Note that I personally do not use this much; it is just an option that it can be nice to have at times.
A ball head design is generally not as accurate to use for positioning as one that hinges and tilts in several directions.
Sometimes one sets a tripod up so that the two legs at the front are fairly short and the third leg is out all the way extended backwards. This is to allow the camera to look down almost vertically for certain shots. To stabilize it you may want a sand bag at the end of the extended leg. I like to buy an old leather hand bag with a zipper for a dollar or so at a thrift store, fill a plastic shopping bag with sand, tie it up and zip it into the hand bag. This gives you a sand bag with handles that you can easily move about and if necessary hang from something to keep it steady. It can be useful to have more than one of these around.
This tip is really important:
when you mount the camera onto the tripod head make sure that the rewind release button on the bottom of the camera is exposed, that you can still get at it when the camera is mounted on the head; otherwise you have to move the camera to unload and load film. While it may seem incredibly obvious to some people, this simple camera positioning took me years to figure out.
Related Articles
Lighting for Jewelry Photography
Proper Studio Light

Lighting for Jewelry and Small Object Photography
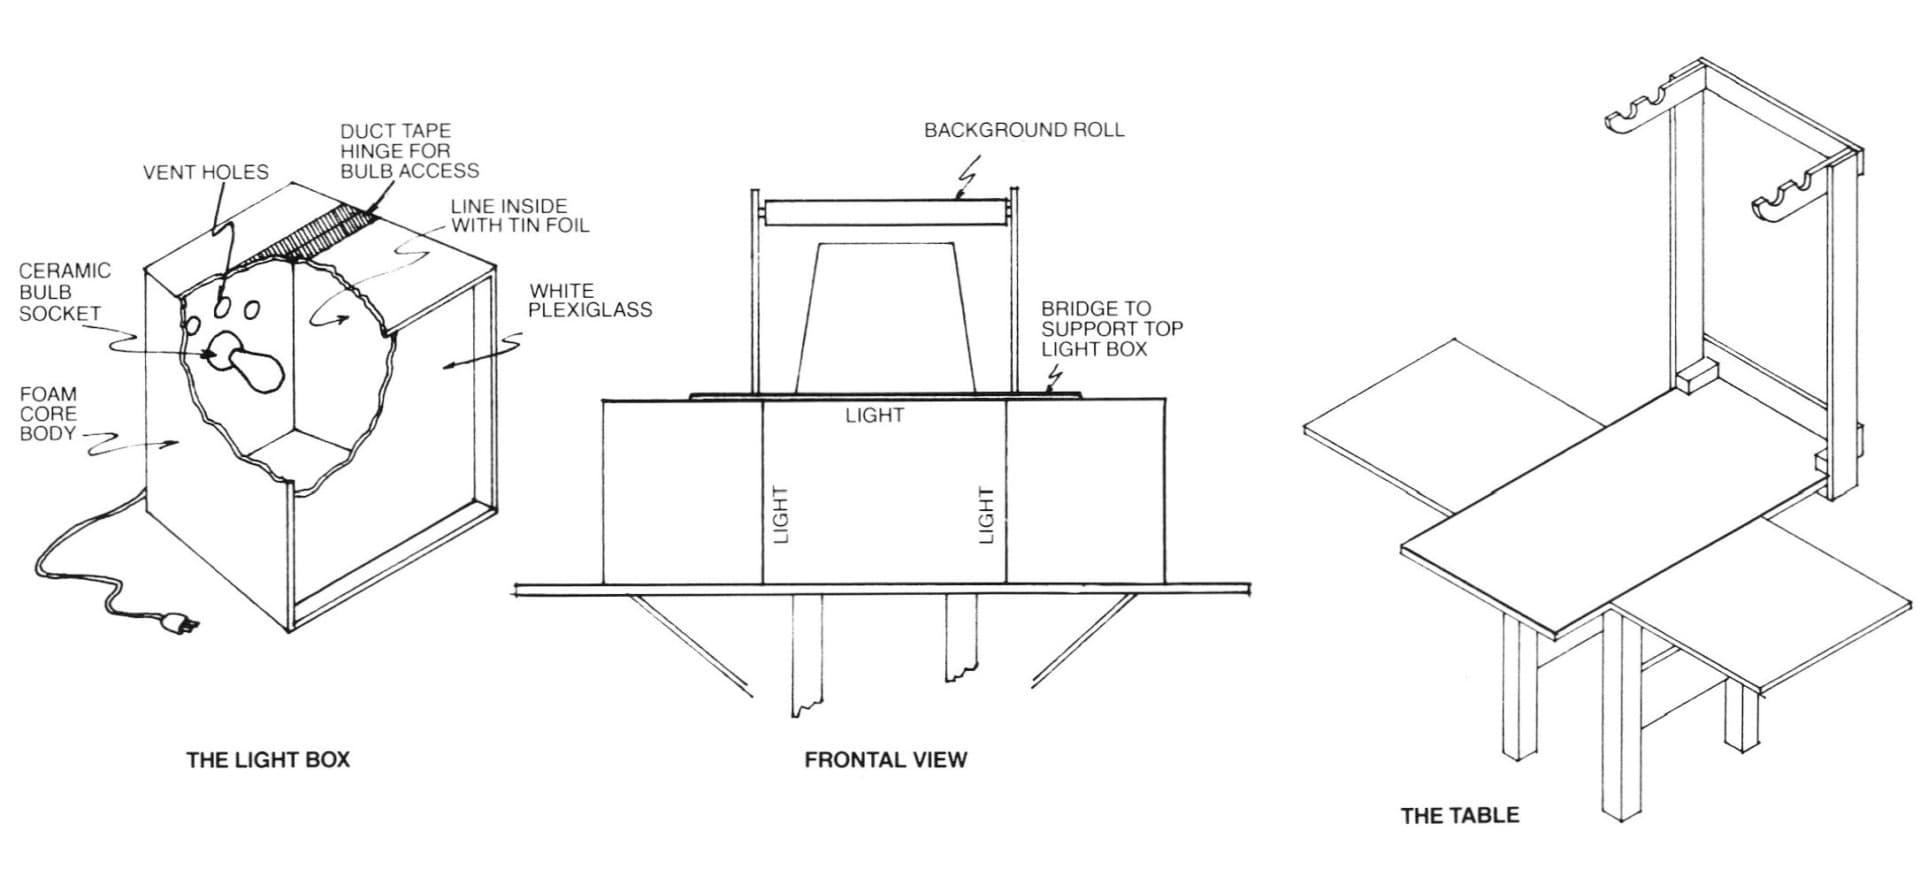
How to Construct a Portable Photographic Studio


The All-In-One Jewelry Making Solution At Your Fingertips
When you join the Ganoksin community, you get the tools you need to take your work to the next level.