
Prong Setting Round Brilliant Gemstones
For setting round brilliant gemstones in prongs, many setters and bench jeweler generalists use a 90 degree low speed bearing bur to cut a bearing in one prong at a time. This procedure is made easy by using the Foredom AllSet with the easy cut prong guide covered in this article because it offers systematic controls for cutting prongs at a higher rate of proficiency. For this example a 90 degree low speed bur will be used to bur individual prongs at a controlled height and depth of cut using a Foredom #52 Quick Change Handpiece and the Foredom AllSet #52 Quick Change Adapter Kit..
4 Minute Read
For setting round brilliant gemstones in prongs, many setters and bench jeweler generalists use a 90 degree low speed bearing bur to cut a bearing in one prong at a time. This procedure is made easy by using the Foredom AllSet with the easy cut prong guide covered in this article because it offers systematic controls for cutting prongs at a higher rate of proficiency.
For this example a 90 degree low speed bur will be used to bur individual prongs at a controlled height and depth of cut using a Foredom #52 Quick Change Handpiece and the Foredom AllSet #52 Quick Change Adapter Kit.
Prong Setting Round Brilliant Gemstones | |
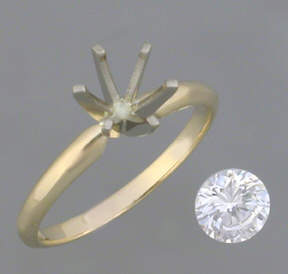 | 1. In this example, I will be setting a 6.5mm round brilliant in a Hoover & Strong solitaire. I select a 90 degree low speed bearing bur measuring 2.7mm to create notches in individual prongs for the bearing. I remove all tool marks check that the prongs angles are the same and evenly spaced. |
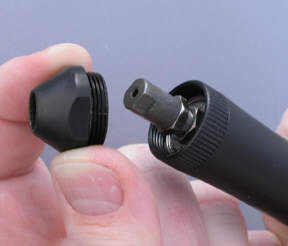 | 2. To prepare the Foredom #52 handpiece for the Foredom AllSet attachment, I loosen the nose cone of the handpiece with a wrench and remove it. |
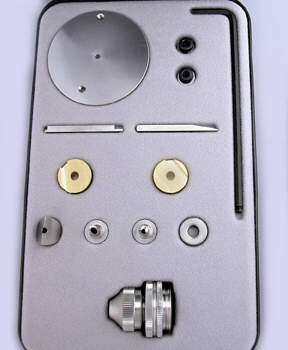
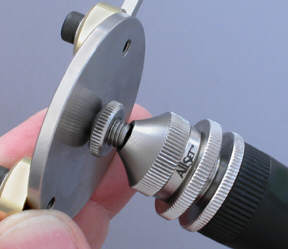 | 3. The nose cone is replaced with the stainless steel one from the #52 Foredom AllSet Adapter Kit. It's threaded and the table-guide screws into it. |
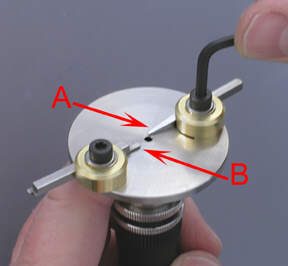 | 4. Next, I adjust the easy cut prong guide (A) and prong stop (B). The prong guide will support the prong being burred and seldom requires adjustment from job to job. The prong stop is set for the depth of the cut. Use of the prong stop is optional. My goal is to remove about 33 to 40 percent of the prongs total depth. |
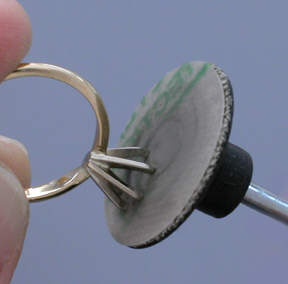 | 5. The prongs are sanded flat on top by using 400 grit abrasive film on a flat disc. |
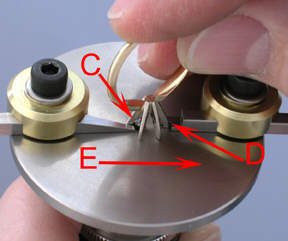 | 6. I insert the bur into the handpiece and adjust the cutting height. Next, I place the ring, prongs down on the table guide. The prong to be cut is positioned adjacent to the prong guide (C). The opposing prong is positioned against the prong stop (D). I lubricate the bearing bur with bur lubricant and begin to make a cut in the prong by sliding the setting along the prong guides (E). Foredom's series TX Flex Shaft is ideal for this procedure as it provides full torque at a all speeds - notably at a low speed required for this project. |
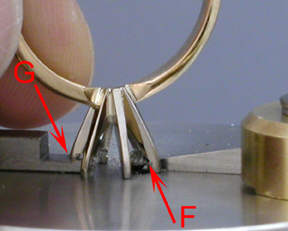 | 7. As I slide the setting, the prong being cut (F) is supported by the prong guide, which prevents the bur from wrapping around it through the cutting process. The prong stop (G) simultaneously controls the depth of the cut in each prong. This feature is ideal for multiple settings of the same style or when the ultimate precision is mandatory. |
 | 8. I inspect the ring to ensure the bearing in each prong is equally cut. Next I remove the flashes of metal from each prong that were created by the burring process with a flat bottom graver. I place the gemstone in the bearing and check that:
|
 | 9. Bend the prongs over the gemstone by bending opposing prongs. IMPORTANT - Check to make sure the prongs and crown of the gemstone are in full contact. Make necessary adjustments if not. |
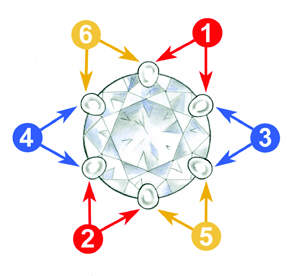 | 10. After the prongs are bent, Dickey advises using parallel pliers to further secure the gemstone. His technique is to gently squeeze adjacent prongs together following the steps outlined in the diagram. |
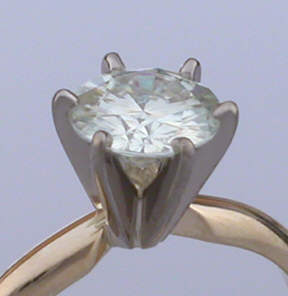
 | 11. I shaped the prongs using a cup bur and a file ensuring even and consistent form. For polishing and finishing, I used a short bristle brush with Foredom's Platinum Blue compound. After cleaning, I finish with Foredom's Platinum White compound and a cotton buff. It is 8000 grit and applies an unmistakable professional luster and finish on the overall ring. |
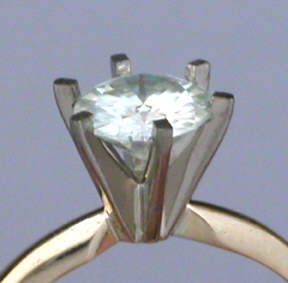
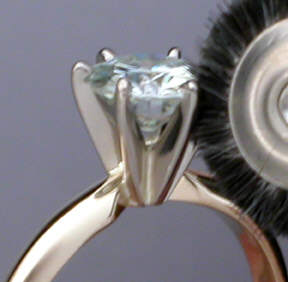
 | 12. The prongs contact on the crown is about 30 percent. The top of the prong is close to or slightly below the height of the table when viewed from the side |
 | 13. Michael Dickey recently changed his shops procedures for setting round brilliants in prongs to using the Foredom AllSet and burring individual prongs. "By setting gemstones using this method, I've reduced potential prong failure, improved our setting quality and increased our shops proficiency." Dickey states, "With the prong guides, it's hard to have a setting procedure go wrong." Foredom makes the AllSet Quick Change Adapter Kits for their No. 52 [as shown in this article], No. 10, and No. 18 "quick change" type of handpieces. The kits include a selection of setting guides primarily for prong and channel setting. I found the components quick to assemble, professionally designed and manufactured and easy to use. |
For information related to Foredom tools, equipment and accessories or for a listing of their distributors, visit foredom.com
The solitaire featured in this article was provided by Hoover & Strong, Richmond , VA. For information about their full range findings, contact Hoover & Strong at 804-794-3700 .
Related Articles

The Fascinating World of Black Pearls

57th Annual National High School Art Exhibition

950 Palladium: Finishing Procedures

Assembled Mounting for Customized Jewelry


The All-In-One Jewelry Making Solution At Your Fingertips
When you join the Ganoksin community, you get the tools you need to take your work to the next level.
