
Micro Vacuum Cleaner for Enamelists
This article describes a micro vacuum cleaner, based on an aquarium pump, for use by enamelists. The vacuum cleaner allows for cleaning up sifted or spilled enamel. It offers an alternative to wet packing when doing cloisonne, and you can use it to create lines and designs. There are probably lots more uses that I havent thought of.
6 Minute Read
This article describes a micro vacuum cleaner, based on an aquarium pump, for use by enamelists. The vacuum cleaner allows for cleaning up sifted or spilled enamel. It offers an alternative to wet packing when doing cloisonné, and you can use it to create lines and designs. There are probably lots more uses that I haven't thought of.
Enamel is often applied by sifting it as a dry powder. It is easy to sift enamel onto a piece, but it is not necessarily easy to control where it goes or doesn't go. Even using stencils or silk screens doesn't afford the user total control of a sifted enamel, which can spill around the edges of a stencil, and which can always be messed up inadvertently. In cloisonné, you may have metal walls to partition the enamel, but in the process of filling one cloison, you can easily contaminate a neighboring one.
At issue is how to clean up enamel in places where you don't want it. A popular method is to use a dry brush to escort unwanted powder out of the way. But most people who use this approach will admit to its limitations. A vacuum cleaner would seem to be a better solution for cleaning up. However the small vacuum cleaners that are commercially available, which are designed for cleaning computer keyboards, are not useful in enameling. The vacuum is far too strong, and they are awkward. The vacuum cleaner I describe here has a low vacuum pressure that can be easily regulated by the user. The user applies the vacuum using a handle shaped like a pencil, so that it can be very easily controlled.
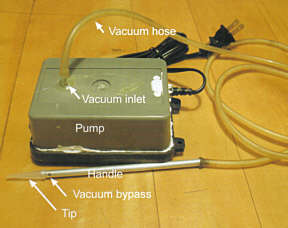 |
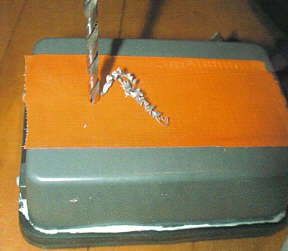
| Figure 1. The micro vacuum cleaner with the components labeled. |
Figure 1 shows the components of my vacuum system. The vacuum source is an aquarium pump that I modified to suck air rather than blow it. The vacuum hose is a length of plastic aquarium tubing, the handle is a length of 1/4" metal tubing, and the vacuum nozzle is a plastic pipet tip with a small (1 mm or less) opening.
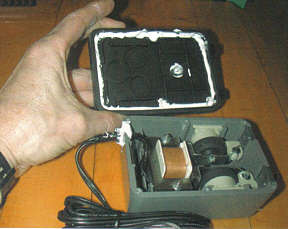
Figure 2 shows some of the steps involved in modifying an aquarium pump to be a vacuum source. No two pumps seem to be the same, so these pictures may not apply exactly to any pump that you try to modify. But hopefully the principal will be the same. Standard pumps blow air out of a nozzle; the incoming air is sucked into the pump through the cracks around the power cord and around the base, and through various other holes in the plastic housing. I bought a medium capacity pump, took the bottom off the case (Figure 2A), filled all the holes and cracks, and sealed the bottom of the case, using bathtub caulk (Figure 2B, C, and E). I drilled a hole in the top of the case (Figure 2D); this is now the air inlet, so that when the pump is turned on, air is sucked in through this hole. I glued a plastic fitting over the hole (Figure 2F). The fitting is the large end of a pipet tip.
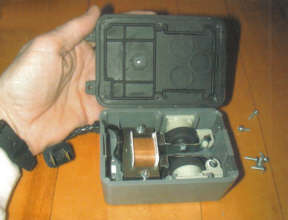 | Steps to follow to convert aquarium pump to a vacuum pump. Note: If you are following these instructions be sure that your pump is UNPLUGGED during these steps. Figure 2A: Remove the bottom of the pump. |
 | Figure 2B: Apply caulk around the edge of the bottom, around the power cord, and in the hole in the bottom. |
 | Figure 2C: Close the case (Note: the duct tape is to hide the brand name). |
 | Figure 2D: Drill hole for suction inlet. |
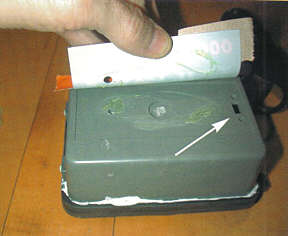 | Figure 2E: Peel back the label on the top. Arrow: note the hidden hole at the end of the top! |
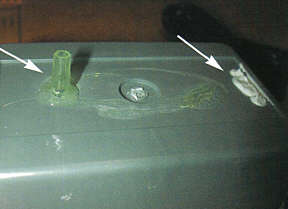 | Figure 2F: Arrows indicate the plastic nozzle epoxied over the suction inlet, and the hole at the end of the case filled with caulk. |
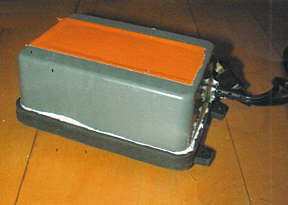
With a length of aquarium hose and a handle and a suction tip (Figure 1) you have a vacuum cleaner.
The vacuum tips that I use are 200u liter 'Universal Fit Bevel Point Pipet Tips', that I got from VWR scientific. The good news is that they are very inexpensive. The bad news is that the minimum order is a package of 1000 tips. The ends can be cut down for doing fine or coarse work (Figure 3).
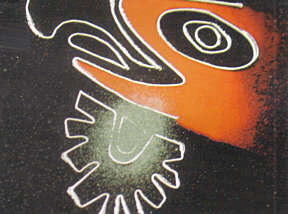
Using the vacuum cleaner. Figures 4 and 5 illustrate what I call the 'sift and suck' method of enameling. Figure 4 shows its use in filling a cloisonné piece. First, 26 gauge round wires were fused to a background. In Figure 4A, red enamel was crudely sifted over the cloisonné wires. In 4B, the red enamel was cleaned up using the vacuum, and the piece was fired. Green enamel was then sifted into another part of the design. Figure 4C shows the vacuum in the act of picking up the green enamel.
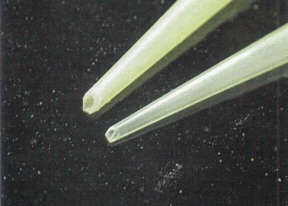 | Figure 3: Pipet tips cut down so as to have openings of different sizes. |
 | Figure 4A: An example of the 'sift and suck' method, using the vacuum cleaner to fill a cloisonné piece. 26 gauge round wires are fused onto the background. In A, the pattern is coarsely sifted with red enamel. |
 | Figure 4B: the red enamel has been cleaned up nd fired, and green enamel is applied |
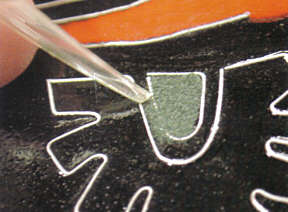 | Figure 4C: The vacuum cleaner tip is in the act of picking up the green enamel. |
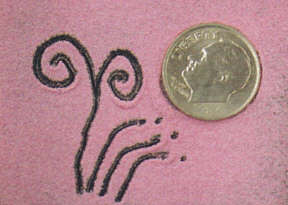 | Figure 5: Using the vacuum to make lines and dots. A layer of pink enamel was sifted over a black background. The vacuum was used to suck up the pink enamel, creating simple design elements. The coin is a dime, for size reference. |
The vacuum cleaner can also be used to create simple design elements such as lines and dots. In Figure 5, pink enamel was sifted over a black background.
Lines and dots were created by simply running the vacuum over the surface.
 | Figure 6. Disassembled view, showing parts used to build handheld enamel vacuum. |
 | Figure 7. Assembled enamel vacuum. |
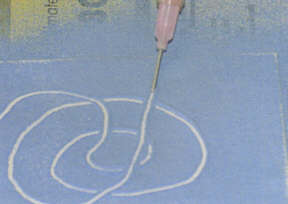 | Figure 8. Vacuum in action, creating a design in dry, sifted enamel powder. |
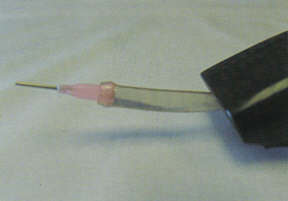 | Figure 9. Close-up of vacuum tip, showing enamel powder collected inside PVC tubing. |
Caveats:
- Keep the enamel out of the pump. If your vacuum is so strong that the enamel is sucked out of the tip and into the hose, you should be careful that it doesn't get into the pump. Take the tube off and shake it out periodically. If you keep the pump above the surface you are working on, the enamel will stay in the tube.
- Noise. The pump than I use happens to be very quiet. But not all aquarium pumps are equally silent. If yours is noisy, you can put a switch in the power cord.
In summary, this little vacuum cleaner is cheap, easy to make, and seems to be extremely useful. I use mine all the time, and everyone else who has used it has been very enthusiastic about it. I am sure there will be countless ways they can be used creatively.
Editor's Note:
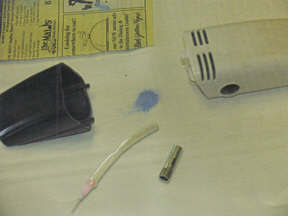
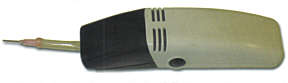
Shown on this page is another type of enamel vacuum, made from a handheld mini vacuum used to remove dust from computer keyboards. In our version, a stainless steel dispensing needle is attached to a piece of PVC tubing. The tubing, which does not have a large enough OD to fill the opening of the vacuum, is inserted into a metal fitting, which fills the vacuum opening enough to create a gentle suction through the tube.
If the particular items in this article are not available, a little ingenuity will help you create an enameling vacuum to be used in your own work.
Related Articles

Customized 3 Jaw Chuck & Earring Holder

Basic Principles for Tools and Equipment

How to Make Straight Wire Holders

DIY Metal Shaping Tools: How To Make Your Own Jewelry Hammers Or Mallets


The All-In-One Jewelry Making Solution At Your Fingertips
When you join the Ganoksin community, you get the tools you need to take your work to the next level.
