Holding Objects for Photography
If an object will sit by itself on the shooting surface this is not a problem but often it needs to be propped up in some way. Even objects that will sit well on a flat surface sometimes need tilting slightly towards the camera by placing something under their rear side. Holding objects in place for the photograph is usually fairly easy and fast just by placing a.
8 Minute Read
If an object will sit by itself on the shooting surface this is not a problem but often it needs to be propped up in some way. Even objects that will sit well on a flat surface sometimes need tilting slightly towards the camera by placing something under their rear side. Holding objects in place for the photograph is usually fairly easy and fast just by placing a suitable chunk of something heavy behind it against which it can lean. Wedges of wood or other materials can be useful for this. In general keep your holding method as simple, straightforward, rapid and clean as possible.
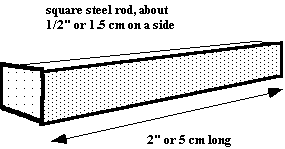
Steel Blocks
I use small steel blocks cut from square rod that I can stack on top of each other until I get a stack high enough and heavy enough to keep the object in place by propping it against the stack. The blocks are about 1/2″ (1.5 cm) thick and vary in length though most are about 2″ (5 cm) long. One can also use large steel nuts from bolts, heavy washers and so on as long as they are clean and don't stain the shooting surface (spray paint cans can serve for medium - sized objects). Square and rectangular pieces of scrap steel are useful. I often put a small blob of Fun - Tack onto the front of the top steel block to ensure the object doesn't move. I have more than one intriguing slide of an object blurring as it falls or swivels just at the moment the picture was taken. You also don't want to see anything that is propping up your object from the front view, and therefore looking for something peeking out from behind it is an important final check before taking a photograph.

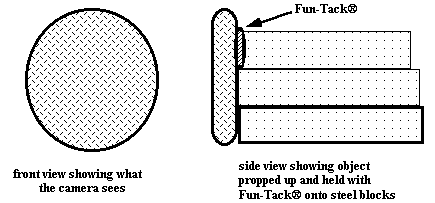
I use Fun - Tack to help hold objects up. This is a material that you can buy at the stationary store for putting up posters that is not supposed to (but does) damage a painted wall. With a small blob of it against your support even a tippy object is helped to stay put. I often use Fun - Tack just to stick an object onto a chunk of steel, or to stick the object itself onto the shooting surface. Fun - Tack will not damage your shooting surface. You don't want to use beeswax or Plasticine to hold an object up, because these will stain the shooting surface, and may also affect the object. Plasticine, for instance, contains sulfur, which will darken and blacken most metals within a pretty short period of time. A warning about the Fun - Tack: it turns silver black if it's in contact with it for some time, so you have to be careful when using it with jewelry. It is fine in contact with metals for an hour or so - just don't leave it overnight. Hot glue is another method for holding objects up but I don't often use it as it takes time to warm the glue gun, damages the paper if it touches it, works well on metals and smooth objects but can damage others. There is the occasional time, however, when hot glue might be a useful solution to a propping problem.
Stainless Wire
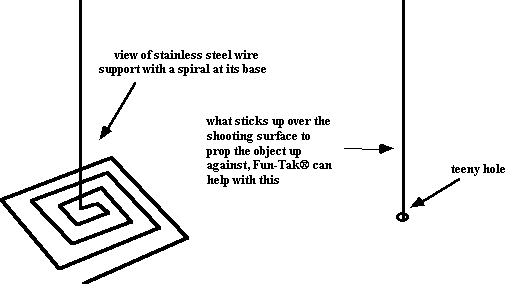
As well as steel blocks, we can use stainless steel wire stands to hold our objects up. We can make a small hole in our nice charcoal gray shooting surface through which we can slide a thin stainless steel wire from below. The base of the wire is bent around with pliers to form a flat spiral which sits under the shooting surface. The paper presses onto the spiral beneath it and keeps the upright wire section stiff and steady. An object (even a thin or awkward one) can be propped against the wire and if necessary a small blob of Fun - Tack can hold the object in place on it. We could use piano wire instead, which you can buy at most hobby stores, but the piano wire rusts and will tend to stain the shooting surface, so I prefer the stainless steel wire. It can be obtained from orthodontists but the least expensive source I have found is Small Parts Inc. (see sources). I use this quite a bit, and one thing that I might recommend would be to place that hole slightly off to one side in your shooting surface, so that you don't disturb the central area of the shooting surface with a hole. The hole is not very obtrusive, but still, it's there. Make it as small as possible.
It's also possible to curve the stainless steel wire above the shooting surface for specific propping problems - for instance, I once shot a flexible bracelet which was stuck onto a curved wire and this bracelet appeared to be rising from the surface and flying through the air in the photograph because it was attached to the wire.
Fishing Line
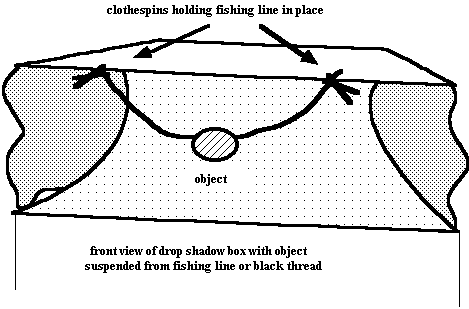
Fishing line can sometimes be quite useful. We might use fishing line for suspending earrings or a pendant or something like that. It might be clamped in place with clothespins on each side of the roof of the drop shadow box allowing us to hang the object so it 'floats.' The trouble is that the fishing line tends to show up in the photograph, because it catches the light. If you run a little black magic marker across the fishing line, you can often kill it completely and make it disappear. Fishing line is, however, a little tricky, so I would normally recommend using the stainless steel wire supports or a prop of some kind if at all possible. Black nylon thread could be used instead of fishing line. Certain objects are best photographed using a glass - topped frame as is described near the end of this section.
Rear Supporting Rod
Another thing that works quite well is a rear supporting rod. Have different lengths of rod available for different problems. Examples of rod materials include dowel, steel welding rod, brass brazing rod, knitting needles and so on. Useful rod lengths might be 8″ (18 cm), 12″ (30 cm), 15″ (38 cm). This one shown has been made from a jeweler's third arm, which is a clamping device that pivots, and there's a rod been installed in it, so that it projects outwards and can be positioned at different angles. If you put a blob of Fun - Tack on the end of it, you can place an object of jewelry or another small object here, and have the rod projecting from the back of the box forward, so that the object is quite literally floating in the air in our drop shadow situation.
If you are careful, you may be able to set things up so that your object completely covers up the stand, and you don't see it at all. If, however, some of the stand is still visible behind the object, then we work with depth of field to eliminate it from the photograph; to make the stand so out of focus no one cannot see it. I usually spray paint such stands with a matte flat black. A third arm stand like this can be purchased at electronics shops such as Radio Shack or at a jewelers supply store.

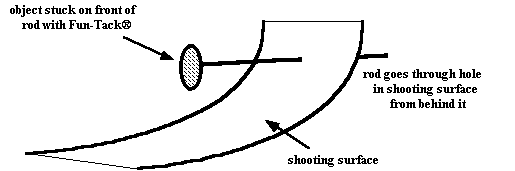
Another way to obtain a similar effect is to stick a rod through the shooting surface from behind and stick the object onto the front of it with Fun - Tack or hot glue. I don't often use this method however as I hate damaging my shooting surface in the drop shadow box. If you damage it you may need to change it and the whole idea is to have to change as little as possible while you are shooting. Changing things takes time.
Again, we can set things up with our camera using depth of field so that only a very short band or thickness of the object is in focus and if we do that carefully, we can make it so that the stand behind completely disappears, just goes completely out of focus and the only thing in focus is our object that's floating in the air. We would set the f-stop on the lens to f-8 or so to do this (see the section Depth of Field).
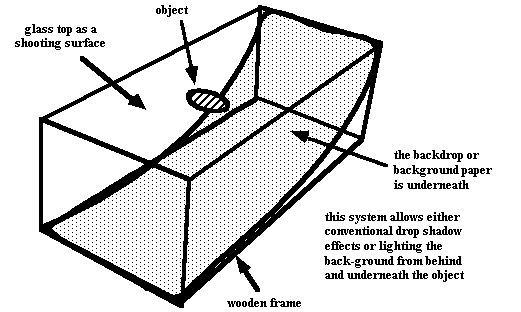
Shooting on Glass in a Frame
Objects like pendants, earrings and other hard - to - prop - up - or - support items can be shot on a glass - topped shooting surface: on a piece of glare - free glass. Glare - free glass can be obtained from photo suppliers but one can use ordinary glass if one is careful. One can also use frosted glasses and plastic translucent materials of various kinds.
One takes a piece of very clear, very clean glass and sets it up on top of a frame of some kind. A quick one can be done with the glass supported on two chairs or boxes on each side. A permanent one is constructed from wood. One places the backdrop paper underneath the glass. One can experiment with all kinds of interesting lighting effects behind the object on the backdrop paper (back lighting) such as giving the object a 'halo' by shining the lights in underneath the object from the sides. The object is placed in the center of the glass and you take the picture with the camera facing down at the object. The object itself is lit from above with a 'soft box' (large diffuse light source) and otherwise conventionally lit so as to stand out against the background, which may be lit as described above or be darkened to produce a drop shadow effect behind the lit object which then magically floats over the drop shadow background.
This approach gives extremely good results, and you don't see the glass at all if you angle the camera and lights correctly. There's often a little bit of messing around to make sure that there's no reflection or glare off the glass to the camera (possibly a time for a polarizing filter). Dust and things that land on the glass can be an irritant in this approach. It can however give you very lovely results and it's a pretty easy set - up.
Related Articles

Photography Considerations

Photographic Equipment for Jewelry and Small Objects

Jewelry Photography Film Types
Lighting for Jewelry Photography


The All-In-One Jewelry Making Solution At Your Fingertips
When you join the Ganoksin community, you get the tools you need to take your work to the next level.