
Raku Enameling
Raku enameling is an exciting process. It is smelly and dirty, and one is much more kinest hetically involved than when sitting at the cloisonne table. The outcome of the process is, in the first few attempts, whimsical to say the least. After the enamelist has done a few pieces, however, the delight in the unpredictable results can easily turn into frustration at the lack of control one has over the materials. The question becomes how to push the raku process from being a 'let's throw this in the raku pot and see what happens' event into an intentional use of materials and what we know in order to produce cohesive work with some life and integrity - works of art which will convey visually a message or feeling.
14 Minute Read
Raku enameling is an exciting process. It is smelly and dirty, and one is much more kinesthetically involved than when sitting at the cloisonne table. The outcome of the process is, in the first few attempts, whimsical to say the least.
After the enamelist has done a few pieces, however, the delight in the unpredictable results can easily turn into frustration at the lack of control one has over the materials. The question becomes how to push the raku process from being a 'let's throw this in the raku pot and see what happens' event into an intentional use of materials and what we know in order to produce cohesive work with some life and integrity - works of art which will convey visually a message or feeling.
Recently in a class at John C. Campbell Folk School, we experimented with ways in which to exercise some control in the process of raku firing. Beginning with a list of my objectives for the class, a group of lead-free enamels, and the results of some testing I did some years ago, we 'lit into' making raku enamels. I have to commend the students - Sandy Dawson, Roxie Mooradian, Ginny and Harold Shuster, Jessie Smith, Jackie Spencer (who enameled and took care of the studio at the same time), and Antoinette Thompson - for their enthusiasm, willingness to risk the outcome, and ability to concentrate on the issues.
Simply stated, the enameling raku process parallels the clay raku process with some adjustments made for the differences in the materials. Materials used are the usual ones: a metal base (usually copper or pre-coated steel) and vitreous enamel. Work is developed in the same way that enameled pieces are. Once a piece has its final firing, it is placed immediately on removal from the furnace into a covered metal container that has been fitted with combustible material. Once the material is flaming well, the bucket is covered tightly. The fire burns the oxygen out of the air in the container and then draws the metallic oxides to the surface of the work resulting in iridescent metallic colors and/or a fumed surface, depending on the enamels used.

Objectives:
The objectives for the class were to achieve a variety of tactile (or physical) and visual surface effects, to discover some methods of controlling design, and then to bring some materials other than glass, copper and/or steel into the work.
Tactile Surface Control
Depending on the combustible material in the container, various physical surfaces will result. Dry leaves, pine needles, sawdust or shavings, and shredded paper are the most commonly used materials. Many potters are using shredded paper to avoid the lines and indentations which result from other materials. However, those other materials each leave their peculiar signature on the work. Dry leaves will often leave the imprint of their skeletal structure in the still fluid enamel, pine needles give a very pleasant series of long lines on the surface, and the sawdust provides a fine, more even texture. This latter material is good for pieces which have had some well-defined line and color work developed in the enameling, since it does not add a further design element which could prove visually confusing.
Visual Surface Control
The visual surface effects depend on use of color, line and oxides in the enamels. Through the testing of colors it can be determined which colors will remain 'constant', i.e. will not produce the metallic glints which can be strong enough to obscure the original color. Generally the opaques are constant. They do pick up some fuming from the carbonaceous material produced in the fire, most of which can be scrubbed off with a glass brush or a 3M? scrubber (which will sometimes leave a scratched surface - the glass brush is better). But there is often a pleasant soft gray cloud pattern which will be thoroughly embedded in the enamel.
Design Control
Carefully considered placement of the constants and of the enamels which will give the metallic surfaces also help in design control. Stenciling a pattern which will leave fairly large areas of the constant provides some definition of design. Sifting a base coat of one color, with a sifting of a second color only over part of the work plate helps control design also.
Elements other than enamel and copper or steel
Gold leaf may be placed on the piece for the last firing in the furnace. This gives a very strong design element which can help with the 'intentional' aspect of the work. For a large defined square, leave the gold leaf on its loose backing paper and place it face down on a surface painted with an adhering solution such as Klyr-Fire?, then gently pull the backing paper off. For more free gold areas try picking up the gold leaf with a damp brush - and good luck to you! It helps to watch a person who works with the material. A wide soft dry brush is used which after being brushed across your hair several times has enough static electricity to cause the gold leaf to cling to the brush making it easier to control. In the raku process the gold leaf may darken some, and do use a gentle hand when scrubbing the carbon off.
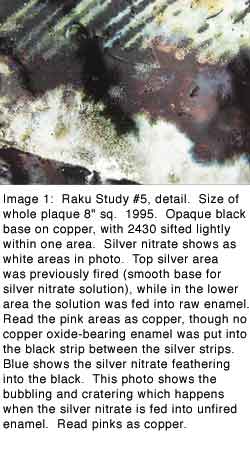
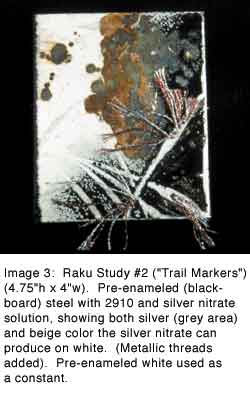
Silver nitrate solution has some interesting effects on the enamel in the raku firing. By careful placement of the silver nitrate, it can become an element in design control, also. When fed with a brush into unfired enamel, the silver nitrate results in heavy cratering and bubbling, giving a very rough silvery surface. If painted on previously fired enamel, the surface is much smoother. The optimum effect occurs with this smoother surface. As the enamel cracks when placed into the furnace for the last firing, the silver nitrate liquifies and runs down these hairline cracks, leaving a fine tracery of silver. This is especially effective when done on a dark blue or black base. Fed into some Klyr-Fire?, the silver nitrate will give a light, feathered look, while painting it onto a dry surface gives a very defined edge to the lines. On one of the test pieces, two crystals were put dry on the enameled plate. On that piece, the result was that the crystal exploded, leaving a starburst of silver in small areas. We did not achieve that effect again, however. Usually a few crystals put into a teaspoon of water will provide enough solution for a good days work - experiment to get the right strength. Do not mix up a lot - its potency diminishes as it sits, and it is a bit pricey, being silver. Silver nitrate on some of the whites will result in beige and pink colors. The silver nitrate can be bought in crystal form at a pottery supply house, or occasionally through a pharmacist, though they have been known to be rather sticky about it.
The Raku Firing Process
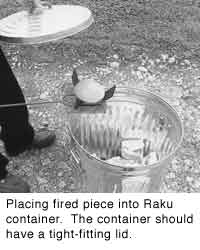
The studio should be set up so that the work can be taken out of the furnace after the last firing and immediately dropped into a garbage can or other container with a lid. At JCCFS, we were able to have one kiln outside on the porch. I usually flip the work over so it lands face down in the material. It may also be dropped in face up, with a little combustible material then dropped on top. If the piece is small, I often will throw rack, trivet and work into the can, on the theory that more hot metal will ignite the leaves or wood more easily. Wait a few seconds until the combustible material bursts into flame and then put the lid on tightly. Occasionally here in the Northeast, the leaves will be damp. If they don't flame up, quickly throw a little dry material on top of the work. If they still haven't flamed but are producing a lot of smoke, then close up the can anyway - it often will work well.
As mentioned in Experimental Enameling by Fred Ball (the only written work I've seen on raku-fired enamels), when using sawdust it is not necessary to put the lid on the can. The sawdust is densely packed and will easily smother out the oxygen quickly.
There are some noticeable differences in the clay and the enamel processes at this point. Enamels should be left in the container for only a few minutes. I wait until the smoke (which inevitably seeps out under the lid) has slowed down and lessened. You will notice a difference between 'active' smoke which is being driven out by the heat, and the slower smoke when the heat is diminishing. Take the work out with tongs. Do not quench it. I hold it in the tongs and wave it back and forth in the air to cool it quickly. If it is left hot, or left in the can, the metallic surface will sometimes retreat. (Note: Do not display these raku enamels in sunlight for any length of time. The copper and glass absorb the heat and can become hot enough so the metallic surface disappears again.)
Once cooled, the work is ready for cleaning, and, as mentioned before, a glass brush is good for this. At this point you may want to make some aesthetic decisions. Some of the carbon patterns are interesting. If the work is going to receive any handling, then I want to be certain that what is on the surface is going to stay on the surface. If it is a wallpiece, then I am more comfortable with leaving some of the carbonaceous material in place. The glass brush does not seem to damage the metallic surface, but do use a softer hand on gold or silver foil.
Three Safety Notes
- Work in a well ventilated space.
- Keep a bucket of water handy for safety purposes.
- And for those of you who can't tolerate the smoke, contact Rio Grande supplier in Albuquerque, NM. Their half-mask respirator (#201-645) with 'pink/yell.chem.cart.filter/pr' (their description) (#201-650) works very well. I smelled no smoke when wearing it. The mask was $9.50 and the replacement filter pack was $17.95 (January, 2001 prices).
To obtain metallic surfaces on small pieces, such as pendants, do the reduction firing by torch instead of the raku container. It is easy to lose the small pieces in the combustible mess, and it is more controllable to use the torch. Remove the piece from the furnace to a soldering tripod and immediately play a soft, smothering flame from the torch over the whole surface. Watch for the metallic glint to appear and immediately remove the flame and quickly cool the work. Do this by picking it up with the pliers and waving it in the air, blow on it, whatever works. One piece was sprayed with air only from a sprayer. Or you may spray with a little water, lightly and in short blasts, using the power pack. ( packs are available from Thompson Enamel or in the paint section of most hardware stores. They are both a great boon and a great source of aggravation.)
Enamels to Use for the Best Effect
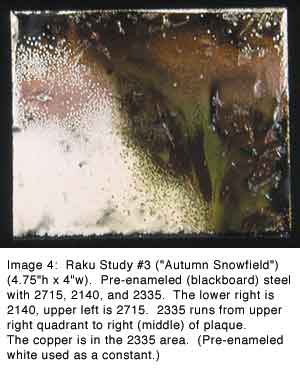
Some years ago I tested some of the lead-free enamels at Thompson Enamel with the help of Woodrow Carpenter and his knowledge of the make-up of these enamels. All of the following enamels mentioned are Thompson Enamels. Gold and cadmium-selenium reds and yellow were tested with disappointing results. Though occasionally there are gold glints in the metallics, I think they are more apt to be coming from some copper content, not from the gold. Cobalt-based colors also give no metallic surfaces. Some iron can be drawn out of 2110 ivory beige, but that color is more useful as a constant. The two best oxides are manganese and copper, with copper being by far the most successful. Nile green (2305) was tested for its nickel content, but was more useful for its copper oxide.
For manganese, try chestnut brown (2190), russet brown (2140), rose purple (2715) and oil gray (2910). These enamels will give a very slightly dulled surface and the enamel appears to have crystallized lightly. (The very best manganese metallic surface, however, comes from lead-bearing 834 smoke gray.)
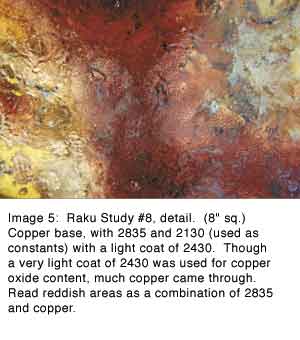
For copper, the best seems to be 2435 turquoise, 2430 beryl, 2335 peacock and 2305 nile green. In experiments with 2435 turquoise (containing the highest copper content) there was copper all over most of the surface of the piece. Using it in defined areas helps with design control. There are some interesting areas in which it looks as though the turquoise color has bubbled through the copper on the surface, giving a pleasing break-through surface with the interaction of its warm and cool colors. The copper itself tends to be dark. 2430 beryl, containing a little less copper and including some iron, produced a tile with the majority of the surface covered with copper. This copper was livelier in sheen and color than the 2435 and had a brown cast to it. I did not see the breakthrough effect with this one, which could be the firing process and not the material. I was happiest with 2335 peacock green, which has even less copper and has some potassium dichromate in it. This also gave a very lively metal surface, and the copper was much redder than the previous two tests. The purest copper color, with a pink cast to it, achieved in these early tests came from the 2305 nile green.
2110 ivory beige was mentioned previously. When used in combination with one of the greens (i.e. 2430 beryl) the result was a very nice test, with the warmth of the ivory beige playing with the warmth of the copper and against the cool green.
The students at JCCFS pushed these experiments even further. Some worked with strong light/dark contrasts, using 1020 white (and experimenting with other whites) and then greens or copper-based blues. Breakthrough patterns figure heavily in these. Another satisfactory combination was 2110 ivory beige used with 2715. Work was done with colored opaques as well as the white. One student did a series of very consistent tests, using the same design pattern laid on various light colored opaques, resulting in a set of tiles which could be easily compared with each other. For all of us, some pieces were great successes, some were real dogs, but all are worth keeping for the study of the process and what happens to the materials.
Further Learning Along the Way
If thin pre-coated steel is used (such as steel blackboards - or more properly now - whiteboards) fire an extra coat of counter enamel on the back to help control cracking.
It is a little harder to pull the metallic oxides from the lead-free enamels to the surface, than it was with the lead-bearing. (I do miss the leaded 834 smoke gray and 387 midnight blue!)
Even though there is a higher percentage of metal oxides in the opaques, they do not give up their oxides. The transparents will give you the results you want.
After setting up your areas of color, try to resist covering the whole with an enamel which will give you metallic luster. Place it judiciously. Copper luster especially can be so strong that it obscures all the rest of your design.
Since an absolutely smooth enameled surface is not a concern with this technique, leaded and lead-free enamels may be combined with little or no problem. I've had no more cracking with those combinations than with lead-free on lead-free, etc.
The lead-free enamels don't crack as much when they go into the furnace, so it is difficult to achieve as much of the silver tracery with the silver nitrate. To offset this, have the piece as cool as possible when it goes into the hot kiln. The kiln should be hot when the piece is put in, but can be cooled slightly so that the cracks that naturally appear at this time heal a bit more slowly, giving the silver nitrate a chance to run.
I have been puzzled several times when copper appears on the surface after the raku firing, and I know I did not put any copper oxide enamels on the piece. My feeling has been that copper is somehow being dragged from the copper plate to the surface. One plate that was fired with pink transparent and ivory beige had a lot of copper and around the edges. It looked as if it had been electroformed with copper; the copper extending in over the enamel a couple of millimeters. (The fact that the piece had been cut with a torch helped this effect.) After observing and assessing work done at JCCFS, we decided that it does indeed have to be coming from the base copper.
And last, but not least, if you don't like the result, scrub the workpiece and do the raku process again. However, if you have a piece which is 90% pleasing to you, consider leaving it as is, rather than losing in a second firing the nice effect you've achieved. Knowing when to stop is very important with raku enameling. Raku pieces are strong works and it is easy to push them too far so that design elements are lost and their inherent and wonderful 'crappy elegance' loses the 'elegance' part of that description. Successful raku-firing is a give and take situation. In preparation give it all you've got in your store of knowledge about design control, including use of line, color and texture. In results, take what the material and process gives back, which is very exciting indeed.
Related Articles

Portrait with Enamel Watercolors

Harold Hasselschwert: Materialization of the Exotic

Intro to Enameling: Double-Sided Pendant 2

Etching Options for Champleve


The All-In-One Jewelry Making Solution At Your Fingertips
When you join the Ganoksin community, you get the tools you need to take your work to the next level.
