
Enameling Malleable Copper
Early in the 1400's someone discovered that a design of juxta- positioned colored enamels would not intermingle when heated to their fusing temperature. Partitions were not necessary! Then someone found that one color could be applied over another with a second firing. The big discovery-thin metal-could be used if enamel was applied to both sides prior to firing. The result was a new technique called painted enamel..
15 Minute Read
Early in the 1400's someone discovered (or took a good look at the millefiori in Celtic enamel) that a design of juxta- positioned colored enamels would not intermingle when heated to their fusing temperature. Partitions were not necessary! Then someone found that one color could be applied over another with a second firing. The big discovery-thin metal-could be used if enamel was applied to both sides prior to firing.
The result was a new technique called painted enamel (painting with enamel is perhaps a more accurate description). Other crafts and trades took note, made discoveries, and the Renaissance was off and running!
Working on 18 gauge (.040″ thick) copper has been the norm for many people working with enamel in contemporary times. It is easily available and comes pre-cut, stamped or spun, ready to enamel. Recently I have been working with Thompson's Malleable copper (M-7). It has been a refreshing change of pace because of some of the working advantages it has over thicker copper.
Malleable copper is .010 inches thick. It is thicker than Thompson's copper tooling foil which is .0052 inches thick. Because malleable copper is relatively thin, it is suitable to shape 3-dimensional forms before enameling. This allows one to break the 2-dimensional flatness much more easily than working on standard 18 ga. copper which would require more substantial shaping tools and equipment.
In addition to being able to easily form shapes and textures with this copper, another advantage over 18 ga. copper is the finished items weigh much less, making them ideal for pendants and earrings. A third advantage is that when the foil is manufactured, it has a very compressed surface, free from oil or grease. By following the process below, the item can be covered with enamel on both sides and fired at the same time eliminating the need for pickling the copper. A fourth advantage is that because the copper is relatively thin, ordinary scissors can be used to cut out the copper shapes to be enameled-no need for struggling with metal shears or saw blades.
Cutting and Shaping the Copper
Begin by cutting out a shape. If precise ovals, circles or rectangles are desired, use a template of that shape and scribe the outline of the shape onto the malleable copper. For instance, an 18 ga. 2 inch copper circle can be laid onto the malleable copper and then traced around with a scriber. Another method would be to lay carbon paper onto the malleable copper. A drawing can be placed on top of the carbon paper. The shape is then transferred onto the malleable copper by tracing over the drawn shape on top of the carbon paper.
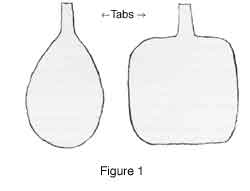
Often times I will incorporate a bail (for a cord or chain to go through) at the top of the shape if it is to be a pendant. A 1/2″-3/4″ rectangular tab should be added at the top of the drawn shape (Figure 1).
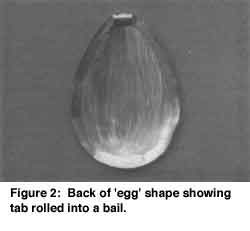
After the shape has been cut out with scissors, use a thick telephone book (for cushion) and a wooden scribing tool to either dome the shape, or to form it into a 3-dimensional shape. For doming, use the wooden tool to press an indention into the copper about 1/4 inch from the outer edge. Next start impressing the interior area of the shape back and forth and up and down. The copper shape should eventually be angled on the phone book as you dome the shape to the outer edge. If a bail is used, roll the tab into a cylindrical form onto the back or convex side of the piece using round needle nose pliers (Figure 2).
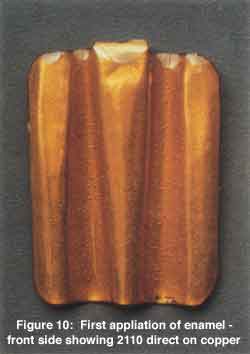
If a dimensional shape is desired, start shaping the piece by impressing a line down the center of the shape on the back side. This impression may be about 1/4 to 1/2 inch wide, sometimes wider at the top tapering down to a smaller width at the bottom. After impressing on the back side, the piece is folded in half. The wooden tool is used to push in and down along the edge of the shape made from the other side, on each of the folded sides. This accentuates the original impression made from the back side. The piece is then opened up. This will form two "wings" on either side of the center shape. Starting on the back side, depressions are made in the center of each "wing". Again, the piece is turned over and the scribing tool is used along the indention in the wing shapes to accentuate these depressions. Next, the outer edge of the whole piece (worked in sections) is angled on the phone book and curved slightly by depressing the edge. The final shaping step is to roll the "bail" tab down onto the back side (Figure 3 and figure 10 shows pendant's finished impressed shape).

Applying the First Coats of Enamel
First prepare a sifter half full of dry 80 mesh enamel. I like using Thompson's 1990 black because it gives uniformity to all backs for multiple works, it covers the LCE-2 uniformly in color and if applied thinly or fired several times, the edges have a deep transparent blue/black quality. Once the dry 80 mesh enamel has been placed into the sifter, apply LCE-2 clear with a brush. A stippling or dobbing application is used to get a sufficient coating. Apply the LCE-2 inside the bail if one has been used. As soon as you have sufficiently coated the copper with the LCE-2, immediately sift on the dry 80 mesh enamel into the wet LCE-2. This is why I suggest preparing the dry 80 mesh enamel in advance, because the LCE-2 should be "wet" when the dry enamel is sifted into it. The LCE enamels dry fairly quickly, and if they are not completely "wet" when sifting the dry powder on, the dry powder will not adhere very well and some may fall off when working the front side of the piece. After sifting the dry powder onto the wet LCE-2, lightly tamp down the 80 mesh enamel with your fingers.
For the front side I like to use 2110 Ivory Beige as my first coat. This fires to a beautiful golden color direct on copper. Transparent clear fluxes or other transparents which fire well direct on copper may also be used. First prepare your sifter 1/2 full of dry enamel. Use a Prevail sprayer or atomizer to apply a 50-50 solution of water and Klyr-Fire or any organic binder (Gum Tragacanth, Enamel Holding Agent etc.) Spray enough to wet the surface, but not running or dripping off. Immediately sift the dry 80 mesh enamel into the wet gum solution. Again, it is important to have your dry 80 mesh enamel prepared to sift before applying the gum solution.

For pieces that have sloping or curved surfaces the enamel cannot just be sifted holding the piece flat in your hand or on a pedestal. The piece must be angled while holding it in your hand so that on the sloped areas the enamel is falling perpendicular to the sloped area. Otherwise you will have an avalanche effect. The enamel hitting the slope will bounce off and fall down into the valley resulting in a heavy buildup in the valley and too thin of an application on the slope which may burn out when firing. Alternating light coats and light sprays of gum and water solution 2 or 3 times will get the best result.
Let both sides dry thoroughly. This is especially important in a workshop situation as some students may not fully realize the importance of the enamel being completely dry. If it is even slightly damp and placed into a hot furnace, the dampness will immediately turn into steam and blow off the enamel in spots. It is best to place the piece on a trivet on top of the furnace or under a heat lamp for 15 minutes. Once it is assuredly dry (gently touch the trivet, if it is uncomfortably warm, it should be dry) then fire at 1450- 1500°F. for 2-1/2 minutes. If any reddish or brownish colors seem apparent when a clear transparent or other transparents direct for copper have been used, you may want to repeat this first firing to insure that all the copper oxide has been dissolved on the front side (see figure 10).
After the piece is cool, use a medium file or 150 grit alundum stone to remove the oxide off the edges of the copper. This should be repeated every time the piece is fired. It prevents small oxide particles from popping back onto the front of the piece in a subsequent firing and also keeps the enamel fresh to the metal edge, minimizing a black "burn" area around the piece.
Options for Proceeding Further
At this point you have several technique options to choose from.
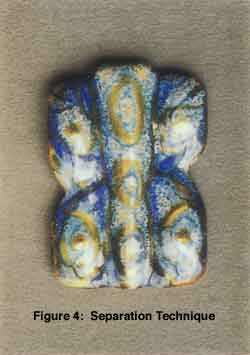
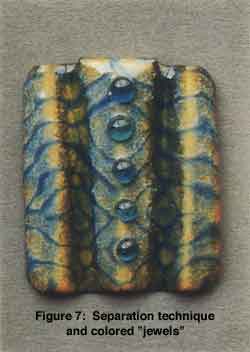
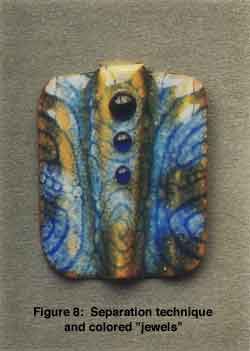
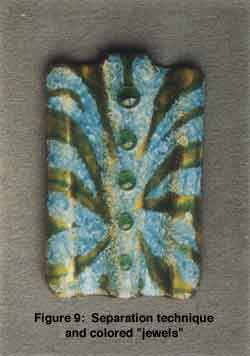
Separation Enamel
On some pieces I like using the separation technique. Select a light colored opaque enamel. One I find works well with any color is 1030 opaque white. A light spray of gum solution is applied to the front and then a light sifting of a light colored opaque is applied. Another light spray of gum solution is applied. Again, dry the piece thoroughly on top of the furnace or under a heat lamp. You now have the choice of firing the opaque enamel, or sgraffitoing lines, areas or patterns into the unfired, dry, gummed opaque enamel. Dump off any excess enamel. Fire to gloss. When cool, stone or file edges. Clean and dry piece. Next apply a medium to dark transparent over the entire surface using the spray/sift method described above. Dry thoroughly and fire to gloss. Stone or file edges, clean and dry.
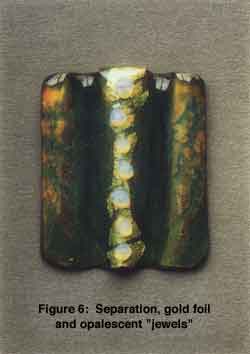
Now the separation enamel is ready to prepare. I prefer using the dry powder (SE-2 dry) and mixing on a tile or piece of glass using the 50/50 mix of Klyr-Fire and water and working the mixture up to a heavy cream consistency using a palette knife. Paint repetitive lines, 1/8″ to 1/4″ apart, in patterns: circles with dots inside, squares within squares, flowing wavy lines, occasional dots etc. The lines should be sufficiently charged with the separation material. If the concentration of the separation material is not sufficient, the end result may not be very noticeable. For a good separation effect, the 2nd and 3rd applications of enamel (your opaque and transparent coats) should be kept thin. Your choice of opaque and transparent colors should have good contrast. The separation application should be of a sufficient concentration. The painted lines should playoff of one another, and the firing should be a little hotter and longer than a normal firing.
Gold and/or Silver Foil, Underglaze Black, Transparent Enamels
After your first firing (as mentioned previously under Applying the First Coats of Enamel ) you may choose to apply gold and/or silver foils for the second firing of the piece. Cut foil between stiff velum or tracing paper. Lay foil onto piece using a wet brush. Charge the brush with water and apply water to one edge of the foil, preferably a top edge so that gravity and capillary attraction will pull the water underneath the foil, securing it to the piece. Foils may overlap one another if desired. Dry thoroughly and fire sufficiently to adhere the foil to the underlying enamel, about 1450°F for 1-1/2 to 2 minutes. When cool, stone or file edges. Underglaze black (P-3, dry powder) is mixed much the same as the separation powder described above, although the black can be thinned down to the desired intensity. Too heavy of a concentration of underglaze black may cause pitting in a subsequent coat of transparent enamel. Apply the underglaze with brush or sponge (for a textural quality). This can be applied to any part of the piece to develop lines, patterning and texture. The underglaze can be applied to the edges of the foil to soften the edge. After the underglaze dries, a wooden sgraffito tool, comb etc., can be used to sgraffito lines or textures into the dried underglaze black, exposing foil or enamel underneath.
Select 3 or 4 transparent colors, prepared to sift. Lightly spray the piece with water/gum solution. Then take index cards or other suitable stencil paper and sift different colors in various areas using the stencil to define lines and areas of color. Dry, then fire until glossy. The foils and oxides can be repeated to highlight certain areas and then covered again with transparent colors.
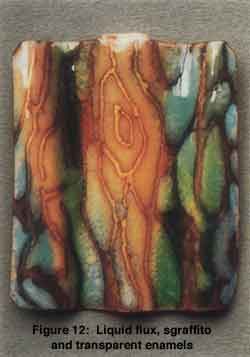
Liquid Enamel
Another option is using liquid clears BC-303L, BC- 969A or BC-1070 opaque white. These are used after the copper has been formed, prior to any enamel application. BC-303L is a medium fusing clear. It is less likely to break up (pull-through) under a subsequent coat of enamel. BC-969A is a softer clear and may breakup under subsequent coats of enamel producing textural qualities. BC-1070 opaque white will produce different shades or qualities of transparents used on top if compared to the same transparents used over clear enamel bases. It is not that one is preferable over another, it is that they each have their own unique qualities. It is up to the user to decide which look they like best.
These enamels tend to settle in the bottom of the container as they set on the shelf. Use a small mixing bowl and remove 1/2 to 1 cup of the "clumped" material. Using your hands, knead the material slowly adding water. Work out any lumps. The desired consistency should be somewhat thicker than "cream", but not as thick as a "milk-shake". A good test is to submerse clean, dry fingers into the material. As you lift your fingers out, they should be uniformly covered with the liquid enamel.
After the liquid enamel is prepared to the right consistency, it may be applied by dipping the entire piece into the liquid enamel, removing with pliers which have been dipped into the enamel before retrieving the piece and then rotating the piece, in an effort to achieve as uniform a coat as possible. Other ways of applying the liquid enamel are pouring some of the liquid onto the piece and letting it run in different directions, brushing it on in specific areas or splattering it on with a brush. The piece is then set on a trivet and placed on top of the furnace or heat lamp to dry thoroughly.
After the enamel has completely dried, a wooden tool is used to sgraffito lines, areas, patterning etc. Dump off excess enamel Fire at 1450-1500°F. This should be fired a little hotter and longer than normal firings. If it looks brown after firing, fire it a second time.
After the piece is cool, submerse the piece in 1 part nitric acid to three parts water (always add acid to water) and leave in the acid until the copper oxide has been dissolved from the bare copper areas. Sparex No 2 will also work but the piece should be left in for a longer time. Rinse the piece off with water and scrub vigorously with a glass brush. Rinse again with water and dry immediately with paper towels to prevent water spotting on the bare metal areas.
Spray lightly with water/gum solution and apply various transparents using stencils as mentioned above. Dry, and fire sufficiently-a little further than a gloss firing.
Jewels
As a final embellishment on some of the works I like to fire glass spheres as another means of breaking a flat surface. These will glow in the light and have a nice feel to the touch.
To make the spheres you will need some lump enamel and sheet mica. Select lumps trying to find several of the same size, grading from larger ones down to smaller ones. Place these on the mica which is placed on a grid. The firing is critical. If not sufficiently fired they will not be perfect spheres. If fired too long they begin to melt down into a puddle. I usually fire at 1450°F for about 1 minute. After 45 seconds I will peak through the door and watch as the lumps begin to soften and round up. At the point that they look like spheres they are quickly removed from the furnace. After they are cool, sandpaper may be used to remove any excess mica which has fused to the bottom of the sphere. This is not too critical as they will still adhere to enamel with some mica stuck to the bottom of the sphere. Use full strength KIyr-Fire on the area(s) that you want to place your sphere. Using tweezers place the sphere on the wet KIyr-Fire. Dry. Fire at 1425-1450°F just long enough to soften the underlying enamel, about 1 minute, more or less. I usually look at the trivet during the firing. At first it looks black. The firing should be sufficient when you start to see the trivet change from black to a deep orange-red, in other words, when the trivet starts to develop color. If you fire too hot or long, the spheres start to loose the shape and begin to sag.
Painting Enamels

Malleable copper is also an ideal base metal for miniature style painting using Thompson's Painting Kit and also Thompson's new Acrylic Painting Enamels. The thin gauge copper eliminates "hair lines" or "crazing" that may develop when firing painting enamels over opaque white covered 18 gauge copper. Thin copper has been used traditionally over the centuries for miniature painted enamels as well as in more recent times, photographic enamels placed on tomb stones.
Oval, circles, squares or rectangles would be formed using the doming technique covered previously. Apply enamel to the back in the same manner as mentioned before. The front side should first be covered with 1010 opaque white and then a light sifting of either 1030 or 1040 (which is slightly translucent). Dry and fire to full gloss. Painting techniques using the Painting Kit or the Acrylic Enamels have been covered in previous issues of Glass On Metal (Vol. 11, No. 1 and Vol. 15, No.5 respectively). A coating of 80 mesh 2020 clear transparent can be sifted through a l00 mesh sieve as a final coating which gives a depth appearance to the painted enamels.
Related Articles

China Painting on Enamel Process

The Enamelware of Tibor Kopocs
Overglaze Technique

The Creation of The Quickening


The All-In-One Jewelry Making Solution At Your Fingertips
When you join the Ganoksin community, you get the tools you need to take your work to the next level.
