
Champleve – Photo Etching with PnP Paper
The use of PnP paper-originally designed to create printed circuit boards-to meet the artistic needs of metalsmiths, jewelers, and enamelists. With results similar to photo etching, but without the expense and more complex procedures, the heat transfer method using PnP has revolutionized the world of artistic etching. Now, the procedure is not only used throughout the USA, but also in many other parts of the world...
6 Minute Read
Paul and I first refined the use of PnP paper - originally designed to create printed circuit boards - to meet the artistic needs of metalsmiths, jewelers, and enamelists (see Glass on Metal, Volume 15, No.3, August 1996). With results similar to photo etching, but without the expense and more complex procedures, the heat transfer method using PnP has revolutionized the world of artistic etching. Now, the procedure is not only used throughout the USA, but also in many other parts of the world.
![]() However, throughout the years, while teaching numerous workshops in this technique, I have been asked this question consistently: "Can one use photographs?" Originally, my response had been that only black and white line drawings were appropriate. Black lines will perform like a resist and will not etch, while white registers "clean" and will etch out. Unlike printmakers, who can create a range of gray tones on paper, the metalsmith traditionally etches away an area in the metal or leaves it intact. In other words, although a stippled or irregular area in metal can be achieved, metal usually is totally etched out in a given area, or it is not. For enamelists working in champlev?, it is especially important to have "clean", etched out areas (unless one is doing experimental or unconventional work) in which to inlay the enamel.
However, throughout the years, while teaching numerous workshops in this technique, I have been asked this question consistently: "Can one use photographs?" Originally, my response had been that only black and white line drawings were appropriate. Black lines will perform like a resist and will not etch, while white registers "clean" and will etch out. Unlike printmakers, who can create a range of gray tones on paper, the metalsmith traditionally etches away an area in the metal or leaves it intact. In other words, although a stippled or irregular area in metal can be achieved, metal usually is totally etched out in a given area, or it is not. For enamelists working in champlev?, it is especially important to have "clean", etched out areas (unless one is doing experimental or unconventional work) in which to inlay the enamel.
Nonetheless, the constant queries set me to thinking-could the photographic process somehow be adapted to this method? The use of photography, especially ones that capture texture and patterns, could add a whole new dimension to etched metal and enamel work.
The Challenge
The first challenge was how to deal with the gray tones prevalent  in all photography. Randomly, a few photographs were Xeroxed, transferred to PnP paper, heat transferred to metal, and subsequently etched. The results were very erratic. As suspected, the pure black and white areas transferred and etched beautifully. The gray tones, however, either translated as slightly imperfect black areas (mostly unetched but with "pinholes") or wildly imperfect stippled areas (partially and very irregularly etched patches).
Some of the etched results were not uninteresting, but there was no sense of control. For example, a partially etched section (from a gray tone in a photograph) might contain an interesting random pattern, while another partially etched section simply would look messy and blotchy-like a result of sloppy technique! It made sense at this point to consider some "refinement" of the Xeroxed photographs, just as I had previously done with simple black and white line drawings. First, it seemed important to use high contrast black and white photographs, when available. This selection would emphasize the pure blacks and whites and cut down on the tonal quality of the photograph. (It should be noted that color photographs could be used, but a lot more "refinement" work on the xeroxes would be needed to "clean them up".) Also, photographs with too many small, unclear details were eliminated. Photocopies of the originals were made, with judicious use of the "darker/lighter" control on the photocopy machine to ensure the best quality reproduction. Some photographs were enlarged somewhat in order to clarify the design and details.
 Next, the black fine point magic markers and white-out pens were used for "refinement" of the Xeroxed photographs. Black areas were made blacker , white areas were "cleaned up" (same process as with the line drawings) and artistic judgment was used to alter the gray areas creatively. Some grays that were distracting were either totally whited-out or blacked in. Other areas were worked into a more controlled pattern and some were left alone, to be etched randomly when erratic results would be an asset.
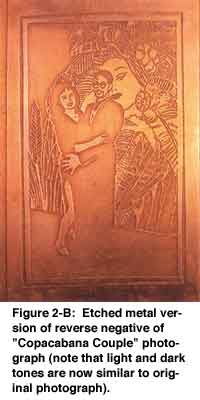
At this point, the "improved" photo/Xerox was transferred to the PnP and subsequently to the metal (again, see Glass on Metal? , Vol. 15, No.3, Aug. 1996) and then etched. This time, the results were impressive, but one result had not been anticipated. All the negative (i.e.) black areas in the original photo/Xerox were now positive (unetched, appearing "light") in the metal, while all the positive (i.e. white) areas in the photo/Xerox were negative (etched away, appearing "dark") in the metal. The explanation for this occurrence is that any area in the transfer registering as black will not be etched; in other words, the black acts as an acid resist. In many cases, this reversal is not important and sometimes even an interesting variation on the original, but in other instances, it is disturbing. For example, a photograph of a white building with darkened windows would etch out as a recessed (etched-out/"dark") building with raised (unetched/ "light") windows.
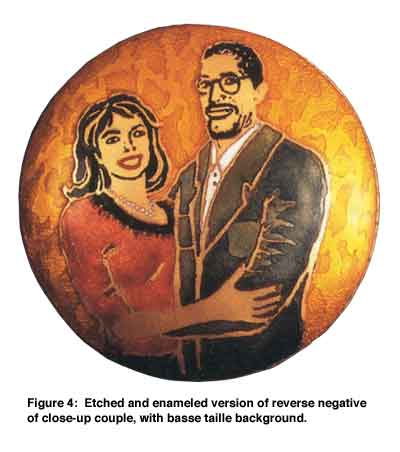
The solution to this dilemma is to reverse the tones in the original photograph, either by having a copy center create a reverse negative or altering a scanned-in photo image on the computer. A reverse negative of the aforementioned building would now present a dark building with light windows. However, when etched in the metal, the image would appear as in the original photo.
Please note that after the reverse negative is created, it too must be "refined" as previously described. The end results of all these adjustments are extremely satisfactory, although there are some variations and/or simplifications from the original photographs due to the necessary "refinement" process.
Another application in creating artistic images to etch with PnP paper involves enlargement of drawings.
Usually I create my designs within a relatively small format (a 6″ or 8″ square or circle). But often I want to have a much larger piece as the end result. In this case, after creating the original drawing, I will enlarge it on a copy machine several times until I obtain the desired size. Sometimes I have to divide the original into small "grids" and enlarge each of these "grids" separately, if the copy machine I am using cannot accommodate enlarged versions of the original past a certain point. It is very important to enlarge each segment the same percentage or they will not match up later!
In any case, once the drawing is the desired size-either in a single piece or in segments pieced together-the black lines are blackened further (they usually have lightened up considerably in the enlargement process) and the white areas are "cleaned up". At this point "fills" may be inserted into selected areas, or these may be inserted before enlarging; it depends on the size and effect desired from the "fill".
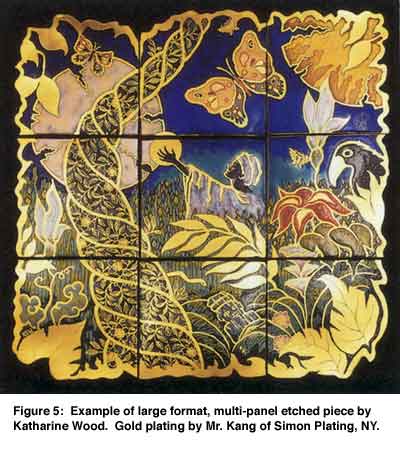
The enlarged drawing next must be transferred to the PnP paper. If one is using standard size (8-1/2″ x 11″) PnP paper, the enlargement must be cut up into sections (either grid-like or free-form) and each section (or possibly a couple of sections, depending on size) Xeroxed onto the PnP blue paper. There is now anew larger size PnP blue paper (11″ x 17″) and, if the enlarged design fits into this size, the entire design can be Xeroxed in one piece onto it. Of course, the copy machine must also accommodate both the larger size drawing and the larger size PnP. Next, the image is transferred to the appropriate size metal and etched out. If the piece has been divided into segments, these will be reassembled after the etching (and enameling) is done.
A final note: always, when doing any kind of etching, it is absolutely essential to refer to a reputable etching manual, both for good results and for safety procedures, including proper acid disposal (ferric chloride is used with PnP). Etching instructions must always be followed with care! With this in mind, the artist should obtain beautiful results in a safe and effective manner.
Related Articles

Etching Options for Champleve
Copper, Brass and Bronze Advanced Etching

Champleve Enamelwork with Ferric Chloride

Photoetching for the Studio Jeweler


The All-In-One Jewelry Making Solution At Your Fingertips
When you join the Ganoksin community, you get the tools you need to take your work to the next level.
