
Combining Enameling Techniques for Jewelry Making
Enamel technique has progressed in a logical and practical direction through the ages, advancing when inspiration, need or new technology permitted. Modern technology has indeed given us new approaches to technique but only from the grounded foundation of knowledge that existed before.
6 Minute Read
This article talks about how combining enameling techniques is done to create unusual and unique designs for jewelry making.
Stencil / Liquid Enamel/ Sgraffito / Acid Etch
"There's nothing new under the sun." This old adage rings true when considering most enameling techniques that are used today. Enamel technique has progressed in a logical and practical direction through the ages, advancing when inspiration, need or new technology permitted. Modern technology has indeed given us new approaches to technique but only from the grounded foundation of knowledge that existed before.
Larissa Rosenstock in the last issue of Glass On Metal describes the technical approach to her work as mixed media. A work may employ the use of under glaze, engraving of the metal, foil, sculpting of the undercoat with diamond bits, opal, transparent and opaque enamel, grisaille and painting all in one piece.
Many individual enameling techniques can be used in combination with other techniques to result in a variety of effects. Traditional and contemporary techniques often make use of more than one identifiable technique, for example, grisaille involves sifting, painting, sgraffito, and the use of fine gold accents.
Although there may be few techniques today that are new and original, the combining of existing techniques in new ways may result in a fresh approach to an old idea. This project involves the use of stenciling, application of liquid enamels, sgraffito, acid etch and transparent enamel direct-on-copper. There's nothing new here, all the techniques and materials have been around for a while. However, the combination of these techniques may be new for some readers, and the emphasis on using transparent enamels direct-on-copper may be new for others.
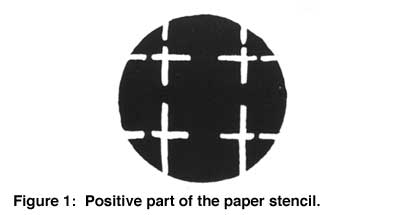
The stencil is used to divide and define the whole composition into distinct areas. The resulting areas are divided into positive and negative areas traced onto industrial paper toweling. The negative (open) area of the paper stencil is covered with a direct-on- copper transparent. After firing and pickling, the exposed copper area (the positive part of the paper stencil) is covered with liquid enamel, dried, and then sgraffitoed. A very pleasing contrast is obtained between the direct-on-copper transparent and the liquid enamel area. Next, the copper that is exposed by sgraffito in the liquid enamel is pickled in acid and then covered with a direct-on-copper transparent.
Procedure
Choose any kind of form; dish, bowl, or plate, flat copper for a wall piece, just about any shape or form will work with this procedure. After choosing a form, contemplate the shape and interior space. Roughly up to half of the space should be designated for the negative part of the stencil (open part of the stencil - opposite of positive part shown in Fig. 1). Industrial brown paper towels work well as stencil material. Prepare the copper for enameling, and cut the stencil to your design. Place the paper stencil over the copper and wet it with water - an eye dropper works well to apply the water. Saturate the stencil with water until completely attached to the copper.
Select a transparent enamel that works well direct-on-copper. Some of my personal favorites in Thompson lead free enamel are 2110 Ivory beige, 2520 Aqua, 2325 Gem green, 2220 Chartreuse, 2170 Van Dyke brown, 2625 Winter blue, 2660 Nitric blue, 2680 Prussian blue, and 2755 Concord purple.
Sift a light application of the transparent enamel over the stencil. The dry sifted enamel along the edge of the stencil will absorb some of the water in the stencil paper. To prevent a "shore line", lightly spray this coating with 50% gum, 50% water solution. Sift a second light application of the same transparent enamel and again, lightly spray with gum solution. Take a dry paper towel and soak up any excess water in the paper stencil, being careful not to move the stencil position. With tweezers, pick up the edge of the stencil paper and remove in one continuous motion. Dry and fire the piece at 1500?F for 2 or 2- 1/2 minutes.
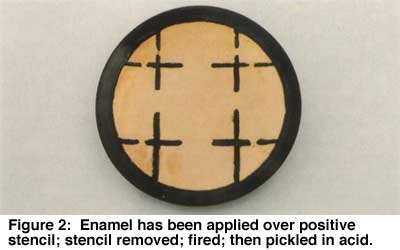
When cool, pickle the piece in 1 part Nitric acid to 3 parts water or pickle in Sparex No.2 for 5 to 8 minutes. Rinse with water and glass brush exposed copper surface ( Fig. 2).
Next Thompson's BC-969 or BC-303 is prepared for application. BC-969 is a "soft" liquid clear and win break through the transparent coat when fired resulting in a "bubbled" textural quality. BC-303 is a harder liquid clear and does not break through the transparent coat when fired. This results in a solid transparent color with no break-through texture.
These base coats tend to settle in the bottom of the container over time. Take two or three spoonfuls of the thickened base coat and place into a separate clean container. Add a very small amount of water and begin mixing. Continue to add small amounts of water until the consistency reaches something heavier than cream, but thinner than a milkshake.
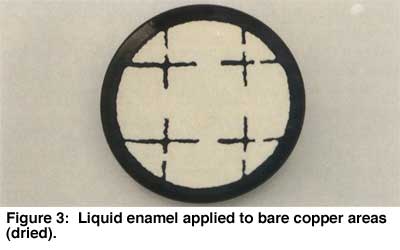
The pickled copper should be free of any oil or grease. You should not touch the bare copper with your fingers before applying the liquid enamel. The liquid base coat is applied with a wide soft brush. Apply as evenly as possible. Tap the edge of the piece with a metal instrument. This will settle the base coat into a smoother application.
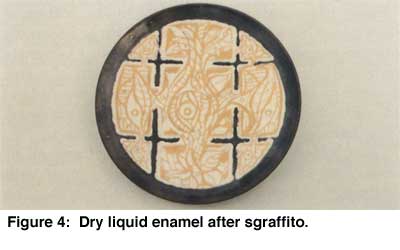
Dry the base coat until all water is completely evaporated (Fig. 3). Sgraffito your design with a sharpened wooden stick or plastic point (do not use a metal scriber as this will scratch the copper). Different thicknesses of line may be employed, but some should be sufficiently wide to expose enough bare copper to make use of the direct-for-copper transparents (Fig. 4). With a soft brush, remove any loose base coat from bare copper areas.
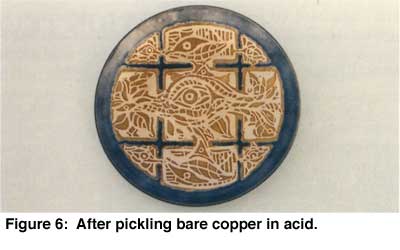
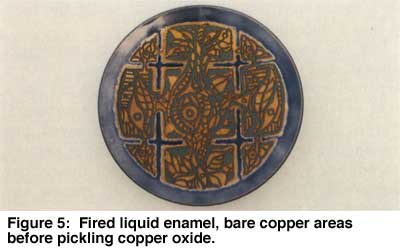
Fire at 1450?F for 1-1/2 to 2 minutes or until base coat becomes transparent (Fig. 5). When cool, pickle in acid until all copper oxide is removed from bare copper areas (Fig. 6). If desired, the piece can be left in the acid for a longer time to etch out some of the exposed copper. When covered with enamel the piece begins to take on the look of champleve.
Some oxide may remain along the edges of the fired base coat. This results in a thin dark line around the fired base coat areas. Glass brush the exposed copper until shiny.
Spray or brush on gum solution and apply an adequate covering coat of the direct-on-copper transparent over the entire piece. On some pieces I have used a light colored transparent such as 2110 Ivory beige. Medium and darker colors can be applied over the 2110 in specific areas for a multi-colored composition.
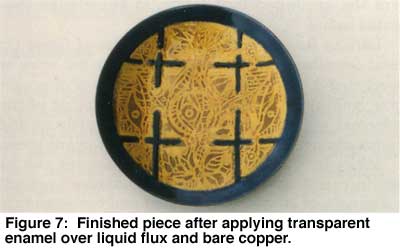
Two firings of the direct-on-copper transparent may be required to completely absorb the copper oxide. Two applications of the direct-on-copper transparent may be required for desired color intensity (Fig. 7).
Options
There are variations to this procedure which expand the possible end results. After firing the liquid enamel and pickling the exposed copper, transparents can be wet-packed over the clear enamel areas only, keeping the bare copper areas bare. After firing the transparent colors, the bare copper areas are again pickled and then can be gold or silver plated.
Another option is to eliminate the pickling of the bare copper areas. Apply the transparent enamel right over the oxidized copper and fire. The copper oxide darkens the sgraffitoed line areas which contrasts very well with the liquid clear areas.
Related Articles

Metalsmith ’97 Winter: Exhibition Reviews

Fads and Fallacies: First Impressions

Enameled Spiral Beads

Klaus Dupont: Joyous Compositions


The All-In-One Jewelry Making Solution At Your Fingertips
When you join the Ganoksin community, you get the tools you need to take your work to the next level.
