
Practical Jewelry Rendering
Gems are a lot of fun to render, but because they require some precision, you might want to render a gem first before spending much time on the whole piece, Transfer the outline and paint the stone first. When you like the effect, complete the rest of the rendering around the stone. Where appropriate, use a template to create a delicate colored pencil outline of the stone.
5 Minute Read
Gems are a lot of fun to render, but because they require some precision, you might want to render a gem first before spending much time on the whole piece, transfer the outline and paint the stone first. When you like the effect, complete the rest of the rendering around the stone.
Cabochons
Opaque Stones
- Where appropriate, use a template to create a delicate colored pencil outline of the stone.
- Select a color (pencil or paint) that best illustrates the color of the gem. Create a wash of this base color across the entire stone area.
- To create the shaded section, darken the base color by adding its compliment. Paint or draw this on the lower right quadrant, following the contour of the stone. For pencils, this is usually a matter of laying one layer over another.
- Add a thin crescent of white wash along the upper left section where the light is closest. Add a sliver of this thin wash on the lower right quadrant, where light bounces back onto the stone. Even if the rest of the rendering is in pencil, use paint for this reflection. Allow this to dry, then sharpen the upper crescent with a thin band of pure white straight from the tube. Paint in prongs or a bezel as called for in the design.
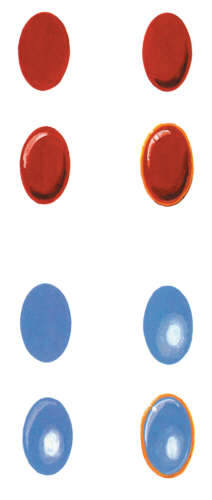
Translucent Stones
- Repeat steps 1 and 2 above.
- Repeat the shape of the stone with a circle or oval of white, slightly to the right and below the center of the stone. Allow this to partially dry then feather it outward with a damp brush. For colored pencils, use white paint to make the dot and white pencil to blend the light outward.
- Repeat step 4 as described above.

When using a variegated stone such as an agate, study the stone before starling, It's usually easier than you might think to mimic the pattern and colors of a stone.

Faceted Stones
The larger the Stone, the more important the details become. The examples here use a very large stone for the purpose of illustration, but as the size goes down the details can be scaled back. In the case of melees and pave settings, for instance, a few well placed sparkles can carry most of the load. The following information refers to stones with a diameter over 3 millimeters. After perfecting this technique you'll be able to edit the information as needed for smaller stones and unusual shapes.
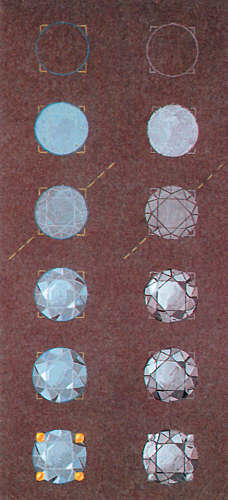
- Use a template to draw a thin pale pencil line around the stone. Lightly indicate the location of prongs (if appropriate) and leave these areas unpainted or plan to cover with an opaque paint later.
- Create a pale wash of the base color for the selected stone. For a diamond this will be white as illustrated. When using paints, this color is achieved by diluting the pigment with water, not by lightening it with white. A ruby, for example, will start with a thin wine-colored wash, not pink. Divide this wash into two areas in your paint tray.When using colored pencils, achieve this effect by using at least three shades of a color - for instance a medium-red, a maroon and a deep red-violet. This range of colors, used in conjunction with a black or dark blue and used at various pressures will provide an adequate range of hue. Anything less will probably be too limited to be convincing.
- With a white pencil or a fine brush and white paint, draw a simplified pattern of facets.
- Imagine a line at a right angle to the direction of the incoming light. Facets to the right of this will be predominately darker while facets to the right will be lighter, though note that both values occur around the stone. Mix black for a diamond or a complimentary color into the base tint and paint facets one by one.
- Use white added to the base color to create the same effect moving toward lighter tones as you move from that line toward the light source, ending with a white facet in the upper left. When using paint, this is achieved by adding white, step by step, to the second puddle of base color.
- Allow the paint to dry and use a tiny amount of white on a dry brush to make a few sweeping hairlines diagonally across the table. If necessary, use a very sharp colored pencil or a knife to refine the facet lines and edges.

Pearls and Beads
Pearls are available in a range of colors, so this information will need to be modified to achieve exactly the right hue. Because the color shifts are subtle, only tiny additions of color will be necessary.
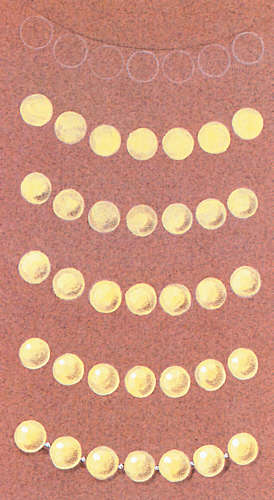
Pearls
- Use a template to draw pale circles; use a hard lead on white paper and a white pencil when working on colored stock as shown here.
- Mix a tiny amount of golden yellow with white to create a creamy opaque color. A very small amount of red will warm the tone slightly. Use a thin wash to allow the warm tone of the paper to show through. Paint this evenly in each of the circles and allow it to dry.
- Shade the lower right section of each pearl with a cardboard stump rubbed in graphite. For delicate work, make a miniature stump from a Q-Tip or lollipop stick.
- Add white to the original creamy mixture and use it to paint an oval or kidney-shaped highlight in the upper left quadrant.
- Make a thin arc-shaped line with the creamy mixture outlining the lower right edge of each pearl, then paint a reflective white dot in the upper left to indicate a light source.
- Paint a dot of color to indicate the knots between pearls; after the paint has dried this can be shaded slightly with a sharp graphite pencil. Use a stump to create a shadow below and to the right of each pearl.
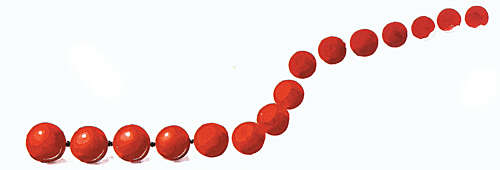
Opaque Gem Beads
- Mix a paint or select a colored pencil that best matches the full color of the bead. Use this to fill in the upper left two-thirds of the form.
- Mix with the compliment or a neutral tint to create a shadow, and paint this in the lower right, blending it into the full color.
- Use a wash of white mixed with the original hue to create an oval in the upper left.
- Create a highlight in the upper left with pure white. Use either a single dot, a pair of dots, or a dot and oval wash; be consistent. Add shadows as usual.
Related Articles

GZ Art+Design Spots 2008 2

Global Village of the Design Elite

Deborah Aguado: Use of Image and Enigma in Jewelry

The Second Round of Orders Has Higher Profile


The All-In-One Jewelry Making Solution At Your Fingertips
When you join the Ganoksin community, you get the tools you need to take your work to the next level.
