
Metal Engraving Tools Explained: How To Choose And Prepare Gravers For Jewelry Work
Many industries have need of specialized engravers, for instance those who make dies, who cut stones and glass, and others who carve reliefs. Though a goldsmith might call on a specialist for certain jobs, it is useful to have a general understanding of the technique and sufficient skills to use gravers for simple everyday tasks at the bench.
8 Minute Read
Many industries have need of specialized engravers, for instance those who make dies, who cut stones and glass, and others who carve reliefs. Though a goldsmith might call on a specialist for certain jobs, it is useful to have a general understanding of the technique, shop for proper equipment and sufficient skills to use gravers for simple everyday tasks at the bench.
How the Engraving Tool Works
Engraving tools are miniature chisels made of hardened steel. They are chip forming tools and subject to the same forces described in Chapter 5. In proper engraving a sharpened tool is set against the metal at a specific angle and pressure applied both downward and forward. The tool buries itself into the sheet, forms a chip, and pushes that curl of metal ahead of it as it cuts.

"The proper angle will depend on the shape of the graver, the quality of the desired line and the metal being cut."
The angle of attack is important to achieve a controlled and uniform cut. If the angle is too steep the tool digs itself into the sheet making it impossible to push it forward. The effort to overpower a buried tool can result in a loss of control and a broken tip. If the angle is too shallow the point never gains purchase on the sheet. There is no chip formed and no cut made. Because the tip of the tool is not caught by the metal, the tool easily slips, creating a nasty scratch.
The proper angle will depend on the shape of the graver, the quality of the desired line and the metal being cut. Understanding and responding to these factors requires a sensitive touch and considerable experience.
Engraving Tool Shapes
Engraving tools, called gravers, are precise instruments. They must be made from top quality steel, shaped and sharpened to specific angles, and fitted into handles that provide comfort and control. Commercially available gravers are made from a highly refined fine grained tool steel. A high speed steel is to be recommended for working harder materials and to have the greatest possible durability; there are even engraving tools with carbide cutting tips.
"A high speed steel is to be recommended"
Gravers are usually sold with preshaped tips, but these angles will need to be reworked before the tool is used. Gravers can be purchased from jewelry supply companies in the shapes shown in figure 10.21.
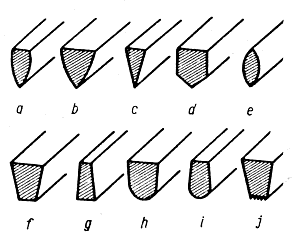 | Gravers forms: a) small pointed (onglette) graver. |
Onglette
This popular shape is shown in two sizes in 10.21a and 10.21b. The sides curve slightly outward from a top edge that is flat and can range from one to four millimeters wide. This tool offers great versatility, cutting a thin line with a light stroke and widening as it is rolled on its side or pressed more deeply into the sheet. It is preferred for cutting letters because of the ease with which it cuts a line of increasing width
The Best Onglette Gravers
Buy List
Knife Graver
Illustrated at 10.21c, this graver is a slim, straight-walled version of the onglette. It is difficult to control on curves and rarely used by itself, but it cuts deep hair-thin lines. It is often used to add delicate embellishments to figures cut with other tools.
The Best Knife Gravers
Buy List
Beveled Graver
This is the stout sibling of the wide onglette, figure 10.21d, used to make bold cuts in tough metal. The side surfaces form an angle of 100¡, with the upper sides being parallel. The width of the back can be between 1.5-3 mm.
The Best Beveled Gravers
Buy List
Oval Graver
This tool, shown at 10.21e can be considered a slim version of the onglette, but in this case the pointed oval is not truncated with a flat spine along the top. In practice this shape offers a blank that is ground as needed to create a tool to shave metal from within tight enclosures. This is the tool, for instance, that is used to carve a seat for a stone inside a bezel wall.
Flat Graver
This tool has a flat base, or ÒbellyÓ that can be used to carve away unwanted metal, as for instance when removing excess solder. The cross section can be trapezoidal (figure 10.21f and g) or a rectangle (not shown). This is also the tool used to make decorative wiggle cuts. It is the practical workhorse of the graver family, being used less for ornamentation than shaving, scraping, and cutting textures. Flat gravers are available in widths from 0.2 mm to 5 mm.
The Best Flat Gravers: Quick Change
Buy List
The Best Flat Gravers: Parallel
Buy List
The Best Flat Gravers: Tapered
Buy List
Round Graver
This name is deceiving because the tool itself, pictured in two sizes at 10.21h and 10.21j, is not round. Nevertheless, the groove it cuts is a round-bottomed trench and it is from this the name is derived. As shown, the side walls can be either parallel or sloped. This tool is among the easiest to control and is therefore useful for all kinds of decorative work.
The Best Round Gravers: Quick Change
Buy List
The Best Round Gravers: Tapered
Buy List
The Best Round Gravers: Blanks
Buy List
The Best Round Gravers: Stepped Blanks
Florentine Finish Graver
This tool looks at first glance like a flat graver, but closer examination will reveal delicate lines cut lengthwise into the belly. These cut fine parallel lines into the surface, an effect that is used to ornament an otherwise plain surface while simultaneously protecting it from wear and fingerprints.
Get Them All: Our Favorite Basic Graver Set

Preparation of the Engraving Tool
It is customary that graver blanks are furnished in a length sufficient to accommodate the largest hand. This means that the rest of us must start by shortening them. Grasp the tool vertically in a vise with the unwanted portion of the tang projecting up. Strike a vigorous blow with a steel hammer sideways against the tang and it will snap off cleanly. To prevent the tip from shooting across the room, catch the broken off part in a towel or rag held against the vise.
Reshape the tang by grinding, either with a bench grinder, sanding machine, or appropriate wheels on a flexible shaft machine. The graver is secured by friction into a handle in the same manner as a file; secure it into a vise and tap the handle into place with a mallet. As the tool becomes shorter through numerous sharpenings, a long handle is replaced by a shorter one. Though the grip might feel a little awkward at first, it will become more comfortable with experience. If your hand muscles get cramped during engraving the tool is too short and should be replaced.
"Though the grip might feel a little awkward at first, it will become more comfortable with experience."
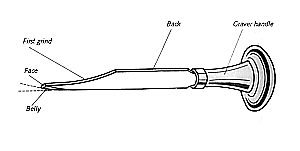
Proper shaping and sharpening of gravers is as important as it is difficult to describe on the printed page. The following description should be supplemented with practice and experimentation. Refer to figure 10.22, an onglette graver, for the following instructions. In general these same steps will be used for other shapes, though the angles of each tool differ slightly.
 |
| Graver with small rib partially ground back. |
Gravers are sold in their hardened state and any grinding should be done in such a way that this temper is preserved. Touch the tool lightly to the grinding wheel, dipping it frequently into water throughout the process to prevent it from overheating. If the steel starts to show color the temper has been compromised.
The first step is to narrow the area adjacent to the tip for 1-2 centimeters (1/2 - 3/4 inch). This will allow better viewing of the working tip of the tool and facilitate sharpening since there is less metal to be removed. Use a stone to cut away at least half of the top section at the tip, creating a gentle arc as shown. This edge should be made smooth because your fingers will be resting on it while cutting. Do not go too far back because this will weaken the tool.
The belly or underside of the graver is ground so it shows two symmetrical facets. If the tool was turned over, these might be said to resemble the roof of a house. The angle between these two facets will be between 30 and 60° depending upon the hardness of the material to be cut. A narrow tip cuts a finer line but is more fragile.
The face of the tool is then ground to a slope, typically around 45°, again depending on the material being cut; the finer the slope, the more delicate the tool. It might help to visualize a pencil point. If it is made very long and pointy it makes a fine line but often breaks in use.
"Both belly and face surfaces should be perfectly flat like the facets on a gem."
Both belly and face surfaces should be perfectly flat like the facets on a gem. This will insure that the angles where the faces meet are straight and crisp, which in turn is what makes the tool sharp. Grinding is usually done on an oilstone, working in a circular stroke, first on a coarse stone and then on a finer one. When the surfaces are correct - check with magnification - shift to a polishing stone like Arkansas or a fine abrasive paper. Follow this with a few strokes on a hard leather with a polishing powder to create a mirror bright finish.
Test the sharpening by sliding the tip of the graver along your thumb nail. A properly sharpened tool will stick immediately while an improperly shaped tool will slide off. There is no point in going to the metal until the tool passes this test. Cutting with a dull graver is tedious, uncontrolled and almost certain to ruin the work.
Related Articles
The Costs of Learning Hand Engraving

The Enamelware of Alan Mudd

Making a 950 Palladium Signet Ring

Engraving Machines


The All-In-One Jewelry Making Solution At Your Fingertips
When you join the Ganoksin community, you get the tools you need to take your work to the next level.
