
Enameling Techniques for Beginners
After you learn to apply enamels by sifting, wet packing, brushing on crackle and firing the base coats, you are ready for some of the simple techniques that require only a feel for color. You can design a piece by repeating one technique or learning to combine techniques. If you are enameling samples of the technique on 3" round or square 18 ga copper, one coat of crackle on the back is adequate. My beginners' course ended with Doris Hall's paisley design, which combined many techniques, and a simple cloisonn piece on a 1" disc of fine silver.
15 Minute Read
After you learn to apply enamels by sifting, wet packing, brushing on crackle and firing the base coats, you are ready for some of the simple techniques that require only a feel for color. You can design a piece by repeating one technique or learning to combine techniques. If you are enameling samples of the technique on 3″ round or square 18 ga copper, one coat of crackle on the back is adequate.
My beginners' course ended with Doris Hall's paisley design, which combined many techniques, and a simple cloisonné piece on a 1″ disc of fine silver.
You need to plan the sequence in order to combine techniques. Have a design and color combination in your mind or on paper, at least the beginning of it. Either start with the design and decide which technique should be used for it or decide which technique you want to use and select the metal and the base coat of enamel for that technique. You need to select either a particular mesh enamel or a liquid form enamel, a transparent or opaque and a light or dark color. All these decisions are for the base coat of enamel on the front of the metal. As you develop the piece, you need to continue to make these same decisions.
For an abstract design with areas of color, using dry or wet stencils and maybe some sgraffito areas, your choice of the base coat influences the selection of the enamel layer or layers over it in subsequent firings, e.g., a transparent blue over an opaque yellow will give you a green. With enamel, as with oil painting, you usually can cover up an unwanted fired color with an opaque enamel in the following firing, especially if you have not fired a heavy coat. If you are planning on six or more layers of enamel, then each coat, except for the base coat, should be a thin application of enamel. To add other techniques to this piece designed with stencils, transparent and opaque sifted enamels and sgraffito, a fine line black drawing could delineate all or some of the shapes you have created. There are an infinite number of choices you could make. When I first learned to enamel, I would daydream about combining an assortment of the enameling techniques.
Firescale
Bare copper, when fired, develops a layer of firescale. The longer and higher the firing, the thicker the firescale becomes on the bare metal. Sometimes, especially with a thick coat, it will flake off when the piece cools after the firing. The firescale layer expands and contracts with the firing as do metals and enamels. Most enamelists remove the firescale from the edge of a copper piece after each firing. When the piece has cooled, the firescale will usually chip off and could contaminate the enamel you are working with if you are sifting on another layer. With the firing, the color of the firescale changes after the second or third firing, from a rust tone to almost a black when a coat of flux is fired over it. (I still use this firescale line for my signature on the back of my pieces. Judy Stone describes this line in her design technique of Layering.) In addition to drawing into the base coat to expose the copper, you can cover the line with sifted flux before firing. This will produce a flux line instead of a black oxidized line. You can also combine both the flux line and the oxidized line in a design by sifting the flux over some of the sgraffito and leaving some of it bare copper.
You can also create a design with firescale. Dilute enameling gum with water 1:1. Brush the diluted gum in any shape or area on bare copper. Sift enamel over the entire piece, stand the piece on edge and tap it to remove the enamel from the ungummed areas. You then have the enamel in the design you have brushed on the piece with the diluted gum. If the enamel did not adhere everywhere you wanted it to be, you may use a small sifter to sift that same enamel over those areas. Fire at 1500°F, only to maturity. If you overfire, the firescale will be thick and could flake off if you enamel over it. The enamel areas will be edged with firescale. This technique is most effective with a pale opaque or a light color transparent for the first firing. When the piece cools, file off the firescale from the edge of the piece and brush the face of the piece to remove any loose firescale. The second layer of enamel can be flux or any light transparent enamel that is sifted over the entire piece and fired. This firing seals the firescale and your piece is ready to be developed further with additional layers of enamel.
Bubbling Through
Fire a base coat of liquid form enamel on the back and soft 80 mesh opaque enamel on the front. Fire two siftings of counter on the back. Fire high a coat of medium fusing 80 mesh transparent enamel over all or part of the piece. The soft opaque enamel will bubble up through the transparent enamel.
Combining a dry stencil with the bubble through
Instead of covering the whole piece with the transparent enamel over the opaque base coat, sift transparent enamel over the edge of a plastic shield held close to the piece. The closer to the piece you hold the shield, the straighter the edge of the sifted enamel. You can also use this technique to sift one enamel color over part of another in a plaid or stripe design.
Flowing
Fire the base coats of any enamel you like. Use a small sifter to apply areas of three or four contrasting colors, opaque and/or transparent, close to each other. Some can overlap. Spray the piece with water until a little wetter than damp and tilt the piece in various directions to guide the flow of the enamels. If the enamels do not move, you can use water in an eyedropper to make the enamel flow as you tilt the piece. When the enamel design is to your liking, hold a piece of paper towel at the edge to draw off the excess water. Sift a light coat of soft flux over the piece to absorb the remaining excess water before you fire the piece to maturity.
Wet Stencils
Fire the base coats. Cut pieces of paper towel, wet them thoroughly and place them over a fired base coat. If the paper hangs over the edge of the piece, you can remove it easily after you sift on the enamel. If there is no overhang, use a pin and tweezers to lift off the wet stencil. If the copper piece has sloping sides, you might want to spray 1:3 diluted gum over the paper after it is positioned on the piece, then sift an enamel and spray the gum again. The sifted enamel should cover only the edge of the paper stencils. The piece is dry when the gummed enamel surface feels like sandpaper. Before you fire the piece, you can sgraffito with any sharp tool into the dried enamel. If you are using only water under the sifted enamel, you can fire the piece when the enamel is just damp. The same washed stencils or new ones can be used for overlays in subsequent firings. The number of layers and firings depends on the design you envision. This is a good technique for learning how one transparent looks over a number of transparent enamels.
Pulling Through
First fire the base coats in an enamel of your choice. Using the Indian sand painting method, apply about four 80 mesh enamel colors in bands of color close to each other. First try enamel colors that are in sharp contrast to your base coat. Black and white are strong colors to combine. Put the point of a sharpened chopstick just beyond an outside band and drag the point through the other colors. If you raise the chopstick a little as you get through the last color, that color will end in a point. Pull through as many times as you like.
Overall Lumps
Fire a base coat of flux on the front of a shallow plate and counter enamel the back. Spray the piece with diluted 1:3 gum and sift a light coat of white or a light color opaque 80 mesh over the whole piece. Place different sizes of soft fusing lumps over the whole piece and press each lump in place, which will move aside the sifted opaque enamel under the lump. Tiny lumps can be close together because they will not spread as much. The larger lumps will expand to cover more area. When the gum is dry, the piece is fired to maturity. If you place enough lumps on the piece they will almost touch each other when they expand and spread in the firing. The opaque enamel will frame each lump. After the lumps are fired, the piece should not be fired again upside down because the lumps might droop down to the floor of the kiln.
If your lumps are too large, put a few of them in a brown paper bag that is inside a plastic bag and put the bag on a scrap of wood. Bang on the lumps with a hammer. The lumps will scatter unless they are in a bag.
Doris Hall's Paisley Design
Doris Hall Kubinyi (1907-2001) was an artist and an innovator in the field of enameling. She and her late husband, Kalman Kubinyi, graduated from the Cleveland Institute of Art in 1929. In the 1940s they concentrated on enameling. They had a gallery and studio in Gloucester, Massachusetts, then downtown Boston, and a final studio move to Stockbridge, Massachusetts. They received many awards and commissions, the largest being the enamel globe at the Babson Institute. Doris and Kalman are remembered as warm and gracious friends.
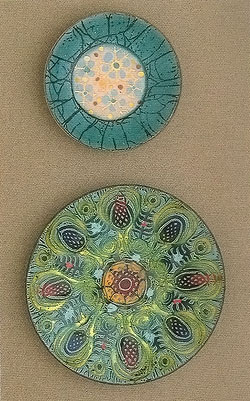 |
| 4″, 18 ga copper, opalescent crackle over soft flux, transparent lumps in center, turquoise transparent border. Bottom plate: 6″, 18 ga paisley design. Photo by J.A. Perry |
This paisley design was a commercial enamel that Doris Hall and Kalman Kubinyi produced. When I began teaching, I used this design, with her permission, as part of my beginners' course because it combined so many enameling techniques. The enamels were Thompson's old leaded 80 mesh and were fired around 1500°F.
Procedure
- Apply and let dry #767 Peacock crackle (now called Liquid Form Enamel) to the back of the plate.
- Sift a good covering coat of #426 soft flux on the front over diluted gum.
- Fire the piece flux side up, supported on a stilt. Front and back base coats are fired in the first firing. This method eliminates firescale forming in firing because there is no uncovered copper. All the subsequent coats are fired right side up also.
- The second firing has another coat of crackle dried on the back and transparent #200 turquoise sifted on the front with the transparent and opaque lumps gummed in place. Push aside the turquoise enamel, about the size of the 1/2″ red transparent lumps, from eight evenly spaced areas about 1/2″ down from the edge of the plate. This exposes the flux base coat where the red lumps are to be placed with undiluted gum. The same is done with the transparent smaller lumps in the center of the plate. Then some small opaque lumps are just pushed down into the transparent enamel. With the tip of a palette knife, a little additional #200 enamel is placed at the bottom of the large red lumps around the edge of the plate. The added enamel forms a banking shelf to support each lump in the firing. With the gum dry and all the lumps in place, fire the piece until the lumps have smoothed down.
- For the third firing, paint about a 1/8″ wide line of separation enamel around each lump, leaving at least 1/4″ between the line and the edges of the lumps. The painted lines are connected with additional lines to form an overall design. The separation enamel, in a one ounce bottle, with an oil base has to be stirred thoroughly and a separate thin brush is kept to use just for it. The brush is cleaned with turpentine. When the separation enamel is dry, fire the piece. The painted lines, when fired, sink through to the flux and double in width.
- For the fourth firing, apply a coat of the Peacock crackle over the entire front of the piece. When the crackle is dry, sgraffito with a pointed stick or tool, following the depressed lines made by the separation enamel which exposed the flux base coat. Additional cross-hatched sgraffitto lines should be done over the lumps. The crackle will break up and the lines will widen as you fire to maturity, or a little beyond, to complete the plate.
Cloisonné Pendant on Fine Silver
Fine silver cloisonné wire on a flat piece of 18 or 20 ga fine silver is the simplest material to use for cloisonné. You do not have to worry about burning up the fine silver wires as you do when you fire fine silver wires on copper. I fire in a heat saturated kiln at 1500°F. The fine silver piece only needs to be cleaned in the kiln because it does not form a firescale coat as does bare copper when fired. My experience is only with leaded enamels, so the results may not be the same with unleaded enamels.
The first cloisonné piece my students created was a one-inch 18 ga fine silver flat disc with a hole drilled for a jump ring.
Materials
- 1″ 18 ga fine silver flat disk with a drilled hole for jump ring
- 1′ flat, fine silver cloisonné wire, .040″ x .010″, for the design
- 2. oz. soft flux, washed and dried. Thompson leaded 80 mesh soft flux #426 for the front base coat or try an unleaded flux for silver
- 2 tsp. total of one or any number of 80 mesh transparent washed enamels to add color
- 1 brush full of very thin craclde for the back base coat
- 1 tsp. uncut enameling gum for adhering wires to the silver piece before firing
Tools
- Pair of pointed tweezers, with the points not very sharp, to bend the wires Straight blade bezel shears to cut the wires.
- #1 sable liner brush to wet pack the enamels
- 1″ 80 mesh sifter to apply base coat of flux to front of the disc
- Carborundum stone for first stoning of top of the wires to remove any fired on enamel
- Scotch stone for final finishing of top of wires
- A wooden board to put across a sink or set-tub for stoning the wires under water
Procedure
- Trace the disc about four times on 3″ x 5″ index cards.
- Draw designs for the wires. For this first one keep the wires at least 1/8″ away from edge.
- As you design, remember that the wires are to form cells in which the enamel will be wet packed with the brush. A wire must have a bend to be able to stand up on its thin edge. Select one design as your pattern.
- Bend and cut the wires to your pattern. It is easiest to work with a 3″ length of wire. When you cut the wires, the cut must be a true straight line for the wire to butt against another wire. Each wire must also be flat against the disc. Read Joseph Trippetti's method for bending wires to the pattern. Each piece, picked up with the tweezer, is placed on the cleaned disc with uncut gum.
- When all the gummed wires of the design are in place and dry, sift the soft flux over the entire wire design area about one third the height of the wire including about an 1/8″ on the outside wires of the design.
- Fire the piece on a trivet at 1500°F until the enamel is holding the wires and the enamel looks almost white. If you use the medium fusing leaded flux, #1005, it will have a yellow cast.
- For the second firing, wet pack soft flux with diluted 1:2 Klyr-Fyre around all the outside wires of the design and sloping down to the edge of the piece. Let dry and fire smooth.
- When the piece is cool, paint a very thin coat of crackle on the back. When it is dry, sgraffito your name or logo.
- Wet pack the transparent colors into the cells with the tip of the liner brush. Push the enamel grains against the wires and then fill in the cell. Multiple thin fired layers are brighter than one thick layer of enamel. Add a drop of diluted gum to each cell. In the Swiss method, the enamel is not filled to the top of the wires. You can stop filling the wires and firing when the piece is to your liking.
- At the sink, put a 3″ square of chamois under the enameled disc and place both on the wooden board under the faucet in order to stone the top of the wires under running water.
- Use the coarse Carborundum stone first, stoning in a circular motion. Then the Scotch stone is rubbed along the length of the tops of the wires. The side edge of the piece is either cleaned the same way or on a polishing wheel with a Bright Boy stone. At the wheel, you rotate the edge of the piece, keeping it moving against the spinning stone.
- A sterling jump ring is set in the drilled hole, and the piece is complete.
- You can also design the cloisonné piece with bent wires without drawing a design. Just bend pieces of wire and place two bent pieces on the silver in the center of the disc. The end of one piece butts against a length of the other piece. Then you add pieces to make enclosed cells, designing with the bent and cut pieces. If you are a jeweler and intend to bezel the enamel, it will be easier if your wires are 1/8″ in from the edge. You can use wood dowels of various diameters to bend circles or part of a circle. A pair of tweezers and your fingers are all you need to bend the wires along with a feeling for design.
Related Articles

Kenneth Bates: Dean of American Enameling

Enameling Care and Considerations

The Jewelry of Patsy Croft

The Enamelware of Ben Caldwell


The All-In-One Jewelry Making Solution At Your Fingertips
When you join the Ganoksin community, you get the tools you need to take your work to the next level.
