
Enameling on Electroformed Vessels
June Schwarcz (b.1918) in Denver, CO. She is a Fellow of the American Craft Council and received their Gold Medal. The museum collections that have her work include Metropolitan Museum, Renwick Gallery of the Smithsonian, and Kunstgewerbe Museum in Zurich, Switzerland. Mostly she makes electroformed, three-dimensional objects. The richness and brilliance of transparent enamels still fascinates her after 47 years of enameling.
5 Minute Read
June Schwarcz (b.1918) in Denver, CO. She is a Fellow of the American Craft Council and received their Gold Medal. The museum collections that have her work include Metropolitan Museum, Renwick Gallery of the Smithsonian, and Kunstgewerbe Museum in Zurich, Switzerland. Mostly she makes electroformed, three-dimensional objects. The richness and brilliance of transparent enamels still fascinates her after 47 years of enameling.
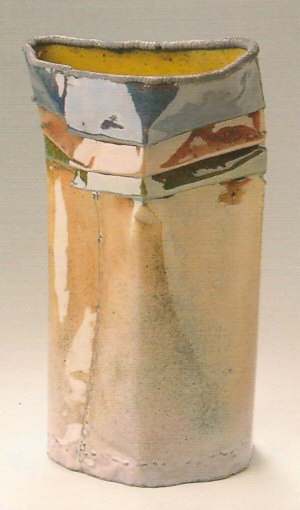 |
| #2114 Vessel: 10″ x 5 3/4″ x 3 1/2″ x 3 1/2″ electroformed copper, enamel. |
Electroforming is electroplating when most of the surface has been thickened by plating. If you silver-plated a copper teapot, that would not be electroforming. Forming an object with thin copper foil and then thickening it with copper in a plating bath to make a sturdy vessel is electroforming. Most of my work is enameled with transparents, and my pieces vary in size from 3″ to 11 1/2″. My method of working is governed by the form of the piece, as each piece is different. I am describing how I usually work. For more information on electroforming, see Metal Techniques for Craftsmen by Oppi Untracht.
Originally, I worked on sheet or spun copper pieces in the basse-taille technique over etched surfaces, to make shallow bowls or wall pieces. For basse-taille I apply transparent enamels that can be fired directly on copper without a coat of flux under them. I use the color as if I were making a watercolor painting, using different colors in each area, some thicker layers and some thinner. I apply leaded, soft flux to even out the coat of enamel and make the layer of enamel thick enough so that it will not burn out in the first firing. On the subsequent firings, I can use any color and continue to build up colors and flux according to aesthetic considerations.
In 1962, I became interested in electroplating. At first I was interested in electroplating in order to achieve greater depth for my etching of the basse-taille pieces. My husband, Leroy Schwarcz, who was a mechanical engineer, brought home a sample of thin copper foil that was about 1 mm thick. It proved to be good for making three- dimensional pieces. It had something of the quality of soft fabric but could be plated to be sturdy enough to handle and to enamel. I found I could make pleats with the foil and sew seams with thin copper wire to form the piece for electroforming.
My shapes are developed on newsprint that is then used as the pattern to cut the thin copper foil. It is important that the copper piece be absolutely clean when put into the tank to be plated and formed. I clean the copper with Sparer 2 and sometimes with sulfuric acid. Sometimes I coat the inside of the foil with melted wax before I put the formed piece in the bath. With the wax on the inside, the piece holds its shape as it is being electroplated. This wax must be completely removed after the plating is finished so that the copper can be enameled. The wax is melted and burned off. Then the piece is soaked in Sparex 2 again to remove the firescale, rinsed and wire brushed. Sometimes I use a sulfuric acid bath instead of the Sparex 2. It is then ready to be enameled.
I have a 30-gallon plating tank. It is about 17″ high with the base 18″ x 24″. The formula I use for the bath is 28 to 30 oz. copper sulfate and 8 to 10 oz. concentrated sulfuric acid per gallon of water. I use a prepared copper sulfate solution although it is possible to make a bath of agricultural copper sulfate. Over time the amount of copper seems to increase in the solution. When this happens, some of this copper must be removed and more water and sulfuric acid added. I test the solution myself when I feel it needs testing. Experience with the results tells me when it needs to be strengthened.
MY kiln is 151/2″w x 18″h x 18″d on a 220V line. I fire at 1500°F. The number of times I fire varies a great deal depending on the design and aesthetic considerations. The number of firings also depends on whether the copper is beginning to blister. Blistering is my greatest problem in enameling electroformed pieces. If the blisters are very little under the enamel, I leave them. If they are large and break, showing black spots, then I clean them and re-enamel over them.
I usually sift on the enamels, but I sometimes wet-inlay the enamel instead if there is to be a pattern in my design. I use 80 mesh leaded enamels; some are Thompson's old ones and others are from various manufacturers. These enamels vary in their degree of fineness of grind. I use some of them just as they come, but if they are too powdery I sift away the fines, using Thompson's 200 and 300 mesh sifters.
The inside of a vessel is enameled first with medium or hard enamel. My husband made me some small sifters from slices of small medicine bottles and other rigid tubing that were attached to dowel sticks of varying lengths. I use them to sift the enamel onto the inside of vessels. I use an airbrush for spraying the 1:2 diluted KlyrFyre. I spray, sift, spray, sift, trying to have the Klyr-Fyre moisten all the particles. When the piece is dry, it is placed in the kiln with the bottom of the vessel toward the back of the kiln. A piece often requires an additional layer fired on the inside before the outside of the piece is enameled.
Occasionally I use a raku technique to get a luster effect. The colors change a little depending on the colors of the enamel used. To raku, I line the inside of a large canning pot with large Acanthus leaves. When the piece completes its final firing, I take it out of the kiln and quickly put the canning pot on top of it. You must leave it that way until it has cooled down somewhat. The piece must not cool off too quickly. You have to be making a fairly large enamel for this method to work. If you do not like the effect, you can fire it away in the kiln.
When I was first introduced to enameling by a student of Kenneth Bates, I was immediately interested in the transparent quality of enamels. Although I sometimes use a few opaques, my interest in the transparents has remained for forty-seven years while I have been working mostly on three-dimensional objects.
Related Articles

Electroforming for Innovative Design

Vermeil Jewelries

Architectural Portraits of Vicki Ambery-Smith

Resists and Electroplating to Create Patterns


The All-In-One Jewelry Making Solution At Your Fingertips
When you join the Ganoksin community, you get the tools you need to take your work to the next level.
