
Drilling Tips and Techniques
We all drill, all the time. We take drills and what they do for granted, but reviewing the obvious doesnt hurt -- and there may be a nugget of new information that is brought to light.
4 Minute Read
We all drill, all the time. We take drills and what they do for granted, but reviewing the obvious doesn't hurt - and there may be a nugget of new information that is brought to light.
Drilling is done for decorative purposes, to install components, to allow a saw blade or bur to be accurately inserted through sheet metal, and to situate stone settings. Most metalsmiths drill with a flex-shaft, using standard twist bits. We often use very tiny bits, which can break easily, and the process usually results in flying debris. Eye protection is required at all times when drilling.
The following are some tips for drilling accurately:
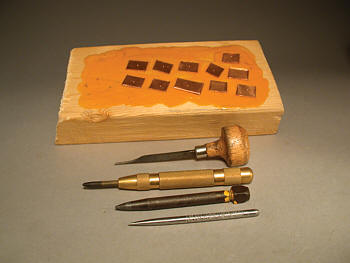
Using drilling boards. It's a good idea to use a mobile piece of wooden board to drill on so that you don't end up with a moonscape bench pin. Such a drilling board can be thinly coated with sealing wax or dopping wax for holding multiple small parts while drilling. Simply warm the metal part with a torch and drop it onto the wax; it melts a spot for itself that then hardens, trapping it in place for drilling. Use a lubricant and avoid heating the part during drilling to keep it locked in position. When you are ready to remove the piece, just pop it out of the hardened wax with a graver or knife blade. Dozens of small parts can be rapidly scattered on a surface like this for production drilling. Remember, though, that it's usually best to drill and work on a component when it is still attached to a larger piece or "handle."
Making a dent. To ensure that the drill bit does not skip and scar the metal, it is best to have a small sharply defined indentation where you want to drill. You can make the dent with a center punch. An automatic center punch can be useful for locating an exact spot for the dent.
A prick punch, which has a long, needlelike taper, works well for denting a precise spot. Lay out the plan on the metal with a sharp scribe and indicate where the dent should be. Then lay the punch down almost flat on the metal with its point exactly on the spot for the dent. Carefully raise it up and tap it with a hammer. By having it flat and raising it up, you achieve very exact placement. It's also faster than trying to hold a punch vertically and placing it perfectly onto a given spot.
A large darning needle works well as a prick punch. I usually snap off the eye of the needle and briefly anneal the very back end of the punch to soften it. This prevents it from shattering accidentally when hit with a hammer, and it keeps it softer than the hammer face to prevent marring.
You can also use an awl or point burnisher in a graver handle, as well as a beveled or onglette graver, to create a suitable dent in metal. When using any of these tools, be sure to start the drill slowly to avoid slipping, as the dent is not as smooth as those made with the previously mentioned tools.
Moving a hole's position for accuracy. When drilling into a dent, always make a pilot hole using a much smaller drill bit than the hole you want to drill. The moment the drill begins to cut at the surface, hold it steady and watch, pressing it down only far enough that the cut becomes a full shiny circle, so you can see how accurately the dent was positioned. Don't drill into the metal, just mark it. Now, you can see if you need to move the dent in one direction or another.
To move a dent, use a beveled or onglette graver. Decide which direction from the hole the dent should move. Point the graver at the hole from that direction. (See diagram above.) Position the tip of the graver 0.5 mm to 1 mm away from the hole, depending on how far you want to move the dent. Drive it in at about 50 degrees, and then lever it up and out. This moves the hole, and the dent, in that direction.
Lastly, take the small pilot drill and begin drilling again in the new position. A hole can be moved as far as a few millimeters, which is usually enough.
Pilot drilling. Pilot drilling is vital for getting an accurate hole. I will often begin a hole with a 0.6 mm or 1 mm drill bit, regardless of what size the finished hole will be. Once, when I was laying out a series of graduated circular holes in a girder shape, I used 19 drill bits for the central, largest hole to ensure accuracy and proper spacing between the holes.
So here's a good habit to get into when drilling: After making each hole, take a larger drill bit or a ball bur and, by hand, turn it once in the hole. This deburrs it and leaves a tiny but perceptible shiny bevel on the top edge of the hole. This "finish as you go" behavior really cuts down on the total time spent working on a piece, and it keeps construction clean and tidy.
Ganoksin Staff Note: Finding The Best Tools For Drilling
The tips and techniques explained above will help you drill with more precision and improve your results on all kinds of projects. Of course, your work product will only ever be as good as the tools you use. With that in mind, make sure your workshop is kitted out with the right tools for drilling.
You can find expert reviews of the best compact drills for jewelry here, or check out our guide to the best flex shaft systems here. We've also got a guide to the best small drill presses for your workbench. Whichever tool you prefer to use for drilling, our buying guides will get you sorted out with the best equipment on the market today.
![]()
In association with
![]()
The award-winning Journal is published monthly by MJSA, the trade association for professional jewelry makers, designers, and related suppliers. It offers design ideas, fabrication and production techniques, bench tips, business and marketing insights, and trend and technology updates—the information crucial for business success. “More than other publications, MJSA Journal is oriented toward people like me: those trying to earn a living by designing and making jewelry,” says Jim Binnion of James Binnion Metal Arts.
Click here to read our latest articles
Click here to get a FREE four-month trial subscription.
Related Articles

Graver Detailing and Sharpening

Basic Spiral Braiding
Metalsmith ’83 Summer: Health Hazards Q&A’s

Green Bench Tips – Part 1


The All-In-One Jewelry Making Solution At Your Fingertips
When you join the Ganoksin community, you get the tools you need to take your work to the next level.

