
The Metal Corrugation Project
The act of contraction into repetitive wrinkles or alternate ridges and grooves. When studying nature forms, corrugation is regularly seen adding innate strength to what might be otherwise considered a frail form. Corrugation has been adopted by industry and used in utilitarian fashion for the manufacture of common objects we regularly see such as packaging materials as well as industrial applications such as roofing, siding, and drainage pipes.
4 Minute Read
Corrugation is the act of contraction into repetitive wrinkles or alternate ridges and grooves. When studying nature forms, corrugation is regularly seen adding innate strength to what might be otherwise considered a frail form. Corrugation has been adopted by industry and used in utilitarian fashion for the manufacture of common objects we regularly see such as packaging materials as well as industrial applications such as roofing, siding, and drainage pipes.
Metal Corrugation
Metal corrugation is a unique roll-formed process whereby a precise and specific repetitive surface pattern is achieved when processing thin gauge annealed 36 - 24 sheet metal or wire. Metal is processed using special tools manufactured with corresponding matching and enmeshing fluted gears that are aligned in such a manner so that the crest of one roller fills the trough of the other. Metal corrugation is a unique process NOT to be confused with the fold-forming techniques studied and highly developed by Charles Lewton-Brain.

In creating this sea form, you will discover and use both the strong and fragile properties of corrugation.
You will need:
- An armature base for forming such as a ring or bezel mandrel, or simply several sizes of round dowels ranging any where from .25″ to .75″ in diameter and 12″ long.
- Annealed 3″ x 10″ strip of 32, 33 or 34 gauge copper or fine silver is best suited for this project.
- Heavy-duty scissors or shears can be used to cut this thin metal.
- Bonny Doon Corrugation tool or Industrial Tube Wringer 401 with opening to accommodate the width of the metal to be processed.
 | Trace the medium size nautilus pattern onto the strip of metal. Use the templates provided or create an altered trapezoid pattern by determining the diameter desired for the large opening and that of the small opening. Note that the circumference of the small end should fit around the circumference of one of your bezel mandrels or dowels for ease in forming at the tip. |
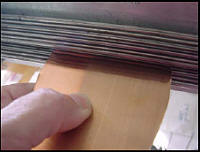 | Begin by tightening down both tension adjustment knobs if using the Bonny Doon Corrugation tool. In unison, back off both of the tension knobs approximately three quarters of a turn. Place the wide end of the sheet flush into the trough of the tool. Advance the metal strip into the tool by turning the handle of the tool. Maintain even alignment by holding the strip straight as it may want to wander left or right during processing. It is not necessary to achieve the full depth of corrugation in the first pass through the tool. Simply anneal and dry the metal then evenly tighten the tension adjustment knobs. Align the leading edge onto the tool for each subsequent processing until you achieve the full depth of corrugation. Anneal and dry the metal prior to beginning hand forming. |
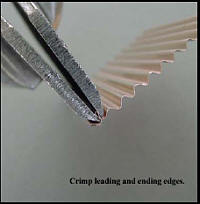 | Evaluate the ends of the corrugated strip. If you find that either end terminates with the raw edge of the metal at the top of the crest, carefully trim away that portion of metal so that the corrugation edges end in trough. To conceal the raw ends of the metal, use a modified sheet metal bending tool and crimp both the leading and ending crests of the corrugated strip. |
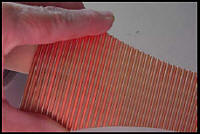 | Clamp the end of the .75″ dowel into the throat of the vise. Center the strip of corrugated sheet across the dowel and begin hand forming by gently pressing down on the outside edges of the metal to contour the shape of the dowel. As you gently and slowly shape to conform the strip around the dowel, dimples will occur in the troughs. Simply use the edge of your slim burnisher and gently rock back and forth into the trough against the dowel and the dimple will disappear. After shaping the strip around the dowel it is then necessary to anneal and dry the metal before continuing to the next forming step. |
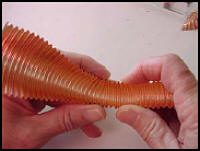 | Begin by gently and patiently compressing the troughs together while working from the center of the form towards the smaller end. |
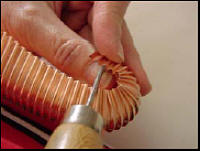 | You may find that some of the crests will compress or become misshapen. Carefully lift the crest by using the edge of the slim burnisher and continue forming and shaping. Compress using both hands. |
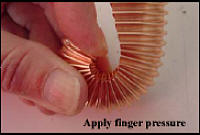 | To further shape and define the bottom of the form, compress the last crests down using finger pressure. |
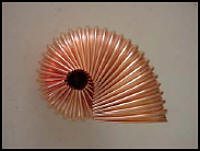 | Working with the upper portion of the form, continue compressing against the troughs by hand while shaping the element around the base completing the form. |
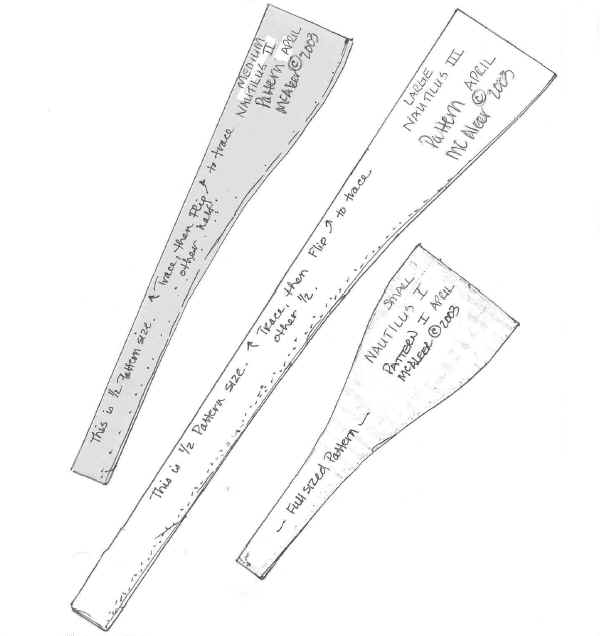
DO NOT FOLD your metal when using the patterns shown. Patterns are drawn half size only to conserve space. Trace one half of the pattern on your metal, flip the pattern over to then trace the other half.
Trace then cut out the pattern(s) of your choice. Note that they can be photocopied for a larger sized form. Trace the pattern onto your metal, flip the pattern over aligning the straight line and trace the other half. Cut out your metal and corrugate using the wide edge as the leading edge. Don't fold your metal to achieve this.
Related Articles

Steps on Making a Basic Wedge T-fold

Steps on Making a T-Fold Boat Fold

Steps on Making a Leaf or Ruffle

Metal Corrugation Vocabulary


The All-In-One Jewelry Making Solution At Your Fingertips
When you join the Ganoksin community, you get the tools you need to take your work to the next level.
