
Setting a Stone with Cold Connections
In the jewelry world the term cold connections usually describes mechanical joining techniques that are used to fasten together parts that cannot be soldered. In many cases, cold connections fall into a "layer-this-onto-that" approach. Cold connections are more than a roster of techniques - they can trigger new ways to think about design. By combining function, engineering, and aesthetics, cold connections lead us to fresh ideas. The pendant described here has only four parts but it uses three kinds of cold connections.
3 Minute Read
In the jewelry world the term cold connections usually describes mechanical joining techniques that are used to fasten together parts that cannot be soldered (i.e., using a "hot" connection). The leaders of the pack are probably rivets, followed by tabs, screws, and knots. It's worth noting that prongs and bezels also belong in the cold connection category.

In many cases, cold connections fall into a "layer-this-onto-that" approach. Drill matching holes in a piece of wood and a brass sheet, then clamp the two parts together with a rivet. There is nothing wrong with that approach but it misses the real importance of mechanical connections. Cold connections are more than a roster of techniques - they can trigger new ways to think about design. By combining function, engineering, and aesthetics, cold connections lead us to fresh ideas. The pendant described here has only four parts (a stone, a brass backing, and two brackets), but it uses three kinds of cold connections.
What you will need:
- Sawframe and blades
- Steel block
- Pumice or Scotch-Brite®
- Chain-nose pliers
- Small drill bit
- Needle files
- Sterling and brass sheet, 20 gauge
- Patina solution (commercial or homemade)
1.
First, find a beach stone exactly like the one shown here. Obviously, I'm kidding. Throughout the project, pay more attention to the concept than the particular shapes I'm using. You might use a pottery shard or a marble - the whole idea is to let the materials influence the design.
2.
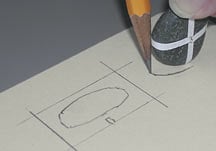
Identify two axes on the stone and mark them with either a pencil or with a couple strips of tape as I did here. This helps you keep track of orientation as you fit and refit parts. Note that I marked the top (A).
3.
Make a pattern for the brackets with thick paper (like a file folder). Sight down over the stone and trace the outline onto the paper. Draw a box around the hole to make the outer edge of the bracket. Repeat for each axis, then cut out the shape with scissors. Test the opening against the stone and trim as needed to make a good fit. Mark a center line along the bottom edge of both pieces, one from the top down and the other from the bottom up. These two slots will be the same size as the thickness of the sheet.
4.
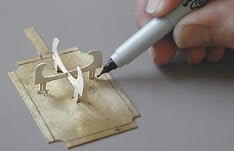
Apply a piece of sticky-backed label paper onto a sheet of sterling and trace the patterns with a sharp pencil or fine-tipped pen. Saw out the two bracket pieces and smooth the edges with a fine needle file. Polish to the finish that best complements the piece.
5.
Press the two bracket parts together in the form of an X. If you've cut accurately (and I know you have), the parts will snap tight. This is the first cold connection.

6.
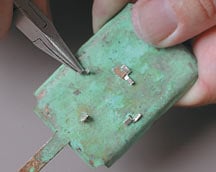
Draw, then saw out from brass sheet, the piece you want for the back. In my example I've made a rectangle that will allow the stone to sit near the top. Set the bracket unit in place and mark the locations of the legs. Drill and saw one, then set the bracket in position to test the next hole. Repeat, checking each hole as you go. It's a lot easier to redraw your marks than to repair a hole in the wrong place.
7.
I chose to make a shallow box by bending up the edges of the brass sheet. My plan is to patina the surface with a crusty green color that will complement the dark stone. This design makes the most of cold connections because it would be difficult to patina the brass after the stone setting was soldered in place.
8.
File the edges to remove the sawing marks, clean the metal with Scotch-Brite®, then set the brass sheet over a steel block. Strike at an angle with a rawhide mallet to bend the walls up.
9.
Clean again with pumice or Scotch-Brite®, then finish. In this example I used green patina solution, but any patina can be used.
10.
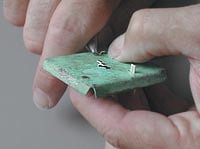
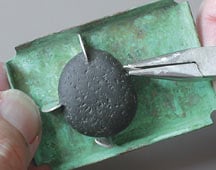
Give the bracket a final polish, then slide the legs through the brass sheet.

On the back, splay the legs in two directions to lock the bracket into place.
If you're counting, that's cold connection number two.
11.
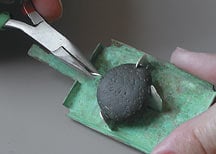
To set the pebble, bend a couple arms of the bracket outward so you can slide the stone into position. Bend the tip of each bracket arm back to its original position. Cold connection number three.
12.
Bend a loop at the top and attach a cord.
Related Articles

6 Basic Wire Skills to Make a Necklace
Rules for Tools

How to Polish Stones, Gems, and Diamonds the Right Way
Bead Setting Method – Part 1


The All-In-One Jewelry Making Solution At Your Fingertips
When you join the Ganoksin community, you get the tools you need to take your work to the next level.
