
Cloisonne Jewelry with 24k Wires
Merry-Lee Rae has been making jewelry since 1966 when she joined her father in the garage while he dabbled in metal arts. In 1976 she fell in love with enameling, and her life took a turn from hard-core academics to a relentless, obsessive pursuit of crafts. She feels privileged to have the support of her extraordinary family. She sees herself as a dedicated romantic. Her awards and achievements, the shows, the galleries, the private collections, and the lack of training are not as important to her as the people who arc touched by her work..
8 Minute Read
Merry-Lee Rae has been making jewelry since 1966 when she joined her father in the garage while he dabbled in metal arts. In 1976 she fell in love with enameling, and her life took a turn from hard-core academics to a relentless, obsessive pursuit of crafts. She feels privileged to have the support of her extraordinary family. She sees herself as a dedicated romantic. Her awards and achievements, the shows, the galleries, the private collections, and the lack of training are not as important to her as the people who arc touched by her work.
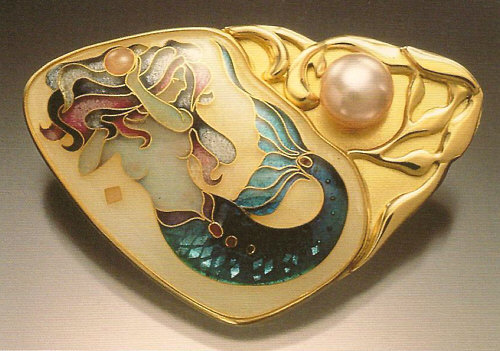 |
| Mermaid Treasure: 11/2″ wide. 26 ga domed fine silver, 24K gold wire, river pearl Fabricated 18K gold setting. |
Since 1976, I have been designing and making cloisonne jewelry, ranging from 1/2′ to 2″. My method of working is primarily the result of trial and error. After thousands of pieces and as many mistakes, I now have a narrow but proven approach. Each piece is started with a detailed drawing, including the plans for any goldsmithing and gemstones. My color test plates are used to select the enamels I will use. Progress notes are kept as a journal to note any unexpected variations from the firing. If there are any technical difficulties, my notes from other pieces often help to find the cause.
My kiln is a "Firemaster" with a 9″w x 61/2″h x 11″d chamber. To reduce drafts in the kiln, the peephole is covered with mica to reduce the drafts. The mica is held in. place with masking tape. I rely on the pyrometer. I fire the enamel piece on a stainless steel trivet on a small firing rack. When firing, I wear welder's glasses to protect my eyes and a welder's glove and copper tongs to place the work in the kiln.
The shape is usually cut of 26 ga fine silver from the drawing and domed either with a Bonny Loon Hydraulic Press or by hand in a wooden dapping block. For most designs, I polish the front surface with white diamond tripoli, clean ultrasonically in non-sudsy ammonia and then brass brush with detergent under running water.
I use 80 mesh Thompson or Japanese leaded transparent enamels. The enamels are washed in small quantities with distilled water in a glass, stirring with plastic spoons and a glass stirring rod. The base coat on the front is Thompson's old flux for silver, #1209 or #757. When my supply is gone, I shall have to figure out something else. I spray the piece with a 1:2 solution of Klyr-Fyre and distilled water before sifting. This flux base coat is a very lightly sifted one that barely covers and is fired on a trivet at 1500°F for 70 seconds or until smooth. I try not to look in the kiln before the time is complete. Then on the back, a light to medium color of transparent blue is used because it holds up well and enables me to see variations in the thickness of the counter enamel. The back receives two to three heavy applications. The piece is then ready for the cloisons.
Cloisonné Wire and Enamel
In general, my cloisonné wire is .003 x .060 24K yellow gold that I roll down from .005 x .050 wire. With tweezers and my fingers, I bend the wires, cut them and place them in position on the piece with uncut Klyr-Fyre. When it is dry, the piece is fired to embed the wires in the base coat of enamel. I carefully inspect each wire to be certain that all my partitions have remained in place and that each joint is tight so that one color will not bleed into an adjoining cell.
When the wire design is embedded in the flux base coat, the piece is placed on a Pyrex lid, which ensures a clean surface and allows me to rotate the piece without touching it. The lid also gives a slippery surface to slide the piece easily to the edge and transfer it to a trivet. I use plastic spoons to hold the washed enamels and I wet pack them with a fine brush and dental tools.
I achieve depth and subtle shading by firing many layers of enamel. Most pieces average from 10 to 20 firings. The majority of my shading is accomplished in the first five layers; any subsequent enameling helps to fine tune and bring all cells to the upper edge of the cloisonné wire.
Finishing
When the enameling is complete, the finishing starts with lapidary equipment to grind the surface of the enamel. The equipment comes setup with a water hose and catch basin. The enamel piece is stuck to a dop stick to make it easy to hold against the wheel. To do this, I warm the enamel piece by placing it face down on top of my kiln and then I heat the dop wax in a small metal pot. Some warm wax is gathered on one end of a short wooden dowel. This wax end is placed on the back of the enamel piece. I now have a little handle to hold on to during the grinding. Be careful not to drip any wax on yourself or on anything that will go into the kiln. The front surface of the enamel piece should be free of any wax.
My lapidary grinder has an 8″ expandable drum. The sanding belt I now use is a 40MIC Microfinishing made by 3M, although for years I successfully used a 320 grit Carborundum belt. The equipment comes with a watering system because the process needs to be done very wet. The grinding is done carefully until all the wires are exposed and all glassy dips in the enamel have disappeared. Careful attention to the edges of the piece requires grinding a sloping edge that is evenly rounded.
I remove the dop stick by placing it in the freezer for a few minutes and letting the piece drop off in the warmth of my palm. Any wax residue is cleaned off with a knife. Holding the piece perpendicular to the sanding belt, remove any enamel from the edges. If you have an irregular edge, a large diamond bit in your Foredom hand piece will aid in this process. Remember to do all grinding wet. Next, the piece is vigorously cleaned with a glass brush under running water. Check that no speck of wax remains, as it will fire into the piece causing cloudiness and bubbles. I use clean, white, unscented paper towels to dry the work and then check that all the wires are exposed. If not, I regrind and glass brush. When the grinding is complete, the piece receives its final firing for a glossy and smooth surface.
If your wires extend to the edge of the piece, you may find a little lump at each wire edge, which could make a problem for burnishing a bezel smoothly over the edge of the enamel. I use my judgment at this point and often will return to the grinder, using a 15MIC sanding belt with about 600 grit, to refine the edge shape and then repeat the finishing steps and fire again.
A few tricks I have learned:
(Note: When I say layer, I mean apply and fire the coat of enamel.)
- For a very light background, apply one to three thin layers in just the background, leaving the cells empty.
- For a dark background, I enamel everything but the background for one to three layers until the wirework is securely sealed to the base and then complete all the cells. The dark background can then be safely completed with several layers.
- To remove a speck, I carefully use a Foredom with a small diamond drill under water in a shallow bowl.
- I often use a design that has two long wires less than a millimeter apart.
- To prevent their being sucked together, tiny gold balls are placed between them in the first layer.
- To fill a cell with foil, I make a pattern by placing tracing paper over
- the embedded wires and do a gentle rubbing with the side of a pencil lead.
- For gold balls under the surface of the enamel, I wet pack a layer and push the balls into the enamel grains. Silver balls will sometimes cause stress cracks, as silver expands and contracts more than gold. To have gold balls on the surface, I complete the enameling and the grinding of the piece; then, using a diamond drill bit, I make depressions in the surface of the enamel for the halls, put them in place and re-fire to fuse them.
- If cracks appear in a finished piece made with Japanese leaded enamels on fine silver with 241( gold wires, the fault is probably with your counter enamel.
- Before the final firing in a larger piece, I warm my grandmother's antique iron on top of the kiln, fire the piece on mica, then quickly slide the piece and the mica onto a ceramic tile and gently weight it with the warm iron. It will hold its new shape for the final firing.
- To remove excess moisture before drying the enamel, I find that a folded square of unscented toilet paper that I pat gently over the enamel works well. I do not use the first few and the last few sheets of either the white Viva towels, which I prefer, or toilet paper because they have glue on them.
- To have a color deepen, I try to plan ahead so that I am adding colored transparents and not filling in with flux.
There is very much to be said for the merits of joyful experimentation and the fluidity of the creative process. There is no right or wrong way to approach this wonderful craft. I offer "my way" as a tool for you to find "your way."
Related Articles

The Enamelware of Sean Alton

Georgian Cloisonne Enamel

Cloisonne Cup – A Noble Chalice

The Enamelware of Ben Caldwell


The All-In-One Jewelry Making Solution At Your Fingertips
When you join the Ganoksin community, you get the tools you need to take your work to the next level.
