
The Different Kinds of Line-Folds
Line-folds offer a large area of exploration. In addition to the use of line-folds by themselves, it is valuable to understand them because the principles involved will show up again in many other folds. If we were making a family tree, line-folds would be near the top because they were found early in my foldforming research. Line-folds are important as a method of pleating and can be used in a series of scoring and bending to create three-dimensional forms. Forged line-folds are used in many foldforms, and frequently create shapes with strong similarities to organic forms. The following pages show a variety of examples of line-folds. As is true throughout this book, these have been chosen to illustrate the basic principles being discussed and to illustrate a few of the directions that have been explored so far. Many further investigations are possible using these basics as starting points. The most basic line-fold involves four steps.
10 Minute Read
Line-folds offer a large area of exploration. In addition to the use of line-folds by themselves, it is valuable to understand them because the principles involved will show up again in many other folds. If we were making a family tree, line-folds would be near the top because they were found early in my fold forming research.
Line-folds are important as a method of pleating and can be used in a series of scoring and bending to create three-dimensional forms. Forged line-folds are used in many fold forms, and frequently create shapes with strong similarities to organic forms. The following pages show a variety of examples of line-folds.
As is true throughout this book, these have been chosen to illustrate the basic principles being discussed and to illustrate a few of the directions that have been explored so far. Many further investigations are possible using these basics as starting points.
The most basic line-fold involves four steps:
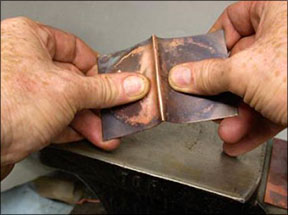
- Fold a sheet of metal over onto itself.
- Mallet the fold to tighten the fold edge.
- Unfold the sheet.
- Hammer the raised line in a process I call confirming.
Line-folds produce raised lines in flat sheet that resemble chased lines or applied wires. They make excellent pattern elements, cloissons for enameling, and serve to make changes in plane and direction in the sheet. Line-folds can also be used as starting points to produce three-dimensional forms. They can be run across each other, and I have even placed line-folds across a chased surface. They can run straight across an entire surface, or they can be limited to the center of a sheet. Line-folds can also be repeated to produce patterns of short raised lines.
It is possible to produce curved line-folds by scoring and bending, techniques that will be described later. As with many foldforms, line-folds can be combined with other foldforming techniques to obtain more complex results.
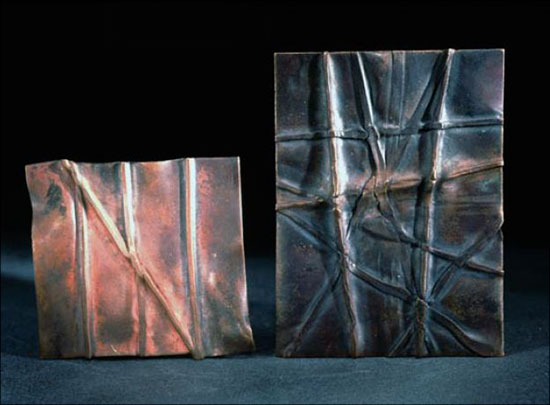
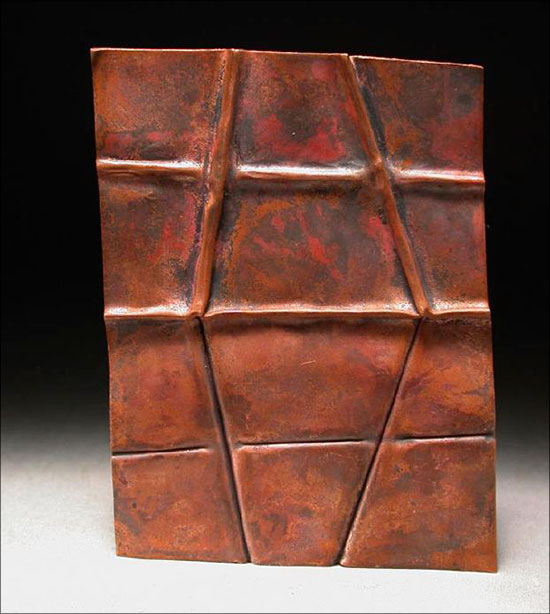
This shape was made with a combination of forged line-folds, one section forged on the open side and the other on the closed sides. In addition to demonstrating what a big. difference this simple variable can make, this piece shows the value of combining different types of foldforming
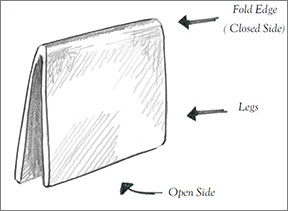
Naming the Parts
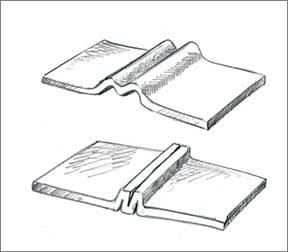
It is useful to have some nomenclature for working with an object. When you describe the parts of something, and give them names, then you begin to understand what you are seeing and you can think about it differently. The names I'll be using as we discuss line-folds are shown in this drawing.
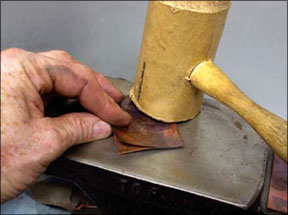
Making a Basic Line-Fold
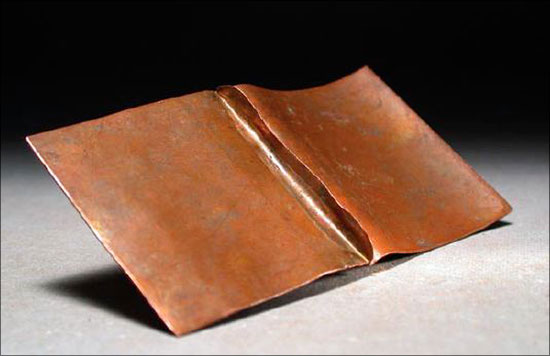
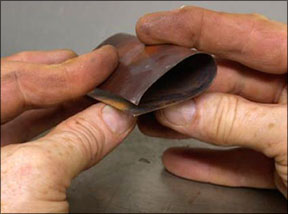 | FOLDFold a metal sheet so the fold edge is positioned where you want the line to appear. |
 | TIGHTENMallet the folded sheet flat. If this was a piece of paper you were folding, the work of the mallet is like pressing the crease with your fingertip. Now comes a fork in the path—to anneal or not to anneal before unfolding. I usually anneal, but there are specific cases when I choose to retain the work hardness created along the fold. Opening an unannealed line-fold will result in a very high, stiff line-fold that stands up from the surface. Unless you want this specific effect, anneal the metal before opening. Quench immediately in water; pickling is not necessary. It is important to dry all metal well before moving on to the next step. |
 | OPENUnfold the sheet with your fingers, then press the unfolded metal against a flat surface. |
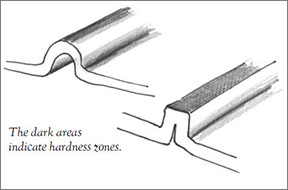
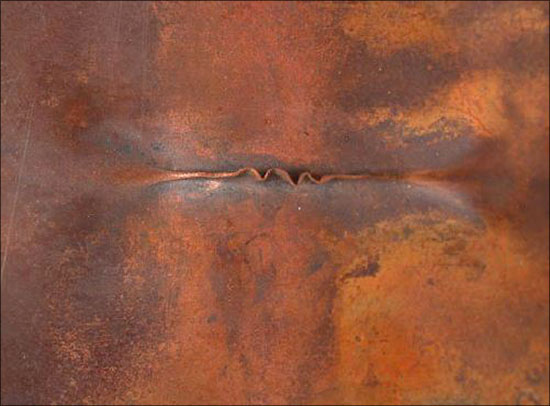
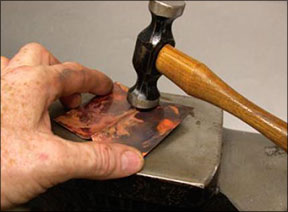 | CONFIRMAfter opening, the fold edge stands up from the sheet as a rounded line. To convert this soft bulge into a proper line-fold, I pound it straight down in a process I call confirming the fold. This can be done with a hammer, a rolling mill, or a hydraulic press. This downward pressure creates three bands of work hardness—one along the top of the fold edge ridge and one each at the point where the legs touch the anvil surface underneath. A planishing hammer with a slightly crowned surface works well for this. Use gentle blows so you don't squash the line out of existence. As you hammer more, the work hardened bands within the sheet push against the still-annealed sections, collapsing them into the dense structure known as the basic line-fold. If the piece is small enough to fit into a rolling mill, that tool can be used to confirm the line, resulting in a very uniform line-fold. |
Variables
Adding More Lines
Additional lines can be added to the same sheet—parallel to, obliquely, or even superimposed upon earlier lines. Secondary lines appear to pass under lines made earlier. In this way it is possible to create a woven effect. If you make a lot of lines this way, the earlier ones will flatten and fade slightly as later ones are added. If you want to preserve earlier lines, as with die-forming a sheet covered in lines, flow solder into the back of the line-fold before further deformation.
Varying Line Height
You can vary the height of the line simply by confirming some folds to a low level, others to a higher level, and one or two even higher off the metal. This can add a great deal to the visual richness of the surface. The rolling mill may also be opened or closed while rolling, or step rolling may be used to produce a variation in line height.
Textures
It is also possible to use a riveting hammer or chasing punches to produce texture on top of the lines while confirming. Upsetting line-folds like this is where the idea for T-folds came from. The line-folds can be roll-printed to texture only the top surface. Line-folds themselves can become a kind of texture and can be used as a component of other pieces.
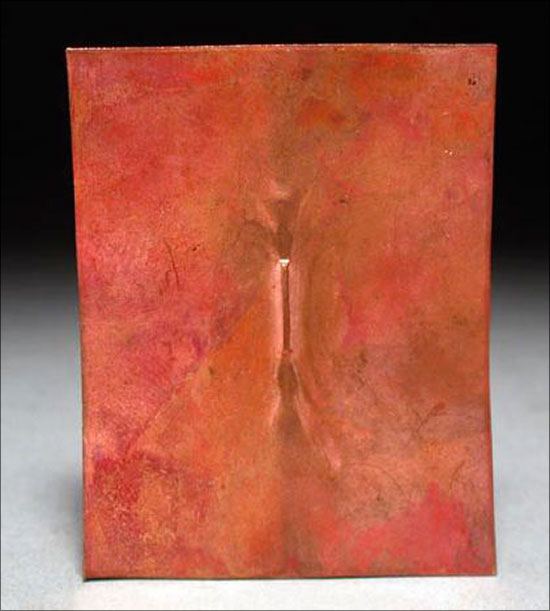
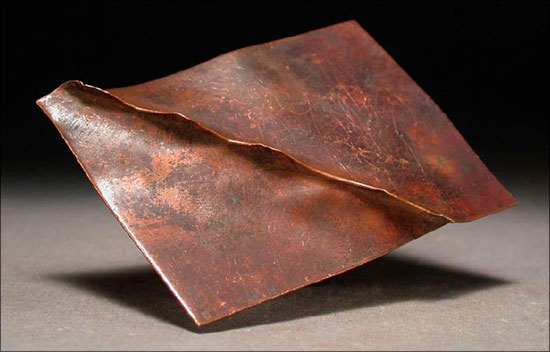
Tight Line
For a crisp line, make a very tight fold edge. As before, fold the metal and pound it flat with a mallet. Use either a planishing hammer or a rolling mill to further compress the fold edge. Don't apply so much force that distortion occurs, but just enough to make a very tight fold. Anneal and open the sheet with your fingers, gently. You may need to lever the legs up and down to achieve the intended final height of the line above the background sheet.
Roll the metal through the rolling mill in a dead pass (i.e., no pressure on the metal). Increase the pressure in small increments with repeated passes to slowly compress the line into itself. If done correctly, the result is a line that looks like a square wire that has been soldered onto a sheet. Note that it is possible to go too far. Experiment so you don't squash it flat. Varied line width is controlled by the tightness of the fold. The width of the line may be changed by planishing part of the original fold edge tightly, and other areas not so tightly, and unfolding.
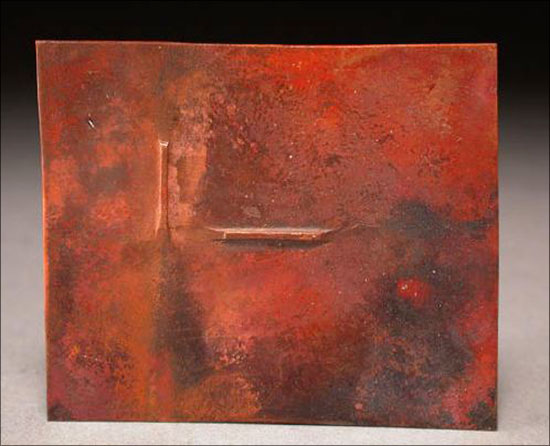
Making a Double Line
To make a thin double line, planish very lightly or upset the fold edge in a vise before annealing and unfolding. You can achieve a similar effect by leaving the fold edge relatively loose and wide (1.5 mm +/-). When this is confirmed, it also forms a small double line. Line-folds can be combined with many of the other folding procedures to produce more complex forms.
Multiple Lines
This line-folding procedure may be repeated until the structural resistance of the metal prevents further folding. I've even taken chased figurative surfaces and run line-folds across them. Sometimes you can make two line-folds at the same time, by bending opposite ends of the sheet towards each other at the same time, not meeting in the middle. Anneal at every stage for an easier time of it.
To make a double line, start with a loose fold, then confrm. The work hardened zones will force the metal to dip in the center, creating the effect of a double line.
Reflected Lines
If a sheet of metal is folded over double before making line-folds, you will have a reflection of the folds made when you open it up. One half of the lines are made while tucked inside the other half (the top ones) so the pattern is reflected. This can be repeated to create complex visual surfaces.
 |
| Reflected line folds |
Other Kinds of Line-Folds
Centered Line
To create a fold that grows out of the sheet, crease the fold only in the center. I find the most effective way to achieve this is by using a rounded hammer and stake. This allows me to pinch the metal selectively.
Centered Line with an Abrupt End
Sometimes you might need to create a line segment that ends abruptly, rather than one that grows gradually out of the surface. To make this, I use a slightly crowned planishing hammer as a punch to drive the metal down, truncating the line. The procedure can be repeated to make a composition of short line segments, Xs, squares, triangles, and other patterns made up of short lines.
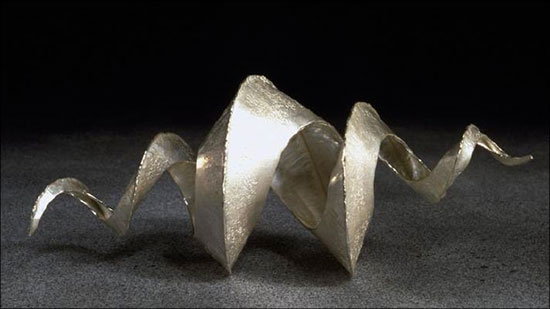
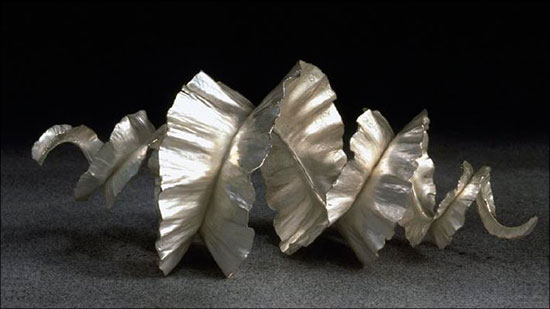
Extruded Line
In this fold, the fold edge is thinned and forged outward instead of being hammered straight down onto the sheet. This produces a fin that rises out of the surface. It can be done as a centered fold, working as much as possible on the outer edge of the fold edge. The extruded fold edge can also be step rolled with a rolling mill, drawing out a thin fin that emerges from the fold edge itself.
Wriggle Extruded Line
When a line-fold is centered and a second is placed at a right angle to it, the first line is stretched during the process. In this example, a centered line fold is folded and pinched, and the fold edge is forged before it is annealed and opened. The piece is bent again at ninety degrees to the original line, the first thin extruded fold edge is stretched. When the sheet is now flattened out, the first line shows a predictable wiggle. If the fold edge is forged thin enough, when bent ninety degrees to its axis and then flattened out, it will wriggle in the same way.
Pinched Line
A pinched line-fold is usually done with a curved hammer (above) and a curved stake (below). The name "pinch" comes from the fact this fold brings the metal together at only a single point. The metal is struck first several millimeters behind the fold edge, then drawn out as blows fall directly on the edge itself.
Alternate Line-Folds
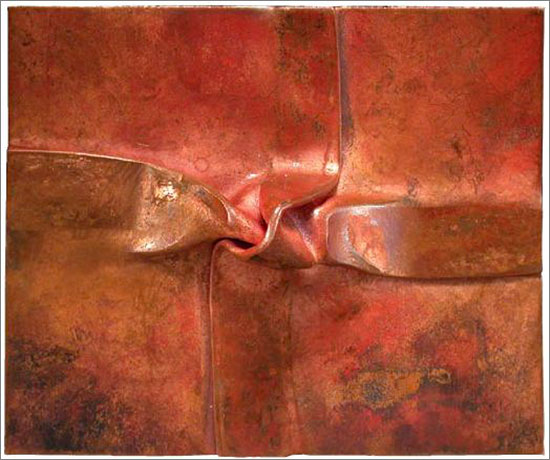
Alternate line-folds can be added to the sheet radiating from the center point, parallel, or oblique to it. Because the structural characteristics of this fold are so strong, it is necessary to anneal at every stage if you are adding additional folds. Such multiple radiating folds produce eruptions of the surface that cannot be achieved any other way in sheet metal.
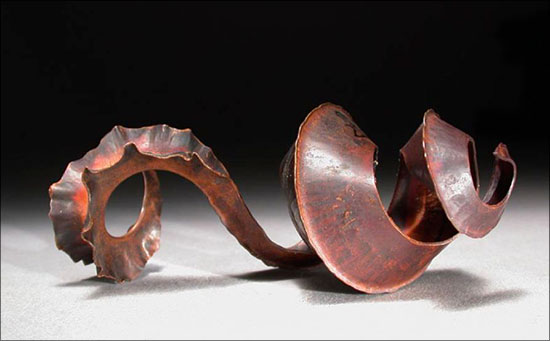
Forged Line-Fold
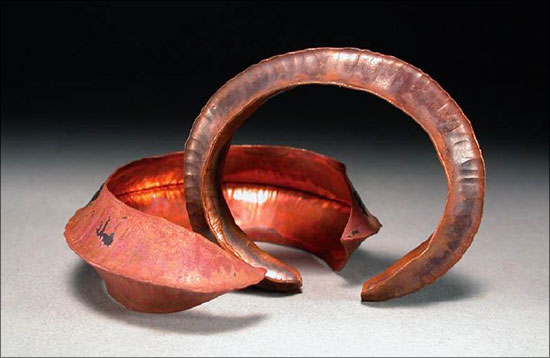
Forged line-folds are among the most interesting and evocative folds. There are three approaches to this fold: You can forge the open side, the closed side, or a combination of both sides. The proportion of fold edge to leg is very important. Shorter legs result in greater curvature, while longer legs reduce the degree of curvature. Forging the closed side can lead to shell or pod forms, and forging the open side tends to create leafy forms. There are two main choices: forge the open side of the fold or the closed side — each takes you on wildly different directions.
Rueger Fold
 |
| Sterling Rueger Fold forged on the closed side. |
When line-folds are forged on their open sides, they curve against the fold edge. Depending on where they are struck, the edges of these forms can be either thickened or thinned. If the edges become too sharp, they should be blunted by upsetting or burnishing. Small versions make for interesting earrings; I have seen this fold done successfully in fold that was as thin as 28 gauge (0.3 mm). Even soft metals like fine silver will be structurally stable because of the changing cross sections of the form.
Early in foldforming I was making line-fold shapes that looked like Viking ships. Paul Rueger, a metalsmith from New Hampshire, copied me but went further. The forms that developed curled around into an exciting shell-like structure. To duplicate this fold, start by making a long line-fold with relatively short legs. The actual shape can vary, but a usual approach is to have the widest part close to one end and the slope tapering from that place to the end of the fold. Rueger Folds look best when their proportions are long and graceful rather than short and stumpy.
 |
Purchase your own copy of “Foldforming (Hardcover)” today. |
Related Articles

Metal Corrugation Vocabulary

Steps on Making a Basic Wedge T-fold

The Metal Corrugation Project

The Jewelry of Cynthia Eid


The All-In-One Jewelry Making Solution At Your Fingertips
When you join the Ganoksin community, you get the tools you need to take your work to the next level.
