
Anticlastic Raising Basics
The word synclastic describes a form in which the dominant curves both move in the same direction. When the two dominant axes curve in opposite directions the result is known as an anticlastic form. A bowl is a synclastic form and a saddle is an anticlastic form.
3 Minute Read
The word synclastic describes a form in which the dominant curves both move in the same direction. When the two dominant axes curve in opposite directions the result is known as an anticlastic form. A bowl is a synclastic form and a saddle is an anticlastic form.
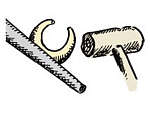
Sinusoidal Stakes | |
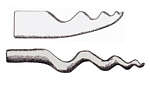 | A flat sinusoidal stake can be made of hardwood or plastic. A metal variety is made by bending a tapered steel rod. All curves should be smooth, uniform, and symmetrical. |
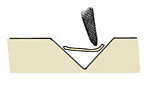
Making a Spiculum | |
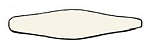
 | 1. Grade roll a sheet so one end is thinner than the other. |
| 2. Cut a shape from annealed sheet and file the edges smooth. Anneal and dry. | |
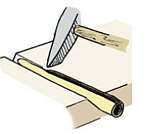
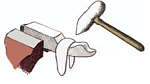
 | 3. Lay the metal along a groove in a wooden block. Strike with a crosspeen along a line just inside one edge. Overlap blows, taking small steps from one to the next. |
 | 4. Reverse the form and and repeat the hammering along the opposite edge. If the form curls, bend it back to straight in your hands. |
 | 5. Continue in this way, striking lines that run along the axis of the form, each time moving closer to the center. It may be necessary to switch to a narrower groove in the forming block. Stop when the form is slightly oval, with the opening at the longest axis of the oval. |
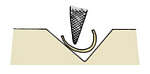
 | 6. To close the seam, hold the spiculum in a V-groove or (better) a rounded groove and tap it with a cross-peen hammer. When done correctly, the form will close as if with a zipper, and the result will be round in cross-section. |
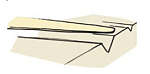
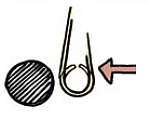
Bending a Spiculum | |
 | Modest curves can be made in a tapered tube by bending it in your hands. Use a mallet to tap the tube, lightly so that its round cross section becomes oval. Note the location of the solder seam. An meal and bend gingerly, distributing the force along the spiculum such that the curve lines up with the tall axis of the oval. Stop when the cross section returns to round. If needed you can repeat this process a couple of times, but more than that and the cross section will become square. |
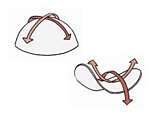
Making a Curved Double Spiculum | |
 | 1. Cut a graceful form and file the edges smooth. Shapes do not need to be symmetrical but this is recommended in early learning exercises. Trace the pattern for future reference. |
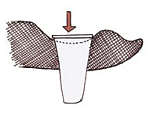
 | 2. Bend the annealed sheet into an even curve and lay it over the stake while holding the legs together. With a smooth cross-peen hammer or mallet, strike the metal to begin the curve. Do not allow the legs to pull upward. |
 | 3. Move along the edge, starting in the center and moving outward, left and right. Reverse the metal and repeat on the opposite edge. |
 | 4. Continue in the is way on the long axis to gradually roll the form upward. Resist the temptation to move too quickly. Use gentle overlapping blows, stopping as needed to manually twist the piece back to symmetry. |
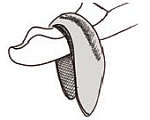
  | 5. Stop when the form is oval in cross-section. Anneal and dry. Hold the form beside a curved stake like an anvil horn or a ring mandrel gripped in a vise. Tap on the edge directly opposite from the point of contact, rolling the form and advancing along that point. |
Grade Rolling | |
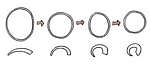
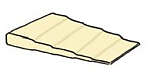 | Control of anticlastic raising requires an understanding of the thickness-to-diameter ratio. Imagine using coat hanger wire to make a series of rings. A two-inch hoop will be easy, a one-inch hoop will be challenging, and a half-inch hoop will be almost impossible. As the diameter gets smaller, the metal needs to be thinner. To create a situation where the thickness-to-diameter remains constant, the metal must be made thinner as it goes to the point. This can be done by careful planishing or with the help of a rolling mill. Rolling can be done before or after cutting out the blank, but it will slightly distort the form, so some filing will be needed in either case. Set the jaws so they equal the metal thickness, then close them a quarter turn. Roll the metal almost all the way through, then back it out. Close the gap another quarter turn and roll almost as far as last time, then back it out. Continue in this way to create a subtle stair step progression. Planish the ridges lightly with a polished hammer to make a uniform ramp. An real, file the edges, and proceed as above. |
Related Articles

An Interview with Leila Tai

How to Customize Curved Tip Melee Tweezers

Introduction to Weaving Metal

The Metal Corrugation Project


The All-In-One Jewelry Making Solution At Your Fingertips
When you join the Ganoksin community, you get the tools you need to take your work to the next level.
