
Reticulation – Ridges and Ripples
Reticulation is not difficult, but it does take practice, concentration, and a deft torch hand. Also, the pattern and appearance of a reticulated piece is not predictable; you probably won't get the same results twice.
16 Minute Read
Reticulation permits the studio jeweler to create unique textures on silver or gold - but it takes a deft hand on the torch to get the desired results.
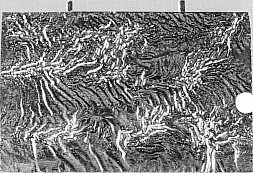
Another, less common method of texturing a surface is reticulation. Reticulation, which is used exclusively by studio jewelers, produces a ridged or ripply surface through controlled heating. The ridges of a reticulated surface are more pronounced than any other surface treatment, looking like a moonscape or a relief map of the Sierra Nevada. In indirect light, the ridges of reticulation cast shadows, like those thrown by mountains in the late afternoon sun. And just as mountain shadows change with the shifting sun, the shadows on a reticulated surface shift as the wearer moves.
Reticulation usually involves heating a sheet of gold or silver alloy up to 10 times to oxidize the copper at the surface, then pickling to remove the oxide and leave a thin layer of pure metal. This process-called depletion gilding-results in different melting temperatures between the surface and the interior of the sheet. Once the sheet is gilded, it is heated with a torch: The alloy in the interior flows before the surface metal does. The result is that the surface wrinkles, something like the "skin" on hot chocolate-only more appetizing.
This texturing method was developed fairly recently, says Oppi Untracht in Jewelry Concepts and Technology. According to Untracht, it first appeared in the late 1800s in Czarist Russia, where court jewelers, including Faberge, created textured objects such as liquor flasks and cigarette cases.
Many of Faberge's craftsmen were Finns, writes Finnish metalsmith Heikki Seppa in Metals Technic: A Collection of Techniques for Metalsmiths. When the Faberge studios closed during the Bolshevik revolution, the Finns brought the technique back to their homeland, and from there it spread throughout Scandinavia. Seppa, who trained with one of the Faberge artists, helped popularize the technique in the United States.
Silver is the metal most commonly used for reticulation Sterling silver (92.5 percent fine silver and 7.5 percent copper works fairly well, but silver alloyed with a higher proportion of copper gives a more dramatic pattern. Seppa reports that Finnish smiths use an 82 percent silver and 18 percent copper alloy. In the U.S., commercially manufactured reticulation silver alloys of 80 percent to 83 percent fine silver and 20 percent to 17 percent copper are available from at least two refiners: Hauser and Miller in St. Louis (800-462-7447) and Hoover and Strong in Richmond, Virginia (800-759-9997). Reticulation can also be done on karat golds, with results similar to those of silver.
Reticulation is not difficult, but it does take practice, concentration, and a deft torch hand. Also, the pattern and appearance of a reticulated piece is not predictable; you probably won't get the same results twice.
Because of its unpredictability, most jewelers start with a sheet of metal larger than they expect to use. (Also, the reticulation process involves some shrinkage.) A sheet of metal measuring 3 to 4 square inches usually gives you a good margin for error, says artist/jeweler Sara Sanford of Portland, Oregon. You can then remove the most interesting sections and incorporate them into jewelry. Even small pieces can be used as accents in earrings, pendants, or cuff links. There will almost always be some metal scrapped, however, so take that into consideration when pricing.
The thickness of the sheet affects the amount of texturing. You can use 16 to 24 gauge (Sanford recommends 22 gauge). Although thinner gauges increase the chances of meltdown, then also create a more textured surface.
Step by Step
Step 1. The first step in the reticulation process is depletion gilding. Heat the sheet to annealing temperature, about 1,100°F, or not quite a dull red. You can use a torch, but a kiln gives better control. (To make it easier to move the sheet in and out of the kiln, place it on a wire enameling screen.) Hold the metal a, 1,100°F for at least two minutes.
Step 2. Quench the metal in fresh, hot pickling solution, such as Sparex, and leave it there for two to three minutes. When reticulating gold sheets, avoid pickle that has been used with silver items, since the silver in the solution may plate itself onto the gold.
Step 3. Clean the sheet under running water with a brass scratch brush, using liquid detergent as a lubricant. (Seppa says that Faberge and his contemporaries used stale beer-more readily available at the time than liquid dishwashing detergent!) Dry thoroughly.
Step 4. Repeat the annealing-pickling-cleaning process. Sanford uses six cycles for silver, eight for gold. For production work, the less frequently the metal is handled, the better, says artist/jeweler and author Tim McCreight of Portland, Maine. In that situation, he recommends heating the metal only twice, holding it at 1,100°F for five minutes the first time, then 10 minutes the second time. After the last pickling bath, clean thoroughly again, but do not use the scratch brush.
Step 5. With a torch or kiln, pre-heat the soldering pad or charcoal block on which you will lay the metal sheet during reticulation. A hot soldering surface helps keep the metal heated evenly during the process.
Step 6. Lay the prepared sheet on the heated pad. Use a large, "bushy" reducing flame to heat the metal (you want to be able to cover the entire sheet at one time with the flame). Gas/compressed air torches {work well for reticulation, as do propane or natural gas/oxygen torches with large tips. An oxy-acetylene flame is too hot and too small for heating the whole sheet evenly, says Sanford.
However, artist/jeweler Gene Pijanowski of "Ann Arbor, Michigan, uses a technique that does incorporate this hotter flame. When working on very large sheets of metal, he uses an acetylene/air Presto-lite torch with a large soft flame to keep the entire sheet hot during the process. In the other hand, he wields an oxy-acetylene jeweler's torch with a small, hot flame to create the texture. "By changing the angle of the torch and the closeness of the flame to the sheet, you can actually start drawing the texture and creating rows and circles," he says. (See the section on reticulation in Untracht's Jewelry Concepts and Technology for photos of Pijanowski using the two-torch method.)
Step 7. If you are using a single torch, reduce the flame to a small, more pointed tip as the metal turns red and approaches reticulation temperature. Slowly move the flame closely over the metal. The tip of the inner blue cone of the flame-the hottest part-should be very close to or even right on the metal.
Step 8. As the metal begins to crinkle, move the flame onward. This is the most critical part, and you have to watch the surface very closely. If you hold the flame too long in one place, you are likely to end up with a hole in the sheet.
The sheet will reticulate only where you focus the flame, so you can leave part of the sheet plain for contrast, if you choose.
Step 9. When the entire sheet-or as much of it as you want-is reticulated, remove the heat, allow the metal to cool slightly, and quench in pickling solution.
Step 10. Clean with water, brass scratch brush, and detergent to give the metal a satin finish. Attempting to highly polish reticulated metal tends to diminish its impact.
Finishing Up
Reticulation is a serendipitous process, and the challenge is to use whatever you get, regardless of your expectations. However, you will gain more control over the process with practice. One thing to remember is that both sides of the sheet will be reticulated, not just the side to which you held the torch. (Sometimes the hidden side shows even better results than the visible one.)
You may also want to consider patination, which can bring out the drama of the ridged surface. "It's all about relief, and a patina shows up the relief more dramatically," says McCreight, who colors his reticulated pieces with liver of sulphur. Baldwin's Patina, made by Seattle metalsmith Phil Baldwin and distributed by Reactive Metals Studio Inc. in Clarkdale, Arizona, can be useful in some instances, since it will not oxidize silver or gold. This is convenient when you want to patinate the surfaces used with the reticulated metal but not the actual reticulated gold or silver.
Reticulation is most commonly used with silver, which textures relatively easily and well. Reticulated silver is somewhat porous and will "soak up" solder when you join it to a non-reticulated metal, so you'll need to use more solder than usual. In addition, you must watch the reticulated sections carefully while soldering. The thickness of the reticulated sheet is uneven, and the heat of soldering can cause the thin sections to melt. McCreight recommends burnishing the edges of the metal to reduce the solder absorption and to even out the thickness of the edges, making soldering a little easier.
Sanford and McCreight have also found reticulated metal to be somewhat brittle. They advise avoiding excessive bending and forming. Sanford recommends reticulating flat pieces of metal, but if you want a shaped piece, repousse the metal slightly before reticulating. Support the repoussed piece from underneath when heating to prevent collapse. Be aware, though, that forming before reticulating increases the chance of burning holes through the sheet.
Seattle artist/jeweler Andy Cooperman says he hasn't found reticulated silver unmalleably brittle, however. "I used to use reticulated silver to make torques," he explains. "Nothing punishes metal more than anticlastic forming, [but] there was no problem [with a reticulated piece]. Sometimes it was somewhat more brittle, but not usually." He annealed the piece whenever necessary, but usually found it worked fine without annealing.
An entire piece of jewelry can be made of reticulated metal, as with Cooperman torques, but most of the artists we talked to use it as an accent, contrasted with smooth or highly polished metals. "It's one of those things that works best if held in reserve," says McCreight. "It's like a hot spice: A little goes a long way." Reticulated metal contrasts well with smooth stones, such as cabochons, and emphasizes the texture of rough stones, such as crystals or drusy materials.
But however you use it, remember that reticulation silver is not sterling and cannot be stamped as such. If you buy reticulation silver, mark the sheets immediately and keep all scraps separate from your sterling silver. When selling jewelry made with reticulation silver and sterling, be sure the customer understands that the piece is not entirely sterling.
A Golden Opportunity
Although reticulation may be common with silver, it's rarely done with gold. After all, who wants to risk a couple of hundred dollars' worth of 14k or 18k gold sheet?
To find out more about gold reticulation, we decided to conduct our own experiment. Helping us were Torry Hoover, Vice President of Hoover & Strong, who offered to send us 12 types of gold sheet, and Sara Sanford, who volunteered her expertise, studio, and torch to conduct the experiment.
All of the sheets measured 2 inches square and almost all were 22 gauge. (Two were 24 gauge, one 18k and one 14k.) Sanford annealed each sheet eight times for two minutes in a kiln set at 1,100°F. After reticulating, all were quenched in a clean, hot Sparex solution. The winner, hands down, was 14k green gold, with the 14k yellow gold coming in second.
The results of the experiments follow:
10k yellow, 22 gauge: Moderately difficult to work with. Reticulates, but the surface is very dull afterward. A tendency to develop holes. Might be worth experimenting with, but it is not recommended.
10k white, 22 gauge: Does not reticulate. Produced some pitting after prolonged heating. Discolored badly.
10k pink, 22 gauge: Relatively easy to work with. Texturing was not as prominent as that of the green golds or the 14k yellow. Ripples were softer, like those on water. Very nice pebbling on the reverse side.
10k green, 22 gauge: Relatively easy to work with. Reticulated nicely, although it had a tendency to develop holes.
14k yellow, 22 gauge: Worked well with good results. Produced an attractive, textured surface with wrinkling and some pebbling. However, there was some tendency for holes to develop. Sanford's second choice.
14k yellow, 24 gauge: Difficult to work with because of the thinness of the metal. Developed very fine pebbly texture and some wrinkling. Better results with 22 gauge.
14k Royal yellow, 22 gauge: Difficult to work with because of the tendency to develop holes quickly. Reticulated surfaces were attractive, but loss of metal was high.
14k white, 22 gauge: Did not reticulate. Produced some pitting after prolonged heating. Discolored badly.
14k green, 22 gauge: Sanford's first choice. Easy to work with. Produced a textured finish similar to that of reticulated silver. "The 14k green was awesome," said Hoover when the test samples were returned to him. "I was surprised at how clean it was." Sanford finds that the greenish color of the metal works well with most gemstone colors.
14k pink, 22 gauge: Relatively easy to work with. Texturing was not as prominent as that of the green golds or the 14k yellow. Ripples were softer, like those on water. Very nice pebbling on the reverse side. After green and yellow, Sanford's third choice.
14k peach, 22 gauge: Did not reticulate well. Some texture developed on the side away from the torch, but was unattractive.
14k palladium white, 22 gauge: Very difficult to work with. Did develop some areas of texture, but only after prolonged exposure to high heat and bringing the metal almost to melt several times. There was some question as to whether this is true reticulation. Probably not worth working with.
18k yellow, 22 gauge: Very difficult to work with. Had a tendency to melt and fold back from the edges when brushed with the torch flame. Did develop some very nicely textured areas, but it had to be heated almost to melt before that happened.
18k yellow, 24 gauge: Very difficult to work with. Had a tendency to burn through, and to melt and fold back from the edges when brushed with the torch flame. Developed spots of very fine reticulation, but it had to be heated almost to melt before that happened. High metal loss.
If you'd like to try gold reticulation in your own studio, you can use these results as a guideline. However, your results may differ, based on the alloy formula and your skill with a torch.
How does it work?
Reticulation works because different alloys of the same metal (such as silver alloyed with varying proportions of copper) have different melting temperatures, each of which is lower than the pure form of the metal. For example, the melt temperature of fine silver is about 1,720°F, while sterling, silver melts at about 1,640°F. Silver alloy}, that have a higher copper content will melt at 1,600°F or less: The melt temperature of 82/18 reticulation silver, for example, is about 1,520°F.
As noted previously, the initial step in reticulation-depletion gilding-results in differing metal temperatures between the surface and the interior of the sheet, causing surface wrinkles. How much wrinkling occurs depends on the difference in expansion rate between the surface and the interior, explains McCreight. Expansion and contraction rates differ for every alloy and for pure metals. In metal prepared for reticulation, the pure metal coating has a higher melting point and lower expansion rate than the interior alloy. Thus, the interior alloy melts sooner and expands more. "As it cools from slushy to solid, it shrinks quite a bit, and that has the effect of pulling the surface into ridges," says McCreight.
Conventional wisdom has held that the higher copper content of reticulation silver is responsible for the improved quality of the reticulated texture. Gold, however, is a different story. When Sanford worked with Hoover & Strong's gold, the results were not expected. If copper alone were the reticulation agent, then the pink or peach golds, which are higher in copper, should have reticulated the most dramatically and easily. However, Hoover & Strong's green golds, which are higher in silver content, proved to be the stars of the show.
While it may be impossible to know exactly what makes an alloy reticulate, Torry Hoover was willing to make some educated guesses. One of the first things he looked at was the differential between the flow temperature of fine gold and the flow temperature of the alloy. The 14k yellow flows at 1,550°F; 14k Royal yellow at 1,600°F; and 14k green gold at 1,715°F. Fine gold flows at 1,945°F. Although the green gold had the smallest temperature differential of the three golds that worked well, it worked the best. So Hoover reasoned that it couldn't be temperature differential alone that caused the improved texture.
Then Hoover realized that sterling melts at 1,650°F, and other silver/copper alloys melt at even lower temperatures. He theorizes that the copper/silver ratio inside the gold sheet-between the two fine gold surfaces- changes slightly during the depletion process, dropping the flow temperature below that of the original 14k green gold alloy. "I think it's the copper-silver ratio [in the alloy]," says Hoover. "Everybody looks at just the copper that's added to the sterling. They don't think of the silver as being part of that ratio. You don't see [the silver] in the gold [alloy], but the silver is playing an important role."
This said, it must be noted that the success here may be due to the particular recipe that Hoover & Strong uses for its green golds. Pijanowski has reticulated 14k yellow gold, and Seppa has worked successfully with 18k gold. So this may not be the last word on reticulated gold.
Production Potential
Although it could possibly be used in mass production, true reticulation seems likely to remain the domain of the artist-jeweler. Reticulation takes a lot of skill with a torch, and chances are that if you have someone that good in your shop, you'll use his or her skills to better advantage. In addition, says McCreight, "it's not a great metal to work with in terms of malleability and soldering. It takes finesse and practice and doesn't lend itself to assembly line production.
"My guess is that a manufacturer would say, 'Make me a nice piece and I'll rubber mold it,"' he adds. "Reticulation has no undercuts, so they [the reticulated pieces] tend to have nice release angles. It would mold up beautifully." With a few nicely reticulated sheets as models, you could make a mold, cast the sheet, and cut pieces out to include in earrings, necklaces, bracelets, or brooches.
Another way to cost-effectively create the reticulation look is by using a rolling mill copy, suggests Pijanowski. "You could dedicate one roll to the pattern and etch the pattern into the surface or impress it mechanically," he says. To save wear and tear on the rolls, you could roll wax sheet instead of sheet metal through the mill, and then use the waxes for casting. The Japanese use a similar method to create texture for pots, says Pijanowski. "Once the pieces are cast and assembled, they look handmade," he explains.
But even if a cost -effective way can be found, McCreight says, "there isn't an educated taste for it. I'm not sure the world is ready for reticulation. There hasn't been a lot of call in the marketplace for a random texture like this."
So for the moment, it seems that reticulation will remain a studio technique-which is good news for jewelry artists looking for a unique texture to add a splash of splintered light to their designs.
![]()
In association with
![]()
The award-winning Journal is published monthly by MJSA, the trade association for professional jewelry makers, designers, and related suppliers. It offers design ideas, fabrication and production techniques, bench tips, business and marketing insights, and trend and technology updates—the information crucial for business success. “More than other publications, MJSA Journal is oriented toward people like me: those trying to earn a living by designing and making jewelry,” says Jim Binnion of James Binnion Metal Arts.
Click here to read our latest articles
Click here to get a FREE four-month trial subscription.
Related Articles

Reticulation Technique and Procedure

The Art of the Celtic Metalsmith

The Work of Mark Rooker

Galalith – Jewelry Milk Stone


The All-In-One Jewelry Making Solution At Your Fingertips
When you join the Ganoksin community, you get the tools you need to take your work to the next level.

