
How to Add a Dichroic Effect to Your Enamels
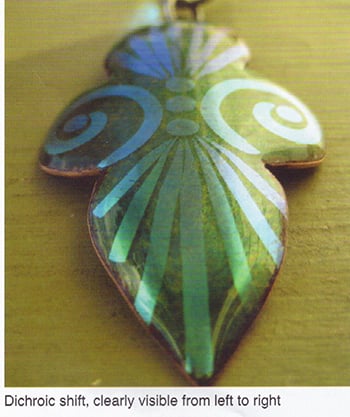
Dichroic glass is simply beautiful. Often referred to as dichro or dicro, the term refers to multiple ultra-thin microlayers of metal oxides which are evaporated onto the surface of glass in a vacuum chamber. These oxides change the way that light is transmitted and reflected, so that as you turn the glass, the color changes. A dichroic coating appears to have additional colors when you turn it and view it from different angles. A piece of dichroic glass may appear one color when you look at it straight on, but different colors when viewed from the side or at an angle. The exciting news is that glass is not the only material that can be coated with dichroic material -- paper can be coated with dichroic material as well.
8 Minute Read
Dichroic glass is simply beautiful. Often referred to as "dichro" or "dicro," the term refers to multiple ultra-thin microlayers of metal oxides which are evaporated onto the surface of glass in a vacuum chamber. These oxides change the way that light is transmitted and reflected, so that as you turn the glass, the color changes. A dichroic coating appears to have additional colors when you turn it and view it from different angles. A piece of dichroic glass may appear one color when you look at it straight on, but different colors when viewed from the side or at an angle. The exciting news is that glass is not the only material that can be coated with dichroic material — paper can be coated with dichroic material as well.
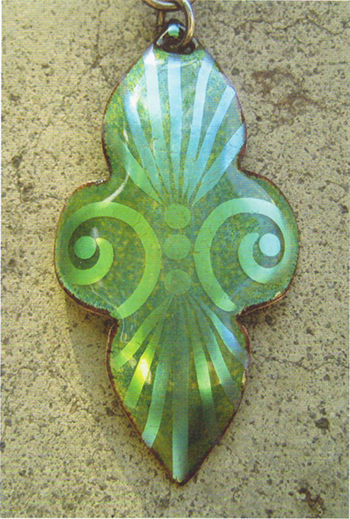
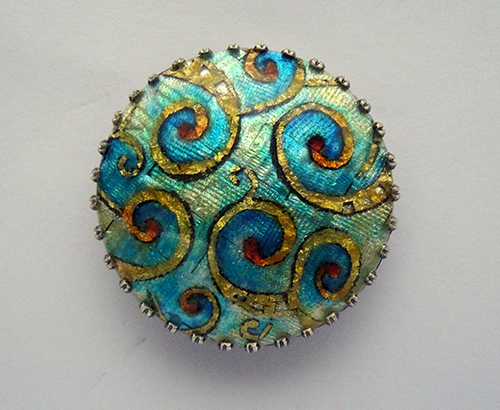
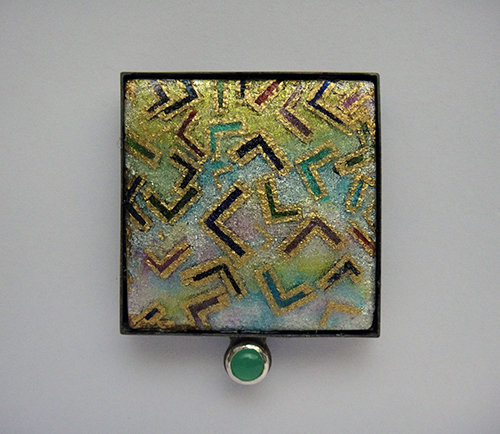
I've only been enameling a short time, but I've been trying to find a way to add a dichroic effect to enamels — why should glass fusers and lampworkers have all the fun with dichro? I'm very happy to share what I've learned so far about creating dichroic enamels. The product I use is Dicro Slide ™, which is manufactured by GlassHopper Patterns and is marketed as a glass fusing, ceramics, and porcelain product. It is paper that has been coated with the same dichroic material that is used in dichroic glass. It has no COE and works with any COE of glass. When applied to an enamel and fired, it has a color shift similar to dichroic glass, changing the way that light is transmitted and reflected so that as you turn the enamel, the color subtly changes (or "shifts").
This special dichroic-coated paper performs like a decal, which makes it very easy to use. You can cut it into your desired shapes with scissors, or even punch out shapes with a hole punch or craft punch.
In planning your design, be aware that the dichroic material tends to flow with the enamel, which can result in a slightly crazed effect. The dichroic effect achieved using Dicro Slide ™ on enamels and in fused glass tends to be more subtle than the dichroic effect of actual dichroic glass. Also, in general, the dichroic effect is more subtle on enamels than it is in fused glass. The colors of the underlayers of enamel change the way the dichroic color appears after firing, although the material is more opaque than transparent. The dichroic effect seems to be more dramatic on curved or domed metal. The color and dichroic effect are stronger on darker colors and backgrounds, and the fired results may vary depending on how long and/or how hot the enamel is fired. As I always tell myself, it's good to embrace unpredictability!
All of my work so far has been with enamel on copper, which is my favorite metal for enameling. I think using the dichroic paper on fine silver or metal clay is an exciting idea, but I have not tried it yet.
The following is the method I have used to work with dichroic paper, but perhaps it is not the only way. This product is new to enameling, so there are certainly different techniques and ideas that have yet to be thought of and tried.
Creating Dichroic Enamels
Supply List:
- Pieces of dichroic paper, cut into desired shapes
- Shallow bowl containing distilled water
- Paper towels or paper napkins
- Wooden skewers (for moving and positioning the wet dichroic paper on the enamel)
Always start with a clean, oil-free enameled surface with several layers of enamel already fired. The dichroic layer should be the top layer.
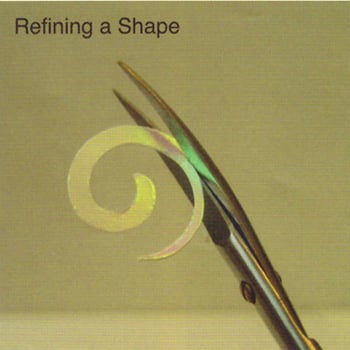
1. Plan your design and cut the dichroic paper into your desired shapes. You can use scissors or a hole punch or craft punch. If you need to, you can very lightly trace your design onto the back of the dichroic paper to help in cutting intricate designs.
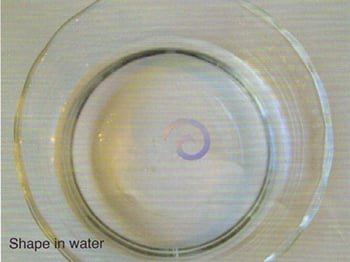
2. Place one of the cut pieces in distilled water, and let it soak for one to two minutes. Always use distilled water! Tap water may have minerals, metals, or additives that can react with the metal in the dichroic material, causing discoloration when fired.
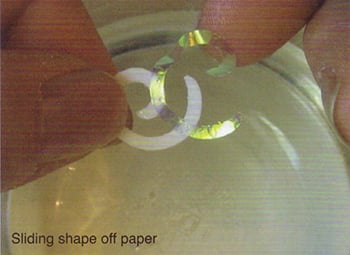
3. Remove the cut piece from the water and gently blot the excess water off on a paper towel.
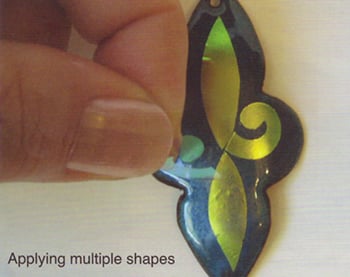
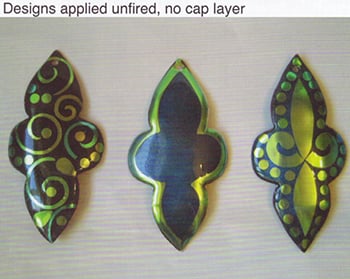
4. Slide the dichroic coating (along with its binder) off of the paper, and apply it to your enamel. (If it does not release easily, soak for a little longer.) It is tougher than it looks! In the kiln, the binder burns off, leaving the dichroic coating on the glass. Generally, place the design on the enamel with the dichroic (shiny) side up. Placing the dichroic side down may produce a different result. The dichroic material will not adhere to itself, so don't overlap it unless you plan on using a cap layer of clear enamel.
5. Keep the shapes slightly damp while moving them on the glass. Use the dampened end of a wooden skewer to move or uncurl the wet shapes.

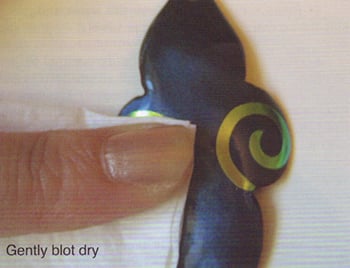
6. Once the design is in place, remove as much water as possible by lightly blotting the design with a paper towel, being sure not to slide the design out of place or lift up the edges of the dichroic material. You need to make sure that there is full contact between the dichroic material and the enamel; if there's not full contact, then the part that is raised up off of the enamel will not adhere during firing.
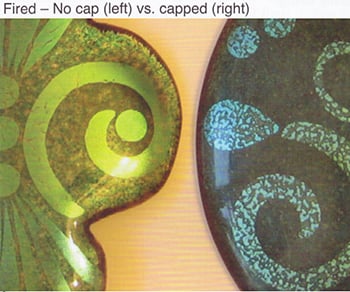
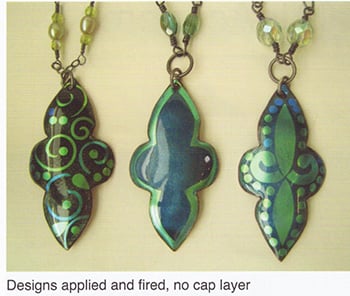
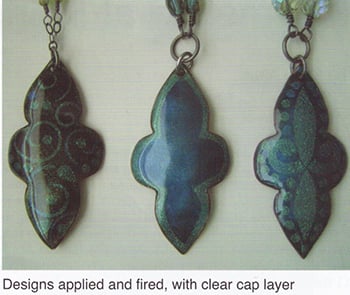
7. You'll need to decide whether or not to apply a cap layer of clear enamel over the applied dichroic design. Without a cap layer of clear enamel, the dichroic material is shinier and has a stronger dichroic shift. With a cap layer of clear enamel, the dichroic coating has a slightly mottled appearance and is much more subtle in color and dichroic shift.
If you decide to add a cap layer of clear on top of the applied dichroic design, spray with 50/50 Klyr-Fire and water if needed and apply a very light coat of clear enamel. Be careful not to let the design slide around on the enamel. I use washed Thompson Clear Flux #2020 or #2030 (80 mesh) or washed Thompson Wax Yellow #2110 (80 mesh). Keep the top coat of enamel light. If the top coat is too heavy, it seems to cloud up on top of the dichroic material.
8. Let the applied dichroic material dry overnight (or at least 12 hours). This is critical! If you don't, steam can create a nonuniform appearance after firing.
9. Fire the piece. You'll need to fire differently depending on whether or not you decided to use a cap layer of clear enamel.
Firing dichroic enamels with a cap layer
I have a small Paragon SC-3 with a ceramic fiber firing chamber rather than fire brick, with a programmable controller. I fire the enamel with the dichroic material and the cap layer of clear enamel at 1475°-1550°F for 1 minute 20 seconds for a jewelry-sized piece.
Firing dichroic enamels with no cap layer
If firing with no cap layer, you'll need to fire it for a little longer and a little lower to give the binder a chance to burn off completely, which will firmly adhere the dichroic material to the enamel without a cap layer to protect it. You may have to experiment with firing times in your kiln to make sure the binder burns completely off. In my small kiln, I fire an uncapped jewelry-sized piece for 3 minutes at 1450°F.
I always vent the kiln by removing the plug just in case there are any fumes from the binder burn-off process. I don't know if this is really necessary or not, but it seems like a good idea just in case. Additionally, it seems best to fire the enamel with the dichroic design only once. My experience has been that it can sometimes fade upon subsequent firings.
Dicro Slide ™ uses a carrier material which keeps it from dissolving when put into water. When enameling small jewelry-sized pieces this carrier material vaporizes rapidly in the kiln. I am not sure what the results would be, however, if enameling using a larger piece. For glass fusing using a large piece of Dicro Slide ™ (bigger than 4×4 inches), the manufacturer recommends that a 20-60 minute "hold" be programmed into the fusing cycle at 950°F to allow the carrier material to burn out. Given that, some accommodation may be necessary during the enameling process to allow the carrier to burn out on larger pieces. Again, this is a product that is new to enameling, and still requires experimentation.
This technique might not be right for enamelists who strive for perfection — the results are a little unpredictable — but for me, unpredictability is a big part of what makes enameling fun. Of course, be sure to do test firings before firing the dichroic material onto an important piece.
I am continuing to experiment to see what other effects I can produce, and I'm excited to see what everyone else comes up with. I hope the enameling community decides to experiment with this new material and enjoys this fun way to add a dichroic effect to enamels.
Torch Fired Enamel DVD with Chris Hierholzer
Torch Fired Enamel DVD with Chris Hierholzer is now on sale through the Ganoksin Project for $19.95 (You Save: 43%)
This 24 minute instructional video is full of close-up photos of the torch firing process in real time. In addtion to showing the firing of the uncdercoat, counterenamel and top coat, Chris shows you his interesting technique of carving through an overlay of gold foil to "draw" a design.
He also includes several different options for the torch firing set-up. Viewing this will help beginners without kilns or anyone wanting to try an alternate way of firing enamels.
Chris Hierholzer has been involved in metals for 50 years, in foundries, welding shops, and jewelry. He is fascinated with the process and its constantly changing creative aspects. He started creating enamels during the 1980's and during that time he was part time assistant to William Harper.
Order your copy of Torch Fired Enamel DVD with Chris Hierholzer today!
Related Articles

How to Customize Curved Tip Melee Tweezers

The Enamel Art of the “Nine Lively Ladies”

New Zealand Enameling Culture

Unconventional Enameling Projects


The All-In-One Jewelry Making Solution At Your Fingertips
When you join the Ganoksin community, you get the tools you need to take your work to the next level.
