Reticulation of Shakudo and Shibuichi
13 Minute Read

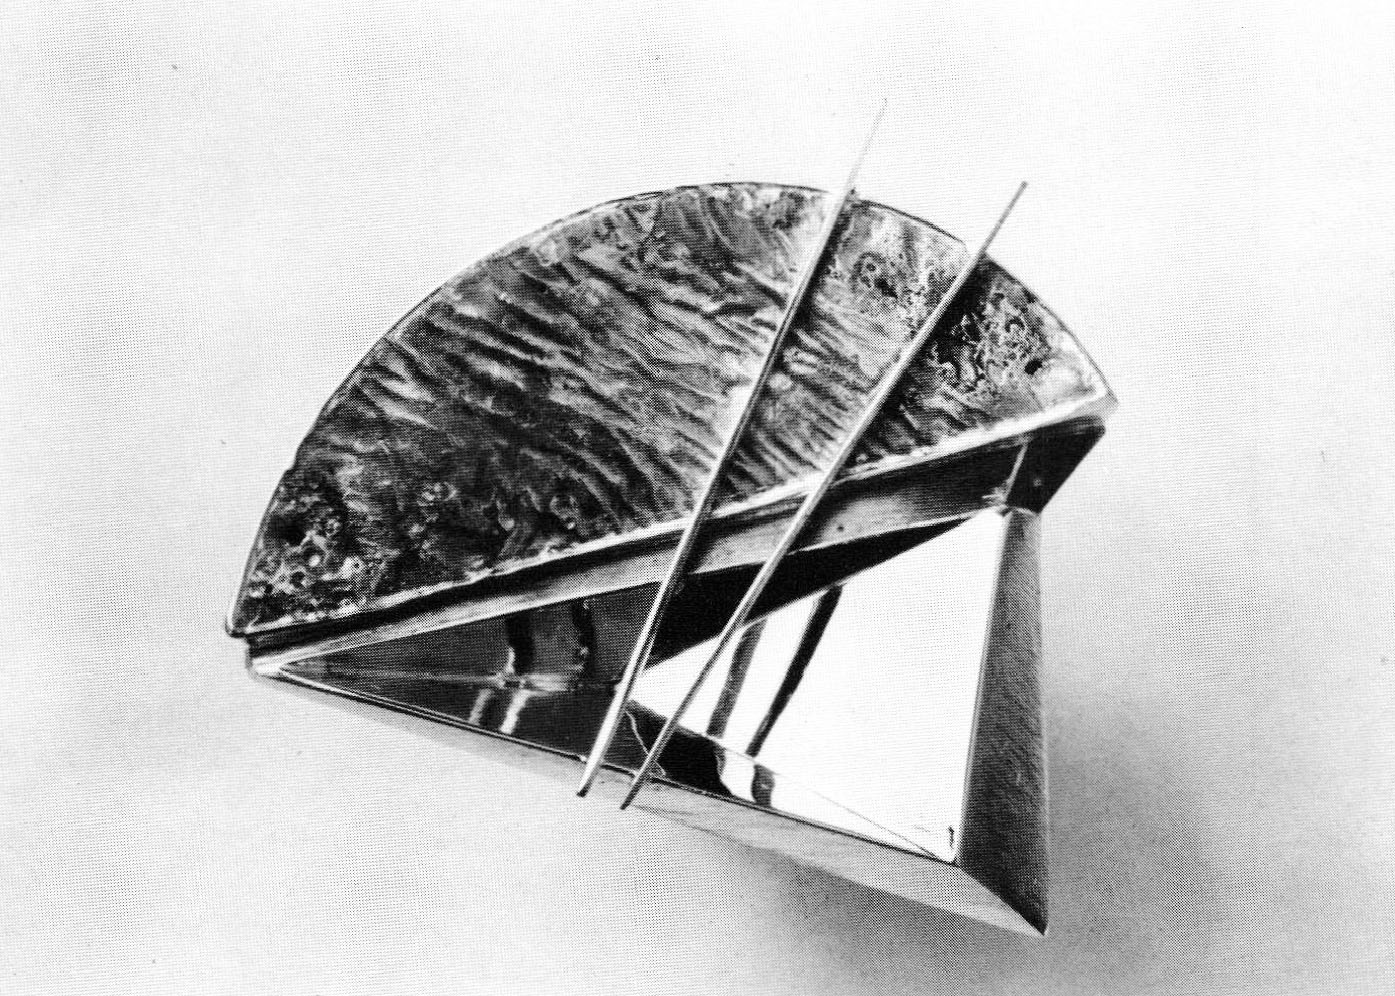
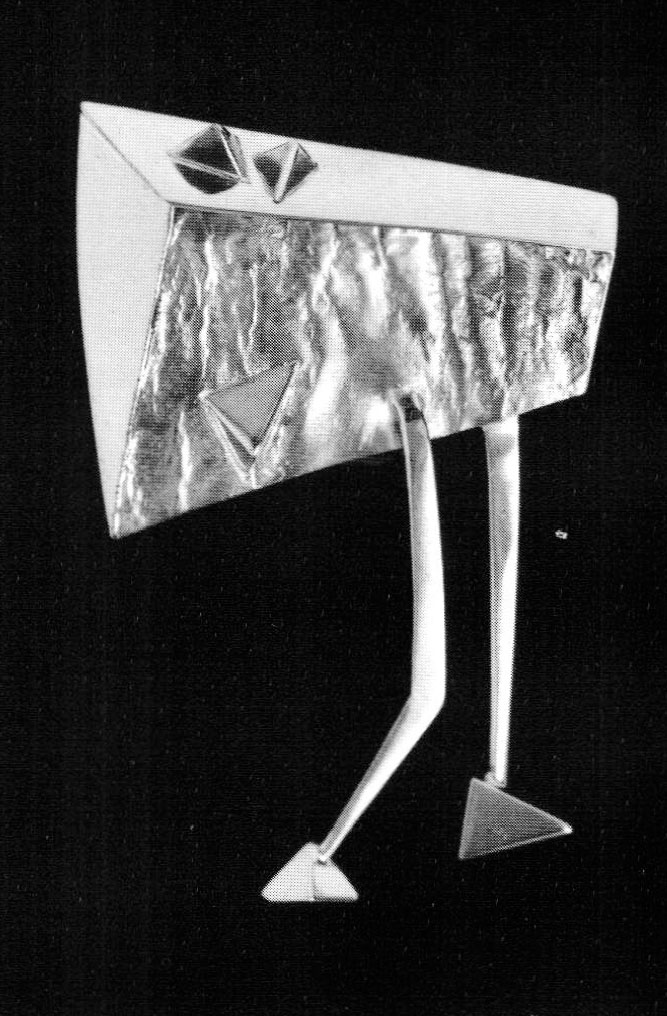
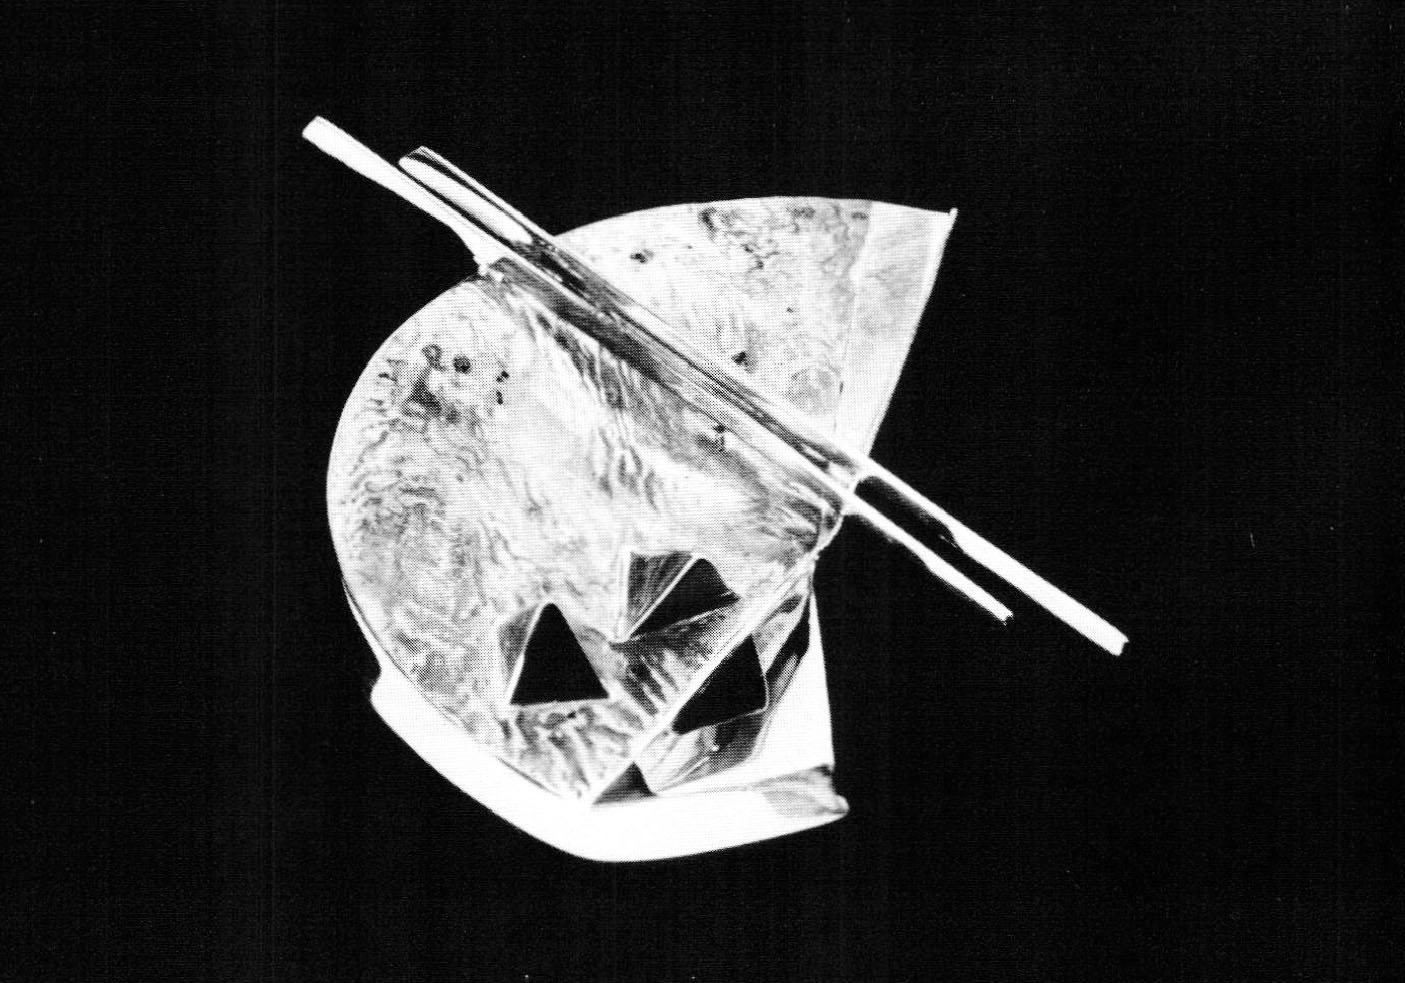
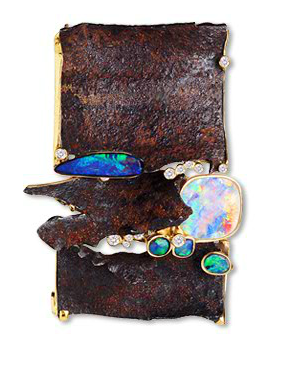
For a number of years I have been exploring the use of the Japanese alloy shakudo in ways other than mokumegane. I was interested in its coloring properties and use in marriage of metal. In 1982. I started coloring it with heat rather than chemicals, finding this gave a wider range of colors. The iridescent quality and vivid blues of the shakudo remained fairly stable and were easily reproduced for production pieces.
Reticulation of Shakudo and Shibuichi
Wanting to examine its qualities further, I pursued the idea of texturing it through reticulation. While I knew that some sort of textured results were possible on alloys of a higher gold ratio than I had been using, I assumed that it might not be possible to reticulate a 95/4. 75 copper/gold alloy due to the predominance of copper. However, I was successful, so I also tried the technique on another Japanese alloy, shibuichi. There are particular problems in reticulating both shakudo and shibuichi, but consistent results can be achieved once all the variables are known Additionally, these metals can be chemically or heat colored later on a completed piece.


Alloys tested
- Shakudo 1: 95% copper. 4. 75% fine gold melting point approximately 1080°C
- Shibuichi 1: 60% copper, 40% fine silver, melting point approximately 920°C
- Shibuichi 2: 67% copper, 32% fine silver, .5% fine gold, melting point approximately 945°C.
Torch
I found that an oxyacetylene microtorch fitted with a #4 tip worked best on 24-gauge sheet.
Due to the high ratio of copper in these alloys, particularly the shakudo, the rate of thermal conductivity is very high, A very hot, yet small-diameter flame is needed. Through additional testing I found the #4 tip produced a much more satisfactory texture than a #5 tip on the shakudo, and with both the shakudo and shibuichi it was easier to control, The #3 tip was too small.
The problem of using a propane/compressed-air torch on shakudo is that in order to achieve a flame sharp and hot enough to reticulate the metal, the diameter tends to be too large, thus heating too large an area at one time. A smaller flame does not allow the metal to reach sufficient temperature. On both metals, the microtorch produced better results and was easier to use.
Procedure: Reticulation of Shakudo 1
Successful reticulation requires that the surface skin have a higher melting point than the core. This is done through repeated annealing and pickling, thus depleting copper from the surface and raising the melting point of the surface. The controlled heating of the metal below this skin produces the reticulated texture.
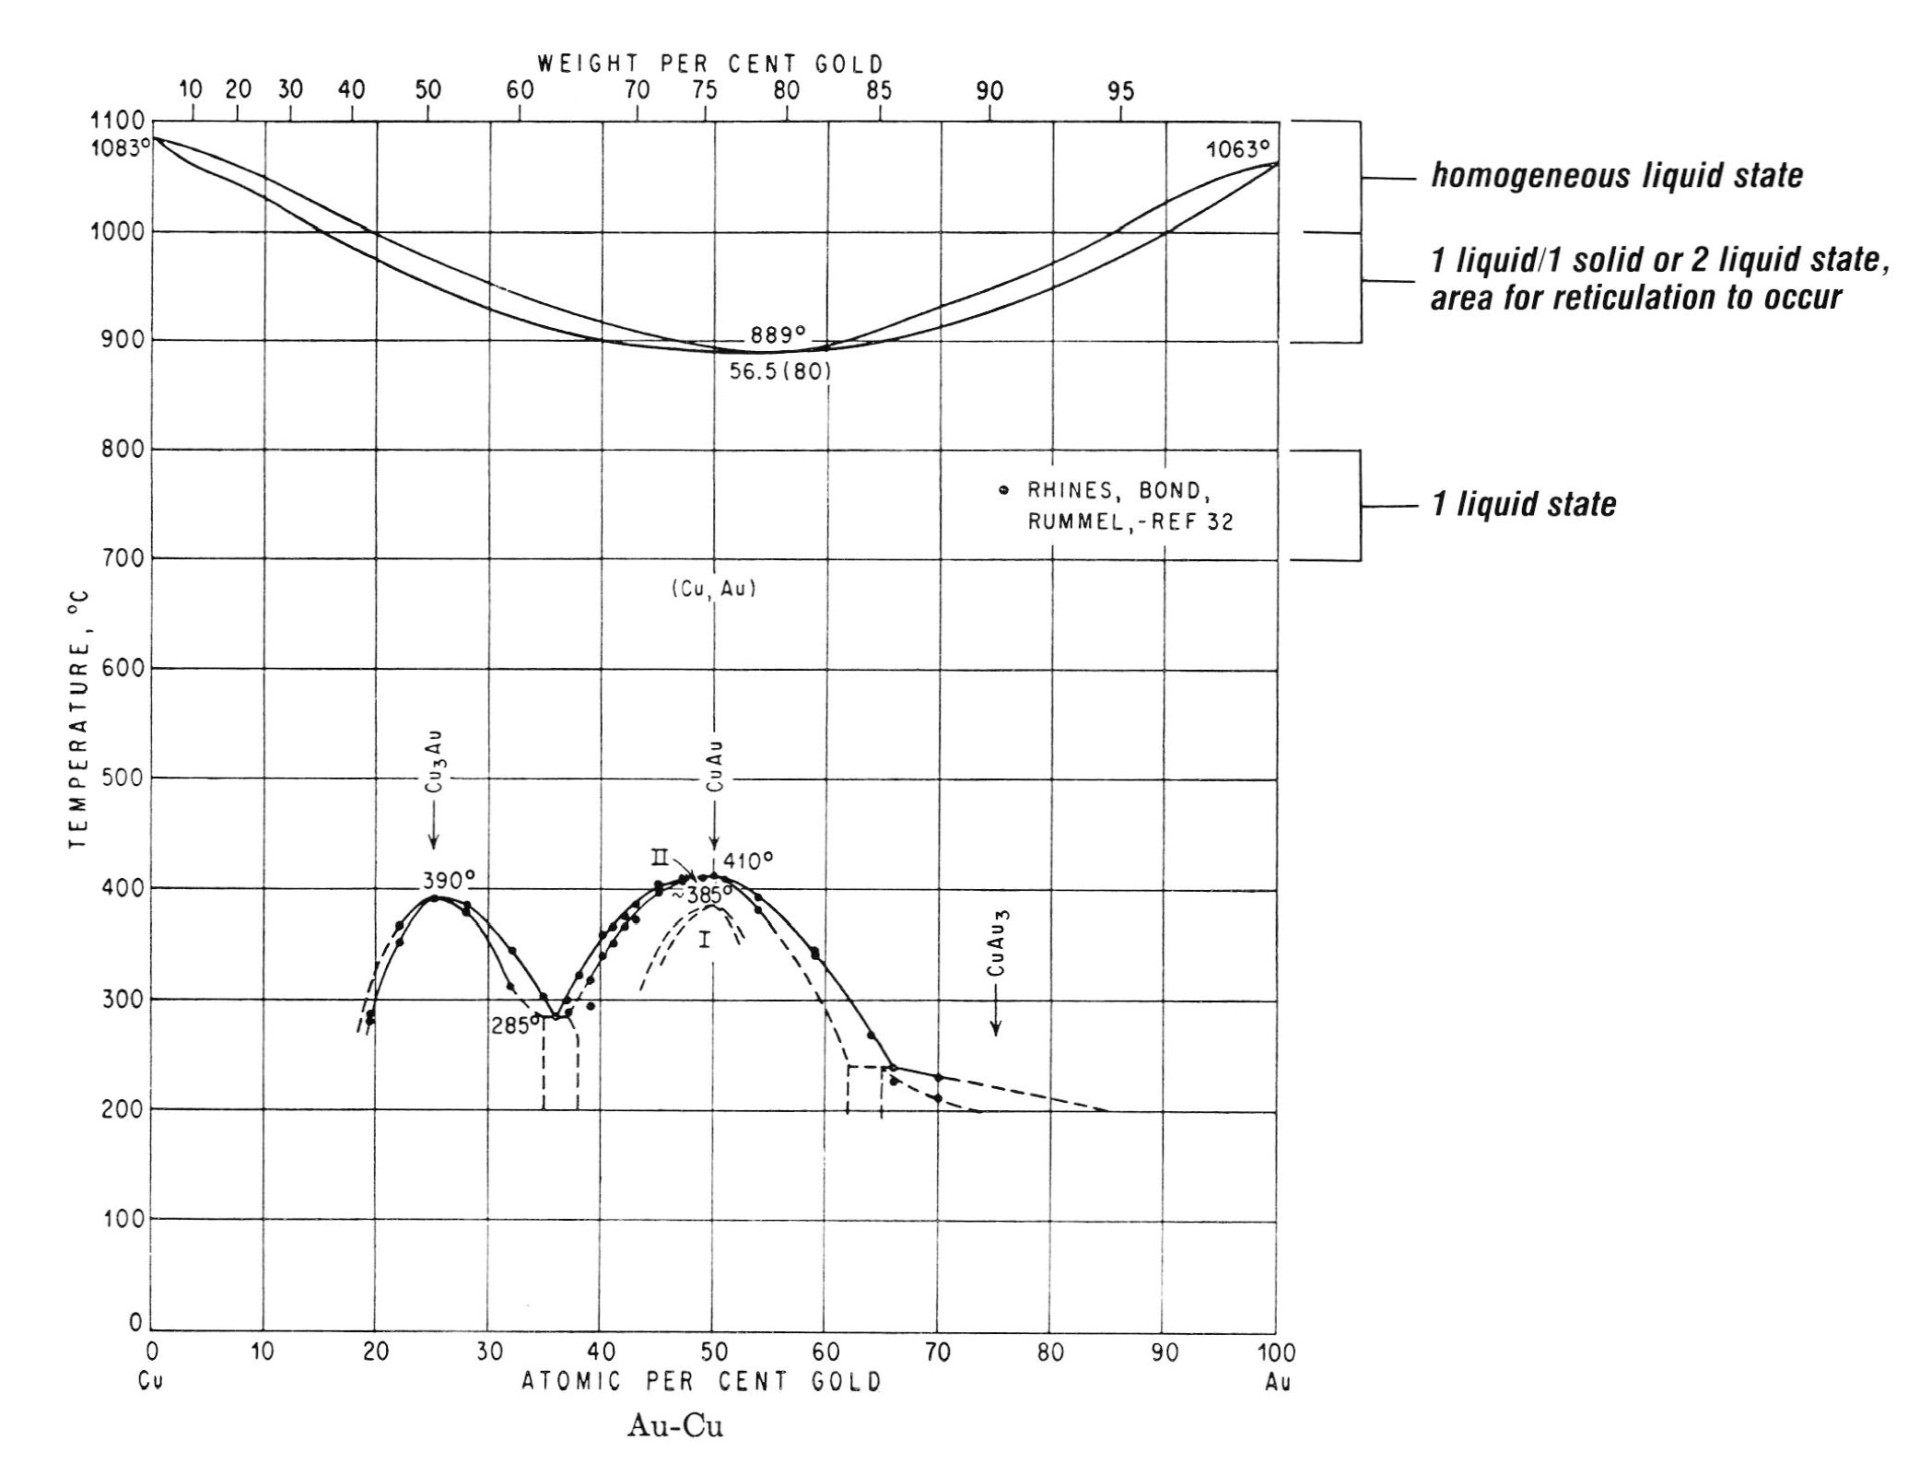
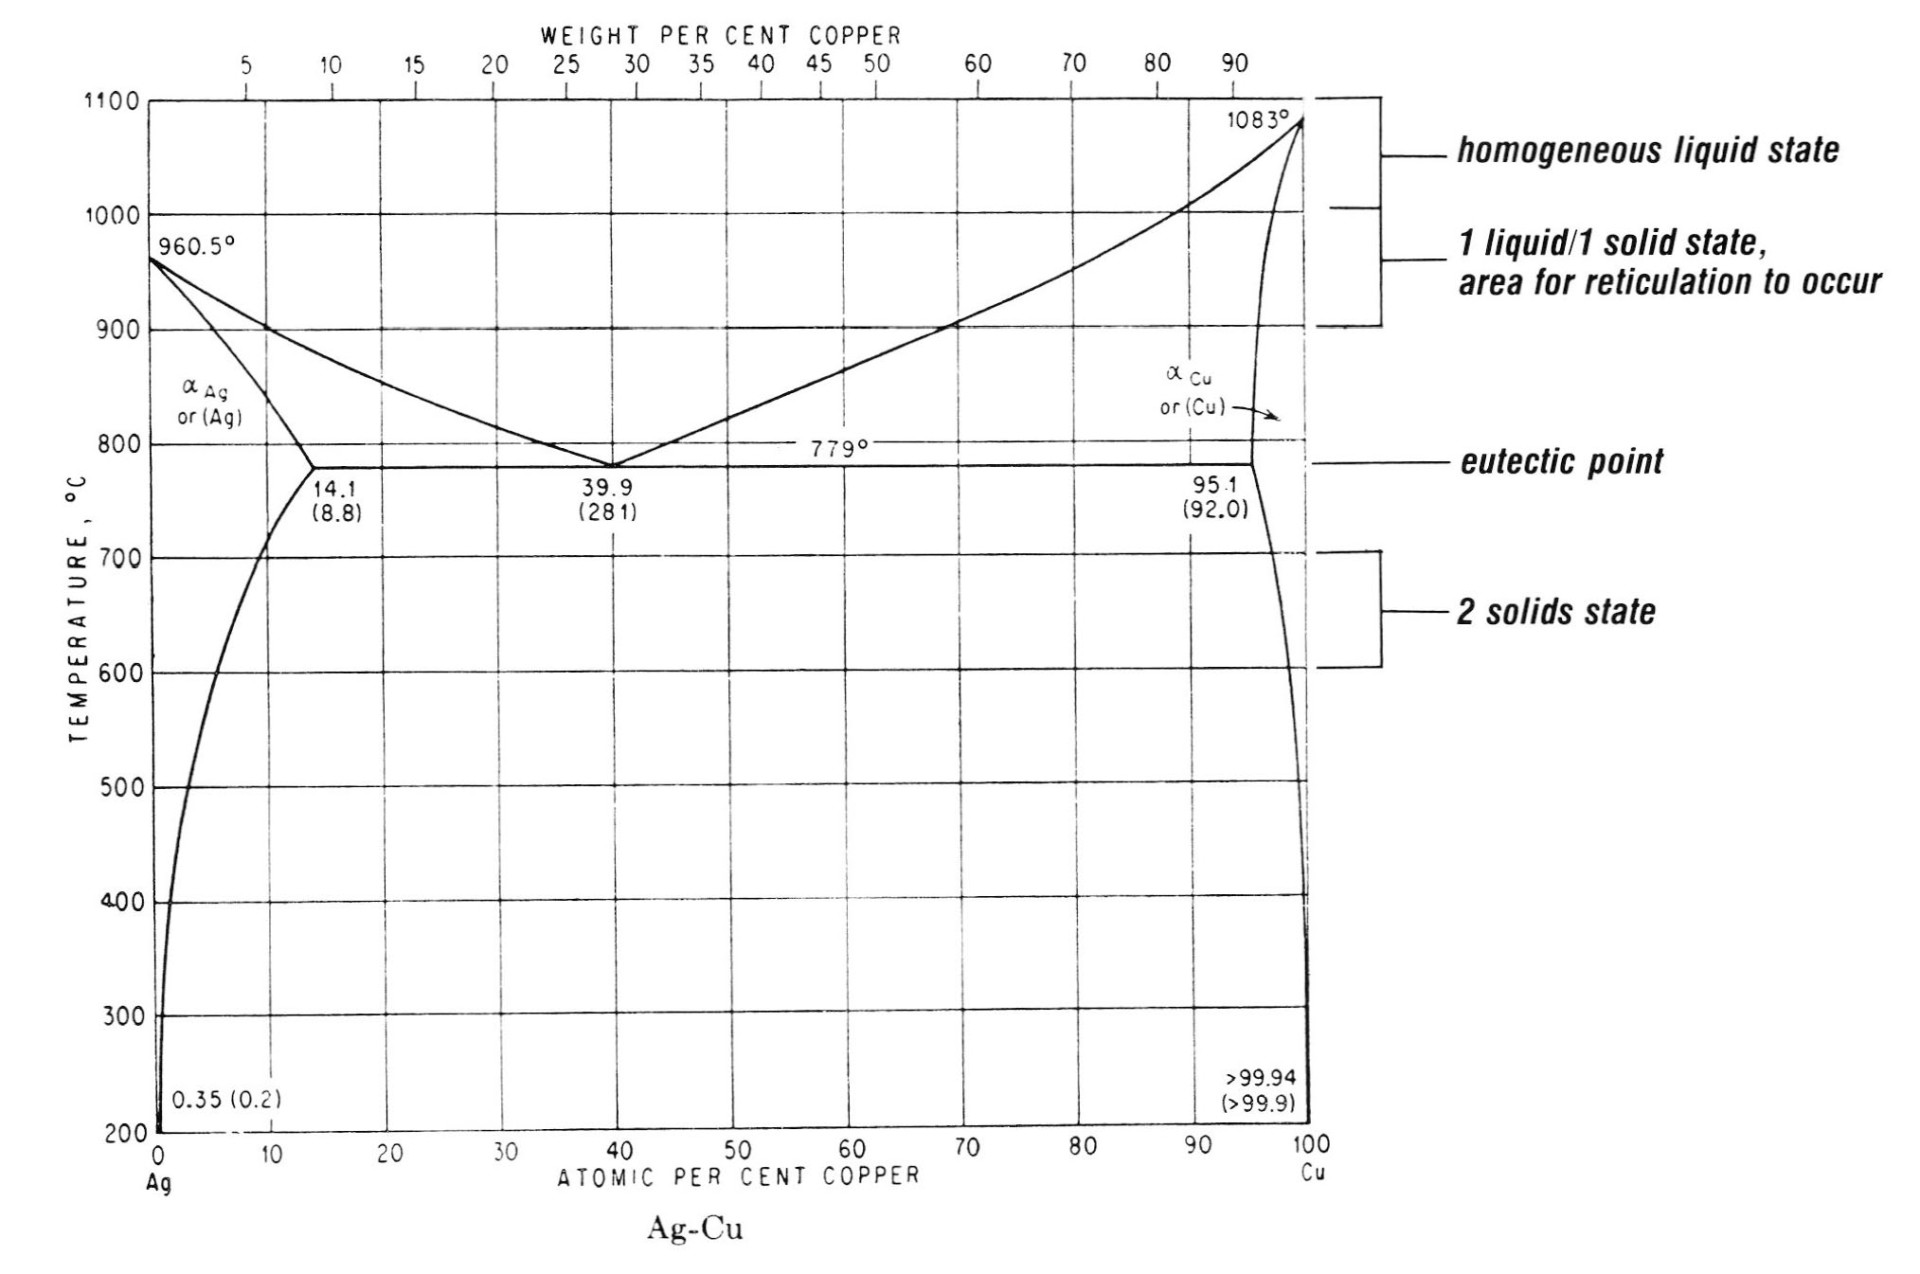
I find it helpful to understand why it is possible to reticulate these metals. Alloys of a gold(Au)/copper(Cu) or a silver(Ag)/ copper(Cu) composition have a point where, when heated, the metal is in neither an all-solid state nor an all-homogeneous liquid state. That temperature range may be as little as 5°C in some alloys, but it is in within this temperature range that the reticulation occurs.
Before the metal is heated to its eutectic temperature (its lowest melting point), it is in a one-solid state or phase for a Au/Cu alloy and a two-solids state or phases for a Ag/Cu alloy. When heated above its eutectic temperature it changes to a one-liquid/one-solid state before melting to a homogeneous liquid, where its melting point is determined. Reticulation takes place when the alloy is in the state where both liquid and solid are present, one-metal phase in the alloy melting just prior to the other. The texturing is accomplished by using the torch to move the liquid and solid phases in such a manner as to line up the solid phase. Thus the direction of the torch movement determines the pattern of the reticule.

The two accompanying charts illustrate the temperatures different binary alloys, either a Au/Cu alloy or a Ag/Cu alloy, reach at their liquid and solid(s) state. They also illustrate the range of possible alloys at which reticulation can occur.
The reticulation of shakudo in the process I describe occurs on the back or unheated side, not the heated side, as is the case for a 82/18 silver/copper alloy, often referred to as reticulation silver, The reticulated surface is also much more subtle. A clear explanation of the principles and process of a 82/18 silver/copper alloy can be found in Jewelry Concepts and Technology by Oppi Untracht (reviewed in Metalsmith Spring 83, volume three, number two, p. 53).
Begin with a sheet approximately the size you need to work in your design. Little is lost on the edges, and their texture can be utilized. The high rate of heat conduction restricts the size of the sheet.
Thoroughly clean the heating block to be worked on with hot water. I prefer using a honeycomb ceramic soldering block. Do not put any flux on the metal as this will completely inhibit the reticulation process. Since the side to be textured is face down, no residual flux should be left on the soldering block.
Anneal and pickle the sheet eight times. After each pickling, rub down the metal surface with steel wool to lightly burnish and clean it. It is not necessary to pickle a long time, minutes will suffice. The shakudo will remain a copper color through the annealing phase. When this procedure is completed, bend the metal slightly to prevent the surface from touching the soldering block. This will ensure that any flux left on the block will not get on the metal. The metal can be flattened later with a mallet.
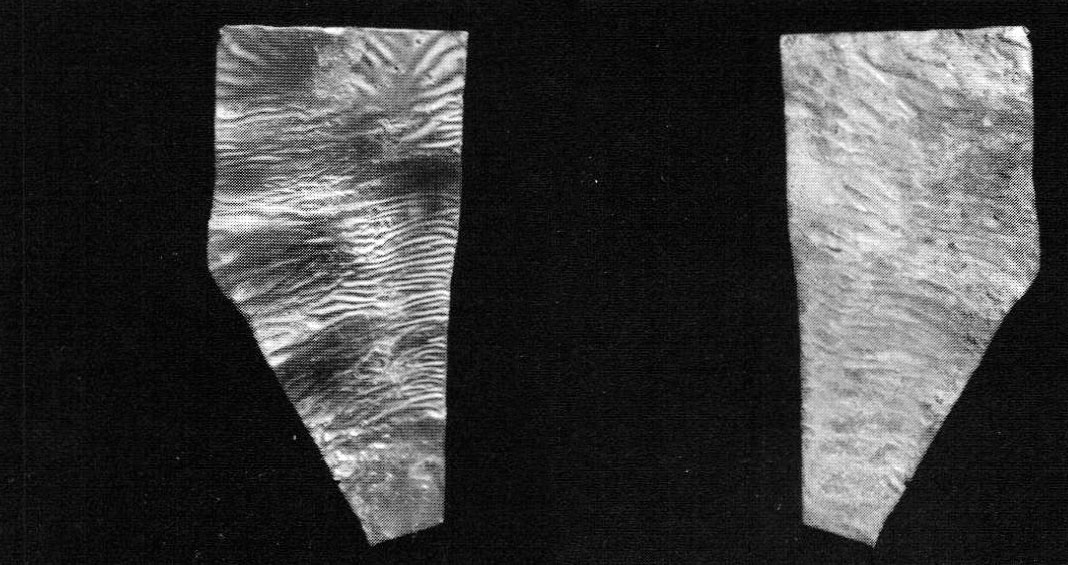
To begin the reticulation process, heat the metal in one area to lust below the melting point, using the oxyacetylene microtorch fitted with a #4 tip. The size of the flame should be fairly large and slightly oxidizing. lf you start from one corner it is not necessary to preheat the metal. From the area just heated, slowly move the torch in small sweeping strokes, but not so slowly that the area melts. The actual working temperature range is very small. The heated area should have a glowing sheen and the metal should look as if it is being pushed forward, The texture on the heated side will look similar to that of welded metal. To check how the reticulation is going, periodically examine the unheated side. The pattern of the torch's movement will determine the pattern of the reticule. However, be careful not to overheat the metal as this will perforate the extremely thin skin of the reticulated side.
The goal is to achieve reticulation on the first attempt. However, it is possible to increase the texture with a second or third repetition of the heating cycle. I have heated metal up to three times, burnishing the piece between rounds with steel wool. Three rounds seems to be the limit, since the surface thickness becomes so variable; after that it is easy to overheat and put holes in the sheet. The final texture of the heated side will be very rough and the backside a smooth reticule. Do not pickle it excessively, as this will also damage the reticulated surface. When the reticulation is completed, the metal can be used in the same way as other sheet. And while it is more brittle after reticulation, it can be formed somewhat.
There is no more difficulty soldering this metal than pure copper, quick oxidation being the only problem. Both silver or gold solder can be used. Avoid getting solder on the textured surface.
| Charts from: Constitution of Binary Alloys by Dr. Max Hanson, copyright 1958 Published by McGraw-Hill, New York Reproduced with permission of McGraw-Hill Book Co., Inc. | |
Reticulation of Shibuichi 1 and 2
As with the shakudo, here reticulation occurs on the back, or unheated side of the sheet. The texture achieved is very fine and quite complex. The size of the sheet is not as critical as with the shakudo since this alloy has a lower rate of thermal conductivity, thus making it easier to heat. Again, the heating block must be free of any flux. Likewise, flux should not be used on the metal.
While it is possible to reticulate shibuichi with a propane/compressed air torch, the oxyacetylene microtorch produces a superior texture and is easier to use.
Anneal and pickle the sheet six times, rubbing it down with steel wool between pickling in order to lightly burnish and clean off the residual copper. The depletion of the copper from the surface will leave the metal a fine silver white.
With a #4 tip on the microtorch, adjust the ratio of acetylene to oxygen to produce a large reduction flame with which to preheat the sheet. Heat the metal evenly to just below the annealing temperature, Then readjust the flame. to a moderate size, slightly oxidizing. The size of the flame should be in proportion to the size of the sheet. It is much easier to overheat the shibuichi than the shakudo, which can then blister the reticulated side.
Starting at one end, heat a small area of metal until it reaches just below the melting point. It will start to glow, attaining a surface sheen. Slowly move the torch. The surface of the heated side will blister slightly as the flame is moved, however, the blistering should be kept to a minimum. Flame size and rate of movement is critical. lf the flame is too large or moved too slowly, the backside can be easily damaged. lf the flame is too small or moved too quickly, little will happen or a very small reticule will be produced. It is necessary to periodically look at the backside to check its appearance. The final texture of the heated side should be blistered and pocked. The texture of the unheated side should be finely reticulated.
The entire process of reticulating shibuichi can be done on top of a metal-top hot plate set at 500°C. This keeps the metal from dropping below a minimum temperature at all times, reducing the time it takes to reach the eutectic point.
Unlike the shakudo very little texturing can be added to the shibuichi with additional rounds of the heating cycle.
The difference in texture between shibuichi 1 and shibuichi 2 is very slight—the 60/40 alloy producing a bit larger reticule . The 67/32/.5 alloy tended to blister more on the backside if overheated.
There are difficulties in soldering shibuichi. lf possible, always solder from the unreticulated side, as it is easy to destroy the textured surface if it is overheated. Gold soldering proved to be extremely difficult, though I had no problems using silver solder. Shibuichi does oxidize more quickly than sterling silver.
The reticulation causes the shibuichi to be brittle, but light forming is possible.
Heat Coloration of Unreticulated Shakudo
The colors that are possible to achieve on an unreticulated shakudo piece are a range of blues and purples with magenta and yellow at opposite ends, and black from successive heatings. The colors are fairly stable unless the piece is excessively handled. They do darken a little with time, though I have found little change in pieces that I have kept for two years.
Once the piece is soldered, filed and sanded to the desired finish, the coloring is ready to begin. A highly polished surface will show the colors off least well. Coloration is the last step, aside from setting stones.
The flame size is contingent on the size of the area to be colored. Too small a flame is preferable to one too large in controlling the spectrum as much as possible. Using a #4 tip on the microtorch, adjust the oxygen-acetylene ratio to produce a slightly oxidizing flame. Both a highly oxidizing flame and a reducing flame will produce scorch marks, so avoid heating too quickly or too broad an area. Also do not use any flux. The metal is only heated enough to change the color.
The piece should be clean and free of grease, Heat the shakudo portion only, starting from one end and brushing the flame up the metal. Let the color rise as the metal cools. Repeat this procedure about three times. An attractive range of colors can be achieved on the first round but is difficult to reproduce on successive pieces. Therefore if matched color is needed, heat once and pickle briefly. It is important that the pickle solution be hot. The temperature of the pickle solution directly affects the final color and a cold solution does not work as well. Rinse and dry completely for the second heating.
Again using a small flame, heat the shakudo from one end to the other, lightly brushing the metal with the flame. Let the color rise through each pass. The color spectrum passes from red to purple to blue, then starts to whiteout to a pale yellow.
A second pickling and third heating will produce a blackish blue.
Should you not like the color range, or if it is overheated or spotty, pickle, sand clean, wash and start again.
Heat Coloration of Reticulated Shakudo
Due to the undulating surface of reticulated shakudo a more iridescent color can be achieved. It is more difficult to color the reticulated shakudo and it is easier to overheat the piece, which results in little color being produced.
Lightly buff with a stitched muslin buff to polish and clean the surface. Wash off all remaining grease.
With a small flame on the microtorch, lightly brush the surface with the flame. Let the color rise between passes. The full range of colors can be achieved through patient heating and cooling.
Heat Coloration of Reticulated Shibuichi
This metal is much more difficult to color than shakudo yet the iridescent colors achieved are very dramatic. The main obstacle is removal of the fine silver surface left after successive heating and pickling. This silver layer must be removed if a range of colors is to be achieved. Again the heat coloring is the last step, aside from setting stones.
To remove the fine silver surface, I use a felt knife buff on the flex shaft. Then on a large buffing machine I finish with a stitched muslin buff . The silver surface is a very thin skin and removes easily without disturbing the crispness of the texture, The remaining metal should be a pale bronze, pinkish in color. When the shibuichi is uniform in color and all grease washed off, the piece is ready for heating.
With lightly sweeping strokes, brush the metal with a small flame on the microtorch. This flame should be slightly on the reducing side. The color will appear quickly with little heating. Overheating will produce a grayish white oxidation that must then be removed to start again. Colors possible to produce include an iridescent, similar to an oil slick, and a range of reds and blues with an overall yellow tarnish.
Each reticulated alloy will produce its own unique texture, whether it is the ones I have described or the traditional alloys.
The alloys themselves can be purchased through Wal-Glo Metals, lnc., 20 Passaic St., Garfield, NJ 07026; telephone (201 ) 773-1983. John Timmer of Wal-Glo is familiar with their production and will make up a new alloy following your formula.
I am grateful to Dr. John Collier and Victor Surprenant of the Thayer School of Engineering at Dartmouth College for their assistance in the explanation and illustration of the principles of this process.
Diane Egbert, a distinguished member of the Society of North American Goldsmiths, has been a practicing goldsmith since 1973. For the past seven years she has coowned a custom goldsmithing studio called Electrum in Hanover, NH. This fall she will relocate to Albuquerque, NM.

You assume all responsibility and risk for the use of the safety resources available on or through this web page. The International Gem Society LLC does not assume any liability for the materials, information and opinions provided on, or available through, this web page. No advice or information provided by this website shall create any warranty. Reliance on such advice, information or the content of this web page is solely at your own risk, including without limitation any safety guidelines, resources or precautions, or any other information related to safety that may be available on or through this web page. The International Gem Society LLC disclaims any liability for injury, death or damages resulting from the use thereof.
Related Articles
Discussion on Refiner Methods

The Art of Gold

Precious Metal Refining
Ensuring the Best Refining Experience

The All-In-One Jewelry Making Solution At Your Fingertips
When you join the Ganoksin community, you get the tools you need to take your work to the next level.
Trusted Jewelry Making Information & Techniques
Sign up to receive the latest articles, techniques, and inspirations with our free newsletter.