
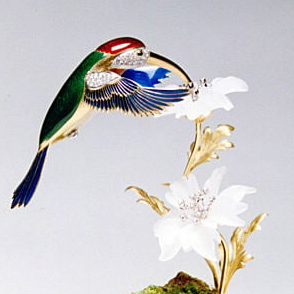
Invisible Setting Ring Repairs
The majority of the invisible set styles that are available are the type where the diamonds are pressed in. To do repairs of any kind I believe you should understand how these stones are set and how to set them.
8 Minute Read

The majority of the invisible set styles that are available are the type where the diamonds are pressed in. To do repairs of any kind I believe you should understand how these stones are set and how to set them.

Invisible Setting
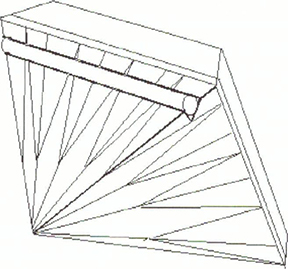
The secret to invisible setting is the precision cut rail(s) that holds the diamond in place. Manufacturers today will create a master model, the stone setter will cut the rails with the utmost precision, a mold is made and the live mountings are set with little or no alterations necessary. Newer proprietary processes will set the diamonds in a package or cartridges typically made of platinum. You can identify these cast in place settings by the two tone under-galley. The boxed settings are dropped in a wax model and cast in place. Some manufacturers claim they can do sizing on these styles without damaging the settings because the box does not move with the shank. Most or all manufacturers will not share information on design limitations.
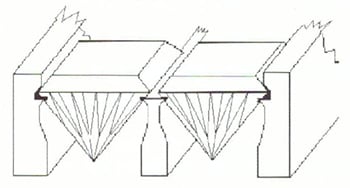
To cut seats for invisible setting first inspect the mounting. The center rail should be significantly thicker than the cross members. Look for cracks, casting defects, and potential problems that could occur during setting. Use a bud bur to clear enough metal away to make room for the pavillion for each stone. Depending on the number of rows and or style, one or more rails need to have seats cut. The finished rail cross section should resemble a (T) shape or flattened (Y). Start cutting this T by using a 45′ bur.006 and or an onglette graver 3/0 to 5/0. Cut a continuous line from one end to the other. If the cross members get in your way trim them down slightly.
The horizontal portion of this rail must have a uniform and unwavering thickness, with a tapered edge. The depth of the cut will depend on the depth of the groove in the diamonds. Practice will reduce trial and error. If more than one rail is needed, take your time, it must be the same height. The outside walls need to be undercut so the diamonds can be tilted into position. Some designs will use rails on the inside and out; the outside wall will only appear to be undercut and holding the stones.
After all trimming is complete, lay the diamonds in position; the rail you cut should be the only contact points. Any metal touching the pavillion will prevent the stone from seating in the rail. You will need to undercut the top and or the bottom outside channel wall to hide discrepancies, if any, and to have the flexibility to slide the stones and make adjustments in spacing. When satisfied that your diamonds will set evenly without damaging each other, remove them and retain their order on a waxed tray. Most manufacturers will rhodium plate the under gallery prior to setting. Use a chopstick or a hard wood dowel with a diameter slightly smaller than the table of the diamonds. Mount the dowel in a graver handle the length is up to you, but I find better control with a shorter dowel.
Set the first diamond in place using the wood dowel. Push down directly on the table of the diamond holding the tool perpendicular to the stone's table. With firm pressure push the diamond's groove into the rail, it may snap into place. Do not force the stone down. You may have to do additional trimming to shorten the rail. Steady pressure will cause the rail to flatten and the stone to set tight. Set each stone slightly loose. When all stones are in place go back and tighten keeping the tables at the same height. Be careful of the spacing, damage occurs at this point if you are careless. The last step is to burnish the outside channel walls.
This is an over simplified explanation of how to set invisible set stones. A true understanding can only be obtained by sitting at the bench and practicing. This is an advanced technique that requires great skill with gravers and precision cutting a straight line.
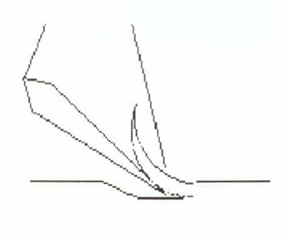
Occasionally either through normal wear or a sloppy repair a stone will need to be tightened. To tighten an invisible set diamond you must reset the rail back in the groove of the diamond. I use my wood dowel screwed in to my reciprocating hammer. Using a light touch, I tap directly down on the stone's table. This tapping causes the rail to push into the groove of the diamond, tightening the stone. The metal takes the path of least resistance. You must use extreme caution excessive tapping could cause a cascade of problems:
- A diamond may break from touching another or from careless tapping. Remember to use a light touch two or three taps at a time between checking for tightness.
- Careless tapping will cause the rail to collapse or break off creating needless repairs.
- Excessive tapping will sink the stone causing the girdle to catch under the rail, again causing needless repairs. Note the grooves and the position of the rails in the grooves. This illustration shows proper placement.
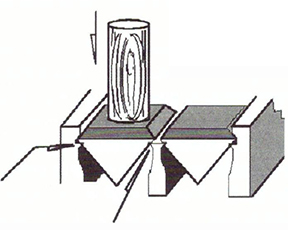
To tighten tap on table of stone with a wood dowel. The tapping mushrooms the rail into the groove in the stone. This takes a light touch.
Repairs
When a diamond falls out and the rail has gone with it, a new rail must be installed.
- Clean the piece thoroughly (aseptic)
- Remove any traces of the old rail using a flat graver and or a bud bur. Do not remove anything more than the broken rail.
- Refit the diamond and check for obstructions.
- Create a new rail using platinum. I cut a knurl from a piece of sizing stock using a blade of a knife or graver. Cut a piece long enough to fit into the full length of the groove of the diamond. .
You could take the easy way out and use a piece of platinum wire approximately 30 to 36 gauge. It needs to be small enough to fit inside the groove on the diamond.
- Glue the platinum wire in the groove using cyanoacrylate adhesive. When the glue has dried trim the wire for a clean fit.
- Test fit the diamond, trim the setting if necessary for the stone to fit level do not remove any more metal than is necessary. The platinum wire must make contact with the setting.
- Remove the stone and clean the piece by steaming. Inject the area where the diamond will sit with 14k white gold paste solder.
- Insert the diamond; excess solder will ooze out around the diamond. I hold the diamond in place with the tweezer side of a pair of head shank tweezers this keeps it from shifting during the heating process. Remove all excess solder from the top of the setting. Use a toothpick if necessary to get between all the diamonds.
- Flip the mounting over and inject more solder into the azure. Remove any excess from the outer edges.
- The moment the stone becomes hot the cyanoacrylate adhesive evaporates with no trace of oxidation.
- Apply a coating of boric acid solution and heat the area from the top and inside of the shank until the solder flows. Do not overheat.
- The solder flows and makes the bond with the new platinum rail and the mounting completing the repair.
- If done properly the diamond should look no different than the others except from the underside, the azured area will be slightly misshapen from the excess solder.
Sizing An Invisible Set Ring
The most important thing to keep in mind is you cannot bend the part of the ring that holds the diamonds. If the rails are bent, the setting is destroyed. No repairs are possible if a conventional sizing method is used.
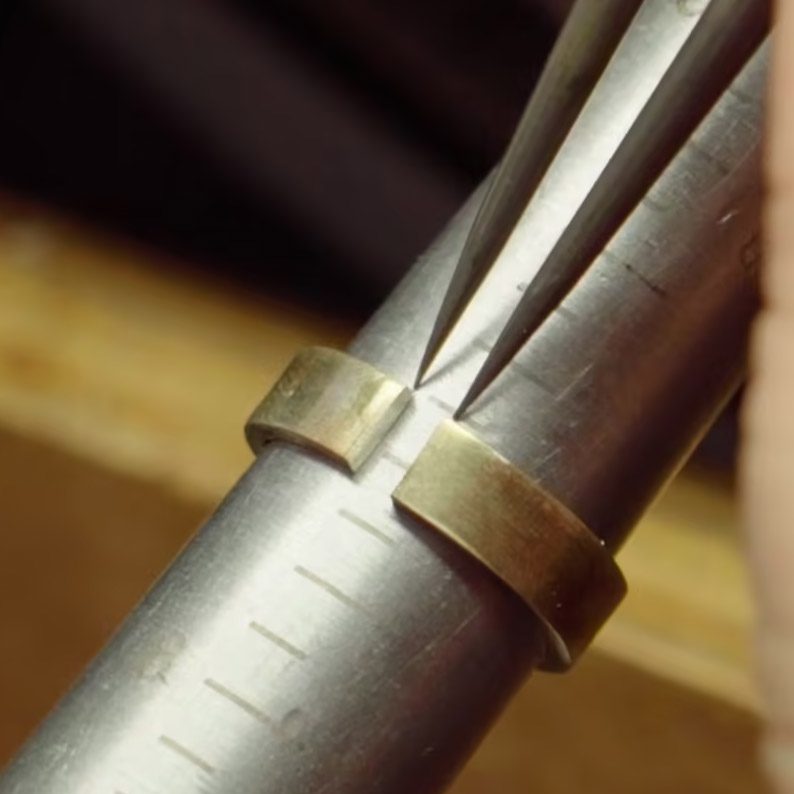
- To properly size an invisible set mounting down you must prep the shank by sawing darts into the shoulders approximately seven eighths of the way through just below the settings.
- Remove a piece to reduce the finger size; for example 1 size = 2.45mm most ring styles can be sized down, up to 11/2 sizes any farther will leave the shank so far out of round it will not fit comfortably.
- Using your fingers or a pair of ring benders close the shank by bending at the darts.
- Solder the joint and solder closed the darts file, sand, polish and buff.
- Do not pull the ring on a mandrel to round out the shank. This will defeat the purpose of the darts. Yes, the ring will be left out of round to some degree depending on how far down you size the shank.
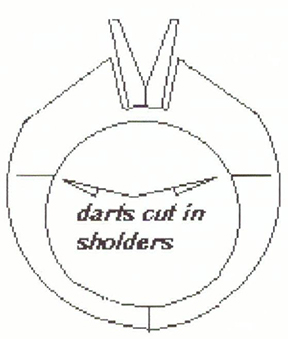
Note: make sure all employees are aware of this; especially the people who do quality control checks if they try to round the ring while checking the finger size, the invisible settings will be damaged.
Sizing Rings Up
- Follow step 1 above, by sawing darts 7/8's the way through the shank.
- Cut the shank at the back and bend the shank at the darts to equally open the shank to add the sizing piece. Most styles can be sized up as much as 1 1/2 sizes.
- Solder in the sizing piece.
- Solder in the darts by using wedges of gold or wire.
- File, sand, polish and buff.
- Do not try and round the shank. If you were careful when adding the piece the shank will only be slightly out of round.
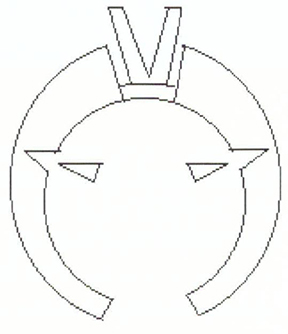
Platinum mountings cannot be sized using this method due to the proximity of the diamonds. The only exception to this is if you are sizing a platinum ring that has gold applications on the shoulders where the dart seam can be hidden
You assume all responsibility and risk for the use of the safety resources available on or through this web page. The International Gem Society LLC does not assume any liability for the materials, information and opinions provided on, or available through, this web page. No advice or information provided by this website shall create any warranty. Reliance on such advice, information or the content of this web page is solely at your own risk, including without limitation any safety guidelines, resources or precautions, or any other information related to safety that may be available on or through this web page. The International Gem Society LLC disclaims any liability for injury, death or damages resulting from the use thereof.
Related Articles
Quality Assurance Benchmarks for Jewelers

Diamond Setting Applications
Citrine Ring
How to Resize a Ring

The All-In-One Jewelry Making Solution At Your Fingertips
When you join the Ganoksin community, you get the tools you need to take your work to the next level.

Trusted Jewelry Making Information & Techniques
Sign up to receive the latest articles, techniques, and inspirations with our free newsletter.