Hi Gang,
Following along Richard’s path, I figured I should update my
progress on Frankenforming an old Neycraft fiber furnace.
I picked the kiln up used for $50 because it had a smashed
pyrometer. I could either (A) pay $155 for a new pyrometer, or (B)
pay $250-ish to convert it to complete computer control. No prizes
for guessing what happened next.
This is essentially the same thing as what Richard did, with the
exception that I started with a premade sheet metal box, and a
premade 110VAC heating element. Pretty much everything else except
the power cord got tossed.
I’m not going to explain the entirety of what I did, because I live
in California. There are lawyers under every rock and shrub out
here, and if you screw it up, it could start a fire. If you do try
to do something similar, please (please) run a full burnout cycle
(or four) while you’re there to keep an eye on it. I don’t generally
trust home-built ‘automagic’ equipment until they’ve run
successfully a few times. Since the whole point of a ramping control
is to let it run a burnout overnight, when I’m NOT there, I put it
on a fireproof surface, away from anything flammable, so even if it
does completely slag down, it won’t set the building on fire, and
(B) will run it repeatedly before clearing it for unattended
operation.
The important parts:
I used an Automation Direct SL-4848-VR PID, which will handle ramps
and dwells, as well as being (theoretically) programmable via laptop
interface.
The other important thing was picking up a 40 amp SSR. (Solid State
Relay) (Their part #AD-SSR640-DC-280A) That’s the switch that cycles
the power to the kiln elements. The PID doesn’t can’t handle the
load on its own, so it flips the SSR. I picked a 40 amp SSR for two
reasons. First, maximum supplied amperage via a normal 110V
household line is 20 amps. So I doubled that for worst case
insurance. The difference was about $7. Cheap insurance. Second,
using the SSR at less than half of its rated capacity will radically
increase durability. For seven bucks, was this even a question?
The PID was $100, and the the SSR was $25. I used the original
K-type thermocouple from the dead pyrometer. New ones run $30-ish.
Which one you need depends on what your kiln looks like, but try for
stainless jacketed, short element.
Other things that happened: I added a 110V muffin fan (computer case
fan) to the side of the kiln to keep the electronics bay cool. The
kiln has a metal shield that creates a sort of tunnel across the
front, where the original pyrometer lived. The shield keeps the heat
from the element from toasting the pyrometer, but since PID’s are a
bit more sensitive, I put a fan blowing into the tunnel on one
side. (If it were set to suck out, it’d be sucking hot air from
around the kiln down into the tunnel. NOT what I wanted.) Open grill
on the other side of the tunnel for exhaust. I put a 1 amp inline
fuse holder on the power circuit for the PID, and an RJ12 pass-thru
connector to allow me to jack my laptop into the PID for
programming. (There’s an extra $60 communication kit that you have
to get before this works. (Which it hasn’t yet. But I haven’t had
time to run it down. It works well enough for what I need it for
now. Fancy programming can wait.))
An on-off switch to control the power to all this widgetry, and a
pilot light to let me know when the element was powered, and off we
went.
One critically important thing was that I picked up a PID that could
‘auto tune’ itself. Meaning that I could put it into a mode where it
would keep an eye on how much power to the element equaled how much
heat. Before I let it auto-tune, I set it for 300 F, and it just
turned the element on, and kept it on solid until it hit 300F. Which
meant that the kiln temp went sailing on past 300 F by about 250
degrees before it started coming back down, and it took almost 3
hours to get stable at 300f. Wild swings, since the PID didn’t have
any sense of the size and thermal inertia of the kiln. After the
auto-tune, it starts cycling the element so that the top of the temp
curve is the target temp. Takes a little longer to get to temp, but
it doesn’t overshoot, and it gets stable reasonably quickly.
One other neat trick that modern PIDs can do is that many of them
have alarm outputs. So if I feel like wiring it up later, I can put
in another SSR, and have the PID set an ‘alarm’ that turns on any
time the kiln is above X degrees. (like 300F) That flips the second
SSR on, which can do neat things like turning on my vent fans
automatically. That way I can’t forget, and don’t have to leave them
running all night. Sneaky, no? This unit actually has ?3? alarms, so
I could rig another one to remind me to pull the wax trays if I
wanted.
The only drawback to using a commercial PID, rather than a
dedicated, custom made kilnminder, is that none of the PIDs I
researched had a time-delay. The way around this is to program the
first step in the ramp to heat at 50F for X hours. That then becomes
your delay start.
The other issue with them is that the displays are pretty cryptic if
you don’t normally mess with industrial process gear. Which is where
the laptop programming interface comes in. I haven’t gotten mine
working yet. I suspect a wiring issue, but since running it down
requires ripping the whole kiln apart to get at the back of the PID,
this will have to wait until I get some down time this summer. At
the moment, I just need the thing working in ‘go to x temp and hold’
mode, which can program in by hand. The new Knew Concepts dovetail
clamps with the anvil are all heat-shrunk using it, so it’s too busy
to tear apart for a function I don’t need yet.
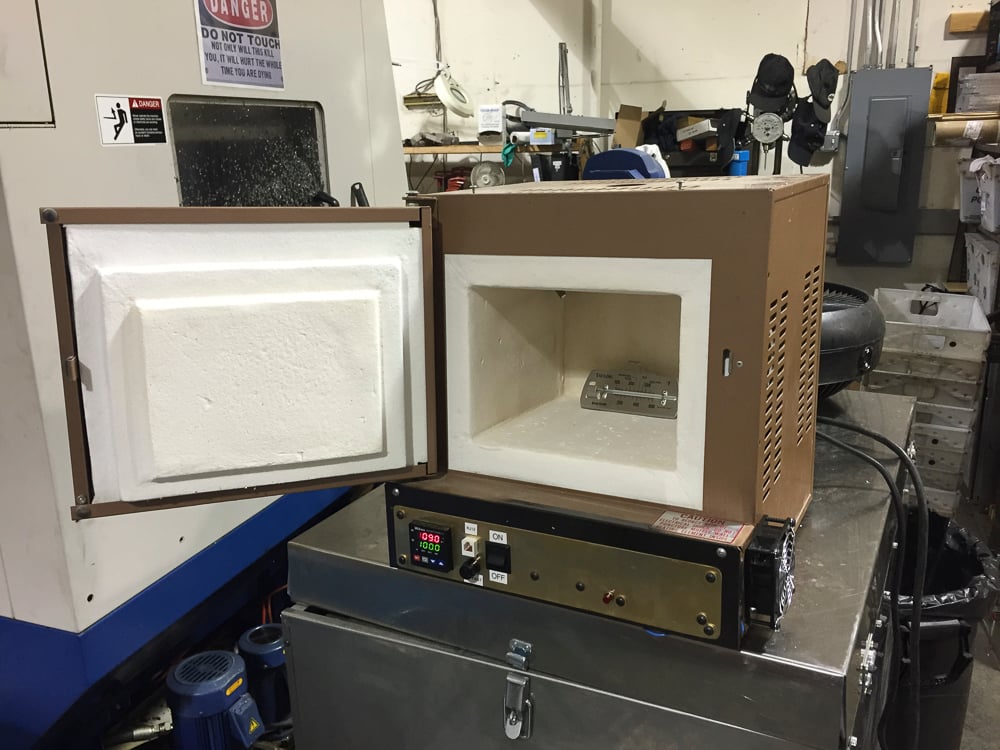
If you do frankenform another neycraft, look at the picture of mine:
I put a brass faceplate on it to give a solid anchor for the
fittings. I cut out the original steel faceplate underneath the
brass in chunks big enough to pass the new gear. What I should
have done was cut out the entire original faceplate under the brass
area. That way I could unscrew the brass faceplate and get at the
electronics without having to tear the whole kiln apart and come in
by way of tearing the back off. Hindsight being 20/20, please learn
I’ve very carefully left out most details of the electrical hookups.
This is not accidental. Please have a licensed electrician do
whatever work you need to have done if you try to do something
similar. Unattended heating gear can cause massive fires if
something’s wrong, so be responsible, and have it done right. Do not
try to wing this on your own. I’m writing this just so the orchid
community has some reference for what’s possible, which parts I
used, and how it all worked out. Not necessarily that everyone
should rush out and try to do it on their own.
Even I had the guy who does the electrical work on our CNC’s double
check me before I lit it up the first time.
Regards,
Brian
PS-> in the photo, it’s sitting on one of our tumblers, next to the
big CNC mill that does many of our parts. The observant among you
may get a kick out of the safety warning sign. (and 50 geek points
if you can identify the tool being used for a hatrack in the
background.) That’s a pretty good glimpse into what Knew Concepts
looks like, most of the time.