Making an engagement ring

Hi

I’m making an engagement ring which is a bit out of my comfort zone.
I’m having trouble working out how to go about soldering two 6 x 4
mm marquise settings either side of a huge emerald cut aquamarine.
I’m using 18ct yellow gold settings. I wondered about binding wire
but that seemed too clumsy.

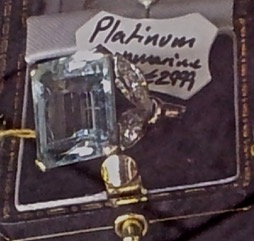
I’ve attached a pic of the ring spotted in an antique shop.

I hope you can help!
Gill Bridgestock

I'm making an engagement ring which is a bit out of my comfort
zone. 
I'm having trouble working out how to go about soldering two 6 x 4
mm marquise settings either side of a huge emerald cut aquamarine. 
I'm using 18ct yellow gold settings. I wondered about binding wire
but that seemed too clumsy. 

This sort of assembly is generally soldered in plaster.

You set up the settings on a soft base. I was taught to use
plasticine, but some people prefer sticky wax.

You arrange the settings into position, being careful to press them
into the base material deeply enough so that the points of contact
where they will be soldered are covered, but leaving the prongs
exposed.

You then make a wall around the set up, so that the assembly is
sitting in a little well. You pour plaster of paris into this well,
covering the assembly, and allow it to harden.

After the plaster has hardened you carefully remove it from the base
and the settings should come away from the support material with the
prongs embedded in the plaster and the girdle and bezel wires
exposed. You’ll be soldering from the back, with the assembled
settings upside-down in the plaster.

You must remove any and all of the base material from between the
settings or it will burn and interfere with the solder. Broken saw
blades are good for prizing the little bits of clay or wax from
between the settings. Also, before the plaster has completely cured
you can trim it with a bench knife so there’s not too much excess
around the set up that might impede the approach of the torch.

Let the plaster dry a good couple of hours before soldering, you
don’t want any residual moisture in the plaster when you heat it.
With the settings firmly set in the plaster you can solder them
together without fear of them moving under the torch. Once all the
joints are soldered and while the plaster is still hot you can quench
it in water and most of the plaster will crumble away.

With gold you are now ready to attach the gallery and shank. If,
however, you use this for a set up in platinum there’s a further
step.

Soldering platinum in plaster makes for very brittle joints. They
will snap easily. With platinum, after soldering you need to set the
clean assembly into a non-reactive high-temperature base and simply
remelt the solder in place. This will remove the brittleness imparted
by the plaster and make the joints strong. In the old days we used
powdered asbestos for this step.

Elliot Nesterman
ajoure.net
I use a product called 3 rd hand. bought it 30 years ago. just keep
adding water and recycling it. works great and acts as a heat sink
for set stones. Form it inside the mounting and around the setting
where you want it to be set leaving the area where you want to solder
exposed. Then solder let cool break apart the material and put the
ring in your pickle. Any residue does not hurt the pickle and comes
right off… Or if you have the tools can tack weld the heads in
place. or the bench matesoldering station will allow you to hold the
ring as well as the setting while you solder.

You set up the settings on a soft base. I was taught to use
plasticine, but some people prefer sticky wax. 

The plasticine is maybe slightly easier to position the work because
it’s a little easier to see just where things are in the grey opaque
clay. In the the wax the advantage is that if something shifts, a
wax pen makes it a little easier to patch or move the wax to properly
enclose those areas that need to be exposed for soldering. Very
minor difference there, and some prefer one, others prefer the other.
But the big advantage I’ve found with the wax is ease of removing it.
After the plaster has fully hardened, put the piece in gently boiling
water.

The wax all comes off and floats to the top. If the plaster if fully
hardened and you’re gentle, you can even use the steam cleaner,
though take care not to blow away the plaster too. Any remaining wax
residue melts and burns off when you go to solder. That might adding
a little more flux if burning wax disturbed it, but wax residue
otherwise doesn’t get in the way. Residual bits of plasticine
however don’t burn away cleanly and if in the area you’re soldering,
can block solder flow.

I have seen and heard of that excellent method of setting up things
in plaster so they don’t move. I understand the basic idea of it but
can anyone recommend any possible books/guides that may exist that go
into detail or steps for using plasticine and plaster to keep things
from moving?

I’m self taught so I try to extend my library which helps me learn
new skills. I think the reason I need pictures or steps for
understanding this is that I don’t get how you can get parts to stick
to each other while the plaster sets up and not having a substance
that will impede the soldering later on. Is plasticine water soluble?
If gravity alone must be used to hold the parts together while the
plaster you pour into the walls sets ups, it kind of defeats the
purpose of not using binding wire, (which I have never been able to
successfully use anyways).

Just curious of the specific mechanics of it. I have a very hard
time with things moving when I solder so I think it’s time I learn
this plaster holding method.

and good luck Richard and awesome stone to set man!

Rick

A big thankyou to Gaudy Baubles, Elliot and Vernon for all your
varied advice it is much appreciated.

I hadn’t realised there were so many different ways to do the job.

I will let you know how I got on & maybe post a pic.

One last query:

I accidentally balled up a post on a cage setting in 18ct Y gold any
helpful advice on how to rescue this mistake will be hugely valued!

Gill Bridgestock

I assume these gems you are adding will cover most of that design on
the sides. Take out the aqua. You can’t heat that. Cut in with burrs
(ball) a hole for the new crowns to set in. Try to get them so they
can rest there while you solder. Plaster or other substances will
mess with the soldering process. Could be a big heat sink. Try to
avoid that. Wire would be ok.

Best if you can get them to set in place or hold in place with a
third hand stand or freehand with a long tweezers. I usually do the
long tweezers.

Set it up so it’s comfortable to hold and you can torch from
underneath.

That’s platinum so you should be hard pressed to melt that. you’ll
go blind first.

Hi Rick

The best intro to the plasticene and plaster soldering technique I
know of is Alan Revere’s book “Professional Goldsmithing”. I have
the original edition. A fine book for any goldsmiths collection. I
don’t know if the new edition has that same

Plasticene is difficult to clean off and will foul the solder joint.
Wax works a bit better. The problem is getting just enough plaster
to hold the join without the plaster itself getting into the joint.
Not easy sometimes. Ihave used super glue to fill the joints first
after I have pressed the parts into the wax. It helps.

Sam

see Soldering Parts Using Pourable Soldering Jig - Ganoksin Jewelry Making Community

best
charles