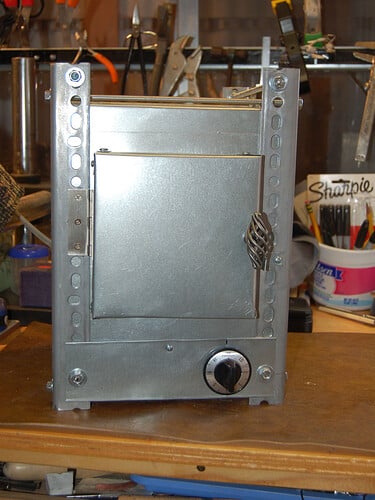
Making your own burnout oven

This one is for our friend Debbie. (You don’t have to avoid the more
traditional ways of making jewelry because of a lack of equipment.)

I long avoided getting into centrifugal casting or vacuuming casting
because I assumed it was incredibly energy consumptive. Like almost
every day in life, at least according to my redheaded wife who
reliably points out my flaws, my assumptions are wrong just about
100% of the time. I also hated the idea of paying 600 to 1000 dollars
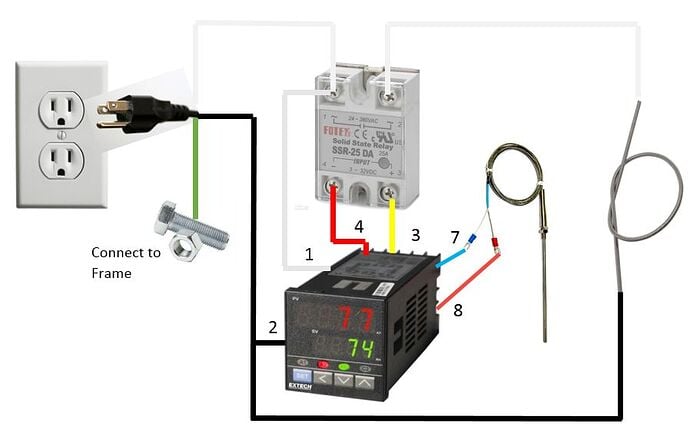
for a small kiln when basically all a kiln can be is about 5 to 10
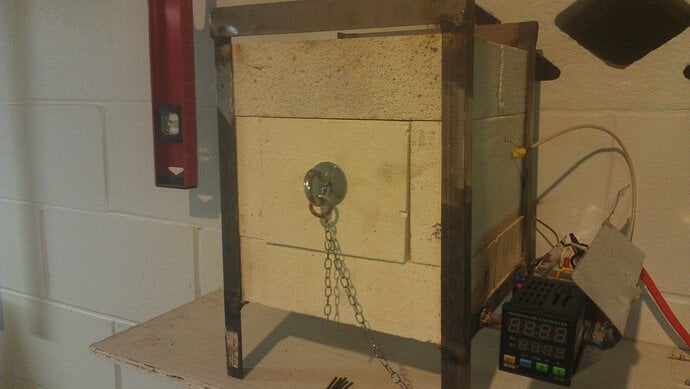
dollars worth of element (wire with resistance), a P.I.D.
temperature controller (can be bought for about 25 to 40 dollars),
and a relay of some kind (a solid state relay is about 7 to 12
dollars. You would also need to build a frame and buy insulation, but
this can still be inexpensive.

I avoided vacuum and centrifugal casting because I pictured a 240
volt mammoth of a kiln sucking 20 amps of current for 5 hours while
the trolls of Florida and Power and Light danced around their
triumphant fires, mocking me.

Then I found out an engineering student posted an instructable.com
project that proves that you only need 700 watts (about 6 amps of
current) running through about 20 ohms of resistance in Kanthal wire
to make a small kiln made of only six 9 inch long insulated fire
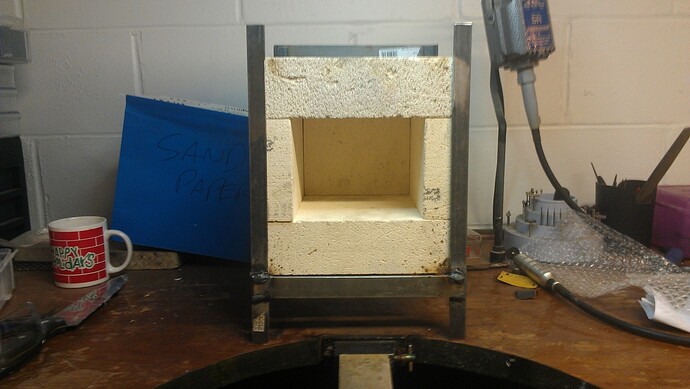
bricks. A small burnout oven made of only 6 firebricks easily gets up
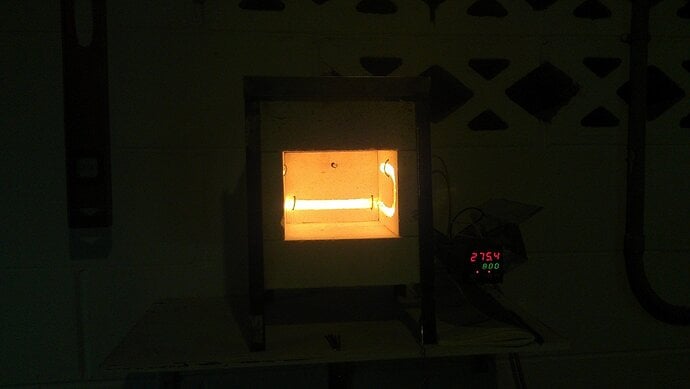
to about 1400 degrees with this set up.

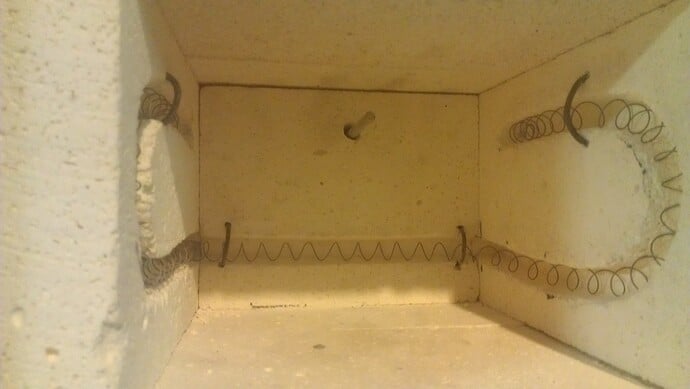
In short, I used the same idea, but wound my Kanthal A-1 wire to
about 16.5 ohms which pulls 7.27 amps. This about 872.4 watts which
is more than enough for a very small well insulated kiln. You could
always go with higher wattage since the P.I.D. temperature controller
will turn the heat off when you are reaching the temperature you
program.

I probably spent only 100 dollars building this burnout oven and
have extra Kanthal wire to wind up another 5 element replacements
when it needs replacing. I think the only downside of this DIY
burnout oven is that since it’s made of soft fire bricks, even with
my welded up frame housing the bricks, the door that is made of these
bricks will begin to wear down and wear out. But these bricks only
cost 4 dollars. Stay safe if you build this and make sure you
understand basic wiring and how electricity works. Make sure you use
high temperature hookup wire for connecting your elements to the rest
of your wiring. Also use heat sinks and if you have one, and a laser
temperature reader to check how hot things/walls/etc, are getting
when your kiln is on.

Here is the instructables project for more

Credit goes to the original 2 people who created the instructables
projects. I will be happy to answer questions if anyone is
interested.

Of course, build at your own risk and never leave one unattended
while plugged in.

If you purchase a P.I.D., make sure you get one that works for a
Solid State Relay. I recommend Auber P. I. D.'s. And for the solid
state relay, I recommend Fotek.

Read about P.I.D’s and solid state relay projects for a few weeks
before you start your build, it will make your project easy.


Knowledge will set you free.

Have fun,
Rick
Hi Rick

What a hoot. I sow the post that someone make to Debbie with the
link to building your own kiln. I built my kiln for under $50, Got
my element form Euclid’s Element, Canada. I’ve since bought the temp
control. I will use it for emailing and annealing as well. Whoever
posted the the first time, Thanks. It fun to know that
there will be a more home build kilns out there.


Happy New Year to all on my 70th. Birthday.
Gene Stirm

[Edit]

Sharing files and pictures with Orchid is easy - Simply attach them
to your Orchid post.

[/Edit]

Where can I buy a PID for $25 - $40 that will control an older kiln.
I will also need an SCR and Thermocouple. Specifications and sources
would be appreciated if you have them. Thanks. Rob

Rob Meixner

Hi Richard,

Good

Might I add a couple of things?

A) carbon soot is conductive. If you try to do a large(ish) burnout
without some sort of top vent in the kiln, you’re quite likely to
short out and blow the coils.

(Ask me how I know this…) (This is one of the reasons I’m really
fond of the old Neycraft kilns with the elements buried in the For
the instructables guy, intending to use it for one project, no vent
was fine. For us, intending to use it a lot? Needs vent.

B) In aid of not frying the kiln, as long as you’re making stuff,
take a bit of angle iron (black iron, NOT zinc plated), and make
two long bars that fit down the length of the kiln. Weld or bolt a
sheet of expanded metal onto the top of it so you end up with a wire
grid across the bottom of the kiln, hanging up in the air by the
height of the legs of the angle iron. Then make a sheet steel tray
that fits underneath it, and slides in and out. Don’t make it a
tight Make sure you get a PID that has ramp-and-hold functions, then
set it to ramp to about 300f, and hold there for an hour or so
before continuing on to the full temp. After it’s held the 300f
stage, open the door and yank the tray out. That’ll get most of the
wax out before it burns.

C) you can use the same PID wiring setup to control an existing
electric kiln, like an enameling kiln, which might save a lot of the
scratch building. Enameling kilns seem to float by me on Craigslist
pretty regularly, for not much. If you have time to wait, wait for
one to float by, and then give it a brain.

D) As a relic of my education in replacing kiln coils that have been
fried by conductive soot, I have a big spool of Kanthal wire. If
anybody wants it, drop me a line directly. I’d like to get $50 out
of it.

Winding up element coils is pretty much just like making jump rings:
wind around mandrel. Just don’t cut them into rings.

Regards,
Brian

Thanks for posting this, Rick.

I have got the tiniest little burnout kiln you have ever seen. I
bought it years ago for under $200. Last night was the second time
I’ve used it in 12 yrs. Got a nice set up at work so I don’t need it
but want to make things at home. I cast an aluminum tool last night
and it worked awesome. You don’t need much. This kiln is only big
enough for maybe a big jewelry flask, and only one. But it gets to
temp perfectly. I have a thermocouple as well. They are not much
more than firebrick and an element but you need to control heat
somewhat. I have not done it “but maybe I should” supposedly you can
burnout on a hot charcoal grill. When aluminum foil melts time to
cast. Remember people have done this and have been driven to do this
since we could make a fire hot enough. Don’t let anyone say you can’t
until you’ve tried it yourself. Make your own kiln for sure, try a
ring of firebrick wrapped with fiberglass insulation and fire it with
a propane torch. The only rules are the ones of nature. I’m sure I
could burnout on a campfire at 2 in the am when it’s all hot coals
but I might not be in good condition to cast then for unrelated
reasons.

Rob, cheaper PID’s from China are available on Ebay, but I don’t know
if they’re easy to use or reliable. They often are sold together with
the solid state relay (SSR) and a thermocouple, usually K-type. I
suppose the cheaper ones have a single set point temperature. It
would be nice to have the PID programmable with at least 4 soaks and
ramps. You know what maximum temperature you want, so that’s part of
the spec.

To Rob, You wanted to know exactly what to buy.

I recommend an Auber P.I.D. (Auber is the brand) that is for Solid
State Relay output. (Some PID’s are only for mechanical relay) You
should call their customer service and tell them you need a PID for
solid state relay (output).

But, I was impatient and could buy this one quicker and it works
perfect for me.

The solid State Relay you need:

the rest of the simple materials. pleaser refer to the instructables
site.

Thanks, Brian, and all the others who responded with great ideas and
improvements for the DIY burnout oven.

I had no idea that the carbon soot was conductive so I will try your
tray idea to remove most of the wax early.

I also like the idea of finding an old broken kiln and just using
the body/frame/insulation and simply wire in your own P. I.D. and
relay with a thermocouple.

This would take a bit more math and more amps if the kiln is larger
than the set up I’m using. But a great idea.

Somone mentioned it’s a minefield buying P.I.D.'s. This is so true.

That’s why I recommend an Auber P.I.D. It’s much better than the
cheaper Chinese P.I.D.'s.

The instructions with the cheap Chinese P.I.D.'s are poorly written
and pretty much useless.

Some people are even using Arduino computer boards to write their
own program when building a kiln or smoker, (or even a brewing
system).

Just remember you will have an easier time if you use less than 10
amps since every household outlet for 120 volts is going to have a 10
amp or maybe a 15 amp fuse. So if you keep it under 10 amps you will
not be tripping your circuit breaker.

be careful,
Rick

HI Guys,

Well, this was the impetus that got me moving on a ‘fix the kiln’
project that I’d been meaning to deal with for months.

I found one of the old Neycraft kilns with the buried elements, for
$50. The catch was that the pyrometer was smashed, and it only had
the old rotary ‘lo-2-3-4-hi’ controls.

So I decided to put a PID on it when I got time. The PID hasn’t
arrived yet, but I picked up this one:

http://www.ganoksin.com/gnkurl/ep81qb

An Automation Direct SL-4848-VR.

The difference between mine and Richards is that the fancy one will
do ramps and dwells. So you can have it ramp up slowly to 300, hold
there while you dump the wax, and then move much more quickly up to
burnout once the water’s gone, and then back down to casting temp.
Also programmable via laptop, if you get the extra little widget.
Which saves much fussing about with the panel buttons. You can also
set the first ramp as a several hour ‘ramp’ at room temp, to give
you a fudged ‘delay start’, to let it start really working in the
middle of the night, so it’s ready to roll in the morning. (I looked
for a PID with a real delay start, and couldn’t find one. I think
the kilnminders are custom setups.)

Other than that, my rig was about the same as Richard’s. I got a 40
amp SSR, just for insurance, but that’s the only other difference.
(US household 115v will max out at 20 amps even on a heavy circuit,
so take worst case, double it, and call it a safety factor.)

I’ll have to sit down with the manual, but I think the secondary
alarm on this model can be used (with some work) to control another
relay. The idea being to use the second alarm to turn on your vent
fans when it starts to work for real, rather than leaving them
running all night.

Regards,
Brian

Rick. Thanks for the specifics. The PID world seems to be all over
the place, especially the low end simpler devices. I think that I
have a fairly good idea where to go with this project. I have an old
burnout oven that I bought forty years ago but never used. I would
like to use it to heat harden and anneal silver. I rebuild all the
old switches and it works, but the temperature control is very
manual. It would be fun to build a kiln, but I already have one, so I
will apply that time and creativity to the controller and then move
on to a larger lapidary arbor. Retirement is great for these types of
projects that eat up a lot of research time. Thanks again. Rob

Rob Meixner

Yes,

Brian has the best idea.

Spend a little more time and money on a fancy P.I.D. temperature
controller so that you can do ramp up parameters.

I forgot to mention that.

At first, I was not sure how good my kiln would turn out. But now
that the elements fires up so nice and the insulation is great… I
will upgrade the P.I.D. controller just as Brian is in the first
place.

The cheap P.I.D. controllers are only useful for getting by on for
a while.

Rick

Just an important update for those interested in the DIY burnout
oven build.

I’m glad I forgot to mention what gauge kanthal wire to use for the
element of a small kiln like this. I used only 26 gauge Kanthal A1
wire for the approximate length of 26 to 29 inches (after coiled and
stretched out a bit) which is the lenght you need for this small
kiln.

Don’t use that gauge wire as it already burned out at only 827 watts
(after calculating the 13.5 ohms resistance of the completed wire).

If I took my own advice and did more research I would have already
known that the smallest gauge Kiln element wires that are sold are 15
or perhaps 17 gauge? I’m thinking those of you who have owned kilns
arleady know this.

I originally bought the Kanthal wire on Amazon, but now I understand
that all of the Kanthal wire in bulk on Amazon, I mean all of it…
is for the people making the E-Cigarette (Vapor) electronic devices.
So they only sell between 24 gauge and 32 gauge.

However, I did find that you can purchase very inexpenive Kanthal
coils that are already wound up and in close enough lengths for what
we need on Amazon Prime and get it in two days.

Since the coils are made for Kilns, the gauge of the Kanthal wire
must be between 13 and 17 gauge.

The tricky part is getting the resistance and the length you need.

Because most kilns are wired for 220 Volt, they only tell you the
wattage of the element if you were using 220. So I think you can
roughly divide the wattage by 4 and it will tell you how many watts
in 120 volt. (Please correct me if I’m wrong).

At any rate, once you have the coiled element, you can measure the
resistance of the wire from both ends, and then use the two formulas
for calculating the wattage your element will give.

Voltage=Current “times” Resistance (you can measure your resistance
with an inexpensive voltmeter).

and Power (which is wattage) = Current “times” Voltage

Current is the Amps, and Voltage is going to be your 120 volts

So all you can simply use Algebra to find yor wattage once you know
your resistance.

If the element I picked on Amazon today ends up working, I will
report the gauge and the exact lenght and resistance I used so I can
help anyone who tries this build.

thanks,
Rick

Richard,

You don’t have to do all those calculations.

Buy kiln replacement elements. They will be for either 120 volts or
240 volts. Of course use the 120 volt element full length. However,
if someone gives you a 240 volt heating element just divide the
element in half Each half will work for 120 volts. You can buy a
manual controller from an electrical parts store or as a replacement
from a kiln manufacturer.

Sometimes they are called a continuous switch or something like
that. The switch is an on-off device where the on-time depends on the
dial setting.

The ratio of on-time to off-dtime is called a duty cycle. Actually,
the duty cycle is the ratio of on-time to the sum of the on-dtime and
off-time.

The duty cycle controls the “average current” to the heating element
and therefore the power. You can also use a light dimmer if your
element uses a maximum of 600 watts.

The may be difficult to visualize so ask questions if you don’t
understand.

Fred

Fred,

Thanks for the helpful info. The main reason I want to know the
specific resistance is because I may have to cut the coil in order to
fit it in the small kiln before I stretch it out. I think you are
right that I may have over-complicated some of it but these DIY kilns
are very small. So the coil that I can use even when I double lap it
is only about 26 inches after being stretched.

(some of the coils you purchase are well over 33 inches long before
you even do the necessary stretching). So if someone is building
their own kiln, and must cut the coil, they will be reducing the
resistance which will increase the amps of current they draw.

For example, if the original element has 20 ohms of resistance, they
are only drawing 6 amps on the 120 volt outlet and they are fine. But
if the coil is too long to fit in the small kiln, (and you really
have to stretch them out so the don’t short out by touching), and
they cut the coil down to let’s say 13 ohms of resistance, they are
getting closer to drawing 10 amps of current.

People will easily be tripping their circuit breakers if they draw
more than 10 or 15 amps of current so they need to know their total
resistance of the coil.

Thanks for your better way to figure out the wattage. It is easier
if I don’t have to cut the coil.

Rick

Just measuring the resistance may still leave you with some problems.
For instance, I would guess that a heating element designed to be
used on a 120 volt circuit is probably going to operate at a red
heat. I don’t know for sure, but I would guess that coil length and
resistance is designed to operate at a temperature that is high
enough for rapid heating but not too high as to cause the coil to
have a limited lifetime. If you shorten the coil which reduces its
resistance you will increase the current as you suggested. But it
will also increase the operating temperature of the element and
might shorten its life if you operate at full power. It seems to me
you should find a coil that is an acceptable length when stretched
slightly to keep the coils from shorting out. What do you think?
Fred

When I built my burnout oven I got the Kanthal wire uncoiled from
http://www.ganoksin.com/gnkurl/ep81qq and coiled it myself on a
metal lathe. They also had replacement kiln switches,
high temp fibre gasket material and kiln cement for the fire bricks.

To reduce the load in a single coil, put two (or four) coils in
parallel.

That way each produces half (or a forth) of the needed wattage.

Karen