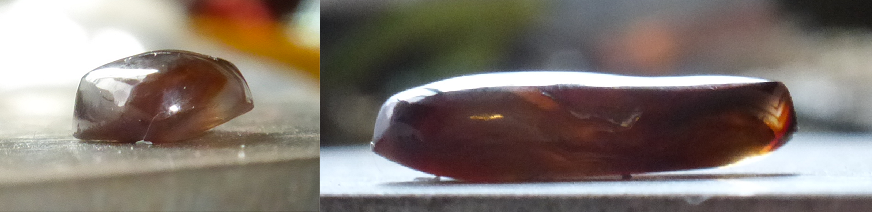
I am trying find a solution to an issue I am having with a cabochon
I am trying to set into a bezel setting for making a ring.
The stone is not entirely flat on the bottom and I do not want to
risk snapping the stone and want the setting to be secure.
I need some way to fill in the space under the stone where it isn’t
flat that will last and survive washing in warm water.
I was thinking us using Thermo Plastic to fill in the gap but am not
sure if this would do well washing in warm water with the ring on.
The bezel will be pushed over the stone and be quite flush against
it so I don’t “think” the material would be able to “ooze” out around
the bezel edge, but I have never used thermo plastic so am unsure of
how it behaves.
I am looking for advice on either this medium or if you have another
suggestion I would love to hear it.
how about making it flat with a lapidary disk, like 80, 100 or 120
grit, then just make the bottom flat. my coarsest lap is 120 grit,
but I could also use my 80 grit grinder. actually safer than filling
in the back.
I learned to use cork you can buy cork sheeting or roll fairly
cheaply at many craft stores and hardware stores used for making or
repairing cork boards it is thin and you can use an xacto knife to
shave it to fit the irregular bottom.
The ‘traditional’ answer was sawdust. (or old newspaper. I’ve seen
that too.)
If it were me, I’d look at soldering up a ring of silver wire to sit
under the worst of the bottom crowning, to stabilize it.
I’d also ponder using sliced up sections of plastic milk jug in
layers. That’s waterproof and reasonably stable over time.
The real question is why you’re using this stone at all? It’s going
to be a nightmare to set, and unless the top face is a whole lot
more interesting than the sides, I can’t imagine it’d be worth the
trouble.
Unless there’s sentimental value to the customer, if it were me, I’d
go look for a better cut stone. Or grind the bottom of this one
flat, if I had to. Wet-&-Dry sandpaper would do it. (wet)
If you have lapidary equipment and some skill, you can epoxy a small
piece of stone to the back and level it up. The Native Americans
would use sawdust in the bezel cup. You can mold some form of epoxy
putty on the bottom. Themol plastic may work, but I have never used
it for that purpose. You can push the stone in while it is still
plastic to get the shape. I have even used a small piece of single
layer cardboard, but don’t like to as a habit. In the end, a square
stone on a solid bearing surface is the best way to go. You should
tell your customer what you have done so that they are aware of the
non-precious metal content in the piece. Solving these problems is
fun and a part of the creativity in our craft. Please post how you
solve the problem. Rob
Were it me. I’d make the side walls of the bezel to fit the stone and
solder with high temp solder. Place the stone in the bezel. Then take
a wire of pure .999 silver or 24 kt gold and make an oval to fit
under the stone and solder it shut. Then with the stone in place
push the very very soft oval of wire under the stone so that the seat
is perfect. You can use a brash pusher or an orange stick to push it
up into place under the stone. Then raise a few beads inside the
bezel under the wire to hold it in place, remove the stone and
solder. You the have a perfect seat. No fillers. Just good metal
smithing. Then set from the top as you like.
This is a technique I use to set fragile cameos or other stones with
an uneven base.
I have used Devcon five minute epoxy. After you mix it up you can
drop some in the setting where the stone is going to need the support
and then lightly set in the stone and “float it out” after about 30
mins. or so you can set the stone. Another way would be to to make a
little dam/ring of clay that would be large enough to encompass the
size of the stone.
Mix up your epoxy and fill the damed area with epoxy and set your
stone bottom side down and let hardened (make sure you clean the
bottom of your stone with denatured alcohol so the epoxy will adhere
good to the stone).
Once the epoxy is good and cured (at least 24 hrs, even though it
says 5 min. epoxy) then you can trim/grind any excess epoxy off and
shape and flatten the bottom/sides and you will have a stone
supported by the hardened epoxy, which you can now set as you would
any other stone.
Were it me. I'd make the side walls of the bezel to fit the stone
and solder with high temp solder. Place the stone in the bezel.
Then take a wire of pure.999 silver or 24 kt gold and make an oval
to fit under the stone and solder it shut. ...
oh cooool love to learn good metal smithing ty Teri
I’ve tried the cork sheet from craft stores or office supply stores.
Unfortunately, it has often crumbled. My best solution has been to go
to an auto parts supply store like Napa Auto or CarQuest and buy
rolls of gasket paper for slight lifts or a cork rubber sheet that
also comes in a roll. Win-win. you get the cushioning of the cork and
the durability and waterproofing of the rubber aspect.
Never use organic material as a filler. I know wood shavings and
sawdust has been used forever, that was how I was taught, but the
key is, it a ring and washing hangs in warm water. A bezel is never
water tight. Wet wood swells and repeating the process will loosen
the stone. If there is a enough material, lap the back flat, if not
use metal, epoxy or plastic for the filler. Old CDs make a good
filler, cut flat or ground.
Although many people have used cork over the years, and it has
worked for some, cork will expand when it gets wet, causing the
cabochon to pop out.
I learned something here at Orchid years ago that works great for
me. I save all the microwave meal containers, like the black ones
from Lean Cuisine. I cut them up in assorted pieces and layer them
here and there under a stone where needed. I used to use bits of
sheet silver but it made the piece heavy, not to mention more costly.
Hope this helps.
I have a variation of technique I make open jump rings that fit into
the bezel and use these to get the correct height for the soldered
wire. Solder in and set etc.