
Wax Build-Up Technique
An English excerpts from the book "Lost Wax Jewelry Making: The Build-up Technique" by Minoru Azama, printed in Japanese by Kashiwa Hobby Books. This article will guide you on the process of using the wax build-up techniques to create a ring shank and how to approach gemstone positioning and symmetry. You will also find information on how to create wax seats for soft porous minerals and stones.
5 Minute Read
This article written by Minoru Azama discusses the basics of the wax build-up technique.
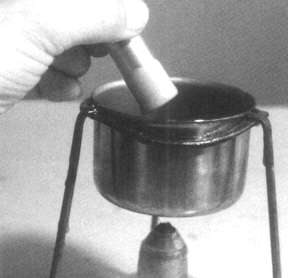
Into a small stainless steel pot, melt wax 1/3 of the capacity. You do not want a full pot because in case of an accident, you want to minimize the burn. Mix hard green carving wax and green injection wax. Start with a 25:75 ratio mixture. Work with this to find the proper mixture that fits your temperament.
If you find in using it, that you are cleaning the wax file more than you like, then add more hard carving wax. If, on the other hand, you have difficulty moving the wax around with your hot tool, then add more injection wax.
For those who do not want to experiment in finding a mixture that would fit their temperament, try Kerr's Jewelers' Carving Wax which has a melting point of 200°F/94°C. Just melt in pot and use.
Gemstone Positioning
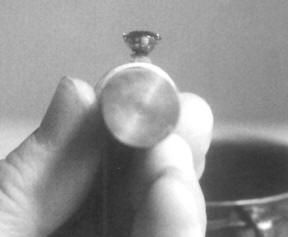
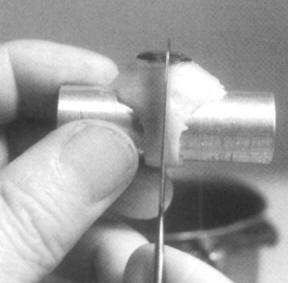
 | Lightly apply wetting agent with a brush or your finger onto the aluminum finger stick and the gemstone. This will prevent the hot wax from sticking onto them. Dip the finger stick into the can of melt wax and pull it out. You will get a thin band; let it cool a little and repeat action till the band builds up to about 1.2 mm in thickness. |
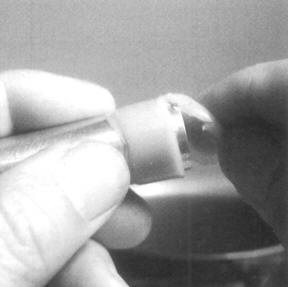 | Cut off the end cap and slide the band to the center of the finger stick. |
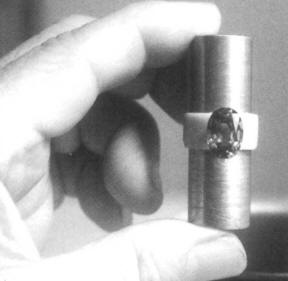 | To position the stone, add a small ball of sculpture wax or any soft sticky type wax on the top of the band. Place the stone into it and position it so that, looking from the top, it is running in the direction you want, i.e. in line with the finger, crosswise or diagonal. |
 | From the side, if the stone is to be flat, see that the table or girdle is parallel with the stick. |
 | From the end, the stone must be perpendicular to a virtual vertical centerline. |
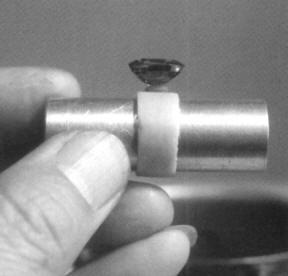
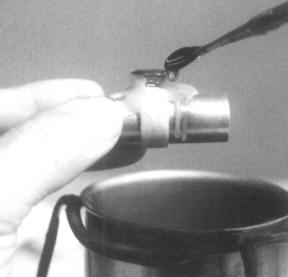 | Using a large spoon-type modeling tool, add wax as necessary. It is best to let it cool a little and then add more wax to build it up. Pouring wax under the girdle of the stone will give you a perfect seat. |
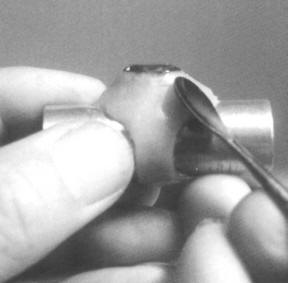 | Working a hot tool on the wax form until it gets fairly cold will give you a smooth surface ready for filing. |
This solid wax model will later be thinned out by digging out from the under side with the appropriate carving tool or by the use of wax burs and flexible shaft machine.
Finding the Center of a Ring or How to Make a Straight Shank
A center guideline is essential in working out a symmetrical design, as well as in getting a straight shank.
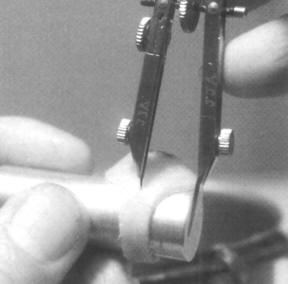 | The use of a divider with two retractable needle points is recommended for measuring a three dimensional project as one leg can be extended to reach down to the lower level. This divider will be used constantly when measuring from the center and for making sub divisions. |
 | Another method is to take a flat spatula, heat it lightly, fine the center of the stone, align the spatula to one end of the finger stick and draw the center line into the wax pattern. Go completely around or repeat on the other side. |
Checking For Symmetry
 | Bring the wax pattern to one end of the finger stick, and trace the shape on it with a sharp pencil. Slip the pattern off the stick by backing it out. This way you do not erase the pencil line. Turn the pattern around and reinsert it to match the scribed line. Any discrepancy should then be corrected. |
Making Seats for Soft Porous Minerals and Stones
The use of drusy, synthetic cluster stones, boulder opal, amber and crystals on a softbase have become popular, but applying hot wax directly on them could make it very difficult to remove and at worse damage the stone. The application of a wetting agent will not help due to the porosity of the stone.
 | To safeguard the stone, wrap the seat portion of the gemstone with a soft pliable sheet wax, the thinner the better. This photo shows the seat wrap cut out from a sheet wax. |
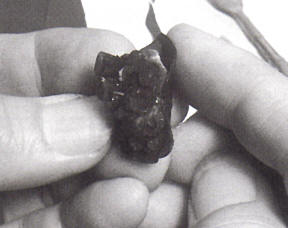 | The form should be larger than the base of the gemstone, so it can be folded up the sides to make the bezel or prongs. Then, onto this apply the melted build-up wax. |
Note: The wax pattern will shrink and so will the metal casting… anywhere from 8 to 11 percent in total. Thus, before casting your wax model, be sure to scrape the inside of the bezel or prongs so as to create a gap of at least 0.5 mm. To check the enlargement of the seat area, gently place the stone in the wax seat and tap the side of the wax pattern and see if the vibration will drop the stone into place.
Never push the stone in
Wax is pliable and will easily accommodate the push. If you push, you will never know if you have enough allowance for shrinkage.
The shrinkage on the ring size is not too much of a concern as the filing, sanding and polishing will normally bring it back to the desired size.
This article is an English excerpts from the book "Lost Wax Jewelry Making: The Build-up Technique" by Minoru Azama, printed in Japanese by Kashiwa Hobby Books. 1999, ISBN-4905588995.
The complete edition is available from Ganoksin in a digital format for only $34.95
 One of the few books available on wax modelmaking; "Lost Wax Jewelry Making: The Build-up Technique" by Minoru Azama, printed in Japanese by Kashiwa Hobby Books. 1999.
Azama process emphasizes building up wax as opposed to starting with a wax blank and carving away material. He uses this approach for organic as well as geometric subjects. The potential of this technique is unlimited!
Azama's work is outstanding, some of it so very precise and geometric that one would think it had been carved of hard wax. The book was written for students at the Japan Jewelry Academy, and Mr. Azama has been generous enough to write a complete English translation
Related Articles

Popular Textural Wax Patterns

Wax Build-Up Procedures

Setting Stones in Wax

Manufacturing a Free-Form Pendant


The All-In-One Jewelry Making Solution At Your Fingertips
When you join the Ganoksin community, you get the tools you need to take your work to the next level.
