
A Crowning Achievement Part 1
9 Minute Read
Often jewelers are called upon to hand fabricate a crown to fit a stone. This is necessary when either the stone is a non-standard shape, or the crown needs to fit a particular design. Although one will seldom hand fabricate a simple round basket crown, constructing one gives the jeweler the basic knowledge and understanding of crown construction needed when creating a more advanced crown.
To make a round wire basket crown, you will first need to determine the size wire you will use. The size used can be determined by the size of the stone and the finished look that you want. A thicker wire will form a sturdier mounting although it may look heavy and clumsy. A thinner wire will look more delicate, however it may not hold the stone securely.
Measure the diameter of the stone. This measurement needs to be to the tenth of a millimeter. Then subtract the diameter of the wire from the diameter of the stone. Multiply this number times 3.14 and round to the nearest tenth of a millimeter. This will give you the length of wire needed to form the under-bezel. For example: for a stone 8mm in diameter using 0.8mm wire, subtracting 0.8 from 8 gives you7.2mm. Multiplying this times 3.14 gives you 22.608. Round this down to 22.6mm for the length of the wire for the under-bezel.
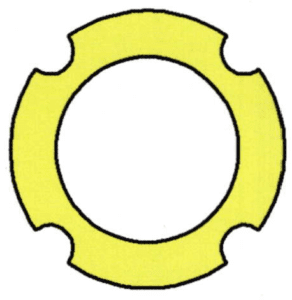
Cut a piece of wire to this length, and also cut a second piece of wire l0% shorter. This second wire is for the bottom bezel. In the example above for an 8 mm stone, the second wire would be cut to 20.3mm. Make certain the ends of the wires are flat. Then bend them in a circle and make certain the ends meet tightly together. If needed hold the ring in a pair of flat nose pliers, and saw through the joint to trim a little off each side of the seam to create a tight fitting seam. Dip in boric acid and alcohol and solder the ends together, using hard solder ofthe appropriate karat and color. Flux the joint well and use a minimum amount of solder. Using a solder pick will aid you in placing the solder.
Do not pickle the rings at this time. Gold is porous and will adsorb the pickling acid, which may impede solder flow on subsequent steps. Ifthe rings are tarnished from soldering and pickling is necessary clean the rings in the ultra-sonic cleaner after pickling. Generally soaking the rings in warm soapy water is all that is necessary to remove the flux and boric acid.
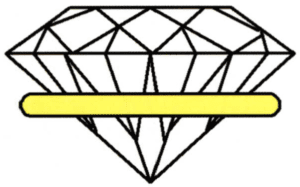
Next clean any excess solder from these seams with a fine needle file and straighten the ring s on a round bezel mandrel. Check the size of the under-bezel by laying the stone on top of it. Looking straight down on the stone you should not be able see the under-bezel. The bottom bezel should be slightly (l0%) smaller in diameter than the under-bezel.
Next prepare both bezels for the prongs. Mark with a scribe or fine tipped marker where the prongs will be placed, making certain they are evenly spaced. To help in laying out the prongs, lay a template for drawing round stones over the bezels. Then using the center lines on the template for a guide, mark the bezels where the prongs will be placed. Another method is to lay the rings on graph paper and use the lines to lay out the prong placement.
Then from the outside of the bezel saw 1/3 to 1/2 of the way through the bezel on each of the marks. Next, use a cylinder bur the same size as the prong wire to cut the shape of the prong into the bezel. The sawed line will help hold the bur in the correct place on the bezels and your work will be more accurate. Hold the bur at a 75-degree angle when cutting. This will allow for the proper angle of the prongs.
Next we need to make the prongs. You need to use your own judgment to determine the height of the prongs. The minimum height of the prong is the distance from the culet of the stone to the table of the stone, if you make your prongs any shorter than that distance the culet of the stone will protrude from the bottom of the crown, which is run acceptable. How much taller the prongs are is dependent on personal preference and the over all look and feel ofthe design of the finished piece of jewelry the crown is being made for.
Once you have determined the length of the prong cut two pieces of wire three times the length of the prong. For example if you want your prong to be 6 mm tall you need to cut two pieces at least l8 mm long. Next take those two pieces of wire and bend them into a U-shape with the sides of the U appropriately at a 75 degree angle. The U needs to fit across the under-bezel and into the notches for prongs opposite each other, not the ones next to each other. The U-shaped wire prong should fit into the notches of the under-bezel matching the angle of the cuts that you made.
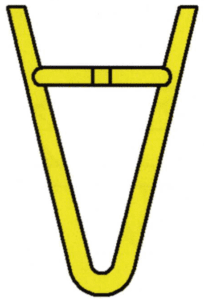
Take one of the U-shaped prongs and slide the under bezel into it to prepare for soldering. The U-shape prong should be snug enough to hold the under- bezel in place without any additional support. The under-bezel should rest at approximately 60 percent ofthe prong height below the top of the prong. Once you have made the crown you want 60 percent of the prong height above the under-bezel. Position the under-bezel in place on the U-shaped prong and dip boric acid and alcohol and add a little flux to the two joints between the under-bezel and prongs. Solder the prong to the under bezel using medium flow solder that matches the karat and color of the crown you arc making. The best way to solder the prong is to place a small piece of solder against one side of the prong where it contacts the under-bezel and heat until the solder starts to melt. Then move the torch to the other side of the prong and flow the solder through the joint between the prong and under-bezel. This way you will be sure you have a good strong joint.
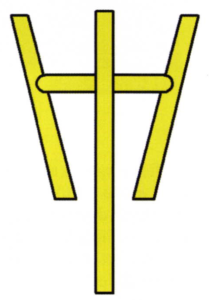
Once you have soldered both prongs, dip in water to cool if it is yellow gold or if it's white gold allow it to air cool before quenching. Then saw through the bottom ofthe U and spread it apart a little bit so that you can insert the other U-shaped piece into the under-bezel. The two U-shapes should cross each other in the back. Once you have positioned the second U-shaped prong solder it in place as you did the first prong.
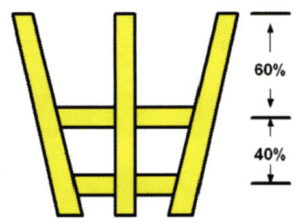
Once all four prongs arc soldered into place, soak in soapy water to remove the boric acid and flux. Then cut the bottom of the U-shaped pieces off the prongs and trim them to the proper length. Remember 60 percent of the prong height should be above the under-bezel and 40 percent ofthe prongs below the under bezel. Once the prongs arc trimmed to length, insert the bottom-bezel into the bottom of the prongs. The bottom-bezel should be held in place on the U-shaped prong and dip boric acid and alcohol and add a little flux to the two joints between the under-bezel and prongs. Solder the prong to the under bezel using medium flow solder that matches the karat and color of the crown you arc making. The best way to solder the prong is to place a small piece of solder against one side of the prong where it contacts the under-bezel and heat until the solder starts to melt. Then move the torch to the other side of the prong and flow the solder through the joint between the prong and under-bezel. This way you will be sure you have a good strong joint.
Once you have soldered both prongs, dip in water to cool if it is yellow gold or if it's white gold allow it to air cool beforequenching. Then saw through the bottom ofthe U and spread it apart a little bit so that you can insert the other U-shaped piece into the under-bezel. The two U-shapes should cross each other in the back. Once you have positioned the second U-shaped prong solder it in place as you did the first prong.
Once all four prongs arc soldered into place, soak in soapy water to remove the boric acid and l. Then cut the bottom of the U-shaped pieces off the prongs and trim them to the proper length. Remember 60 percent of the prong height should be above the under-bezel and 40 percent of the prongs below the under bezel. Once the prongs arc trimmed to length, insert the using medium flow solder of the correct karat and color.
Once all the prongs are soldered to the bottom bezel soak the setting in soapy water to remove the boric acid and flux. Check in all directions to make certain all the prongs are at the same angle and that the bottom-bezel and under-bezel all are perfectly parallel in every direction.
Next, File off the bottom of the prongs to clean up the bottom of the crown and if necessary use a fine No 6 cut needle file to remove any excess solder. It is very difficult to file the solder joints and keep them looking nice and clean and sharp so it is best to use a minimum amount of solder so that you do not have to do any clean up at this stage.
Polish the crown using a bristle brush in your flex- shaft, and you will be ready to use the crown, adding it to your piece of jewelry. Because we used hard and medium flow solder you can easily attached it to the jewelry using easy flow solder. When the stone is set in this crown the distance between the bottom-bezel and the under-bezel should be the same distance as between the under-bezel and the girdle the stone. For proper proportions the under-bezel should be exactly in the center between the girdle of the stone and the bottom-bezel. That's why we left 60 percent ofthe prong height above the under- bezel as this gives you 20 percent of the prong height to use in setting the stone. If this is too much you can always trim the prongs while setting, however, if the under-bezel is too high and the prongs are too short you will have difficulty securing the stone in the prongs.
Although this seems like a very simple and easy project to complete, it is quite an accomplishment to make this crown. To keep all four prongs properly spaced and at the same angle, the bottom and under bezels all perfectly parallel, and to set the stone so that all proportions are correct, takes a skillful goldsmith. If you can accomplish all of this in creating this crown you truly have attained A Crowning Achievement.
See also:
- A Crowning Achievement Part 2
Related Articles

Enhancing the Stone – An Update on Diamond Treatment

A Crowning Achievement Part 2

Flush Mount Diamond Setting

Fish Tail Setting


The All-In-One Jewelry Making Solution At Your Fingertips
When you join the Ganoksin community, you get the tools you need to take your work to the next level.
