
Setting and Shank Assemblies
Setting and shank assemblies are routine work in many retail manufacturing jewelry shops. Heres a method for expediting this process using ABI tack-welding technology.
3 Minute Read
Setting and shank assemblies are routine work in many retail manufacturing jewelry shops. Here's a method for expediting this process using ABI tack-welding technology.
Setting and Shank Assemblies with Tack Welding Technology | |
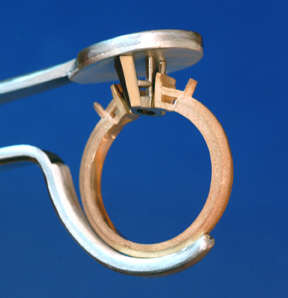
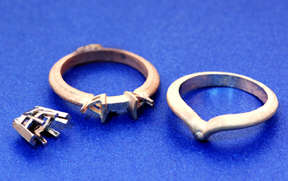 | The parts for this project include a 14-karat yellow gold wedding set and a 14-karat white gold marquise setting. The shanks are rough castings and the setting is cast and magnetic pin finished. |
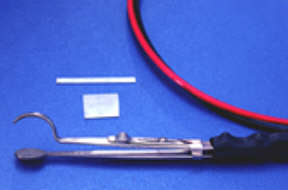 | To tack the white gold setting into the engagement ring, double pole tweezers will be used as the only lead from the ABI Tack II tack welding unit. This tool was custom made and an overview of how it was made was published in the May 2004 issue of PJ. The article is entitled Tool Modifications: Part 2. Sterling silver pieces will be added to the area where the tweezers come in contact with parts being tacked for better contact and to reduce metal contamination. The slide locking device will also be removed. One side of the tweezers lead will be attached to the positive terminal and the other side of the tweezers lead will be attached to the negative terminal. |
 | The sterling silver sheet and wire were fit and soldered to the tweezers using soft silver solder and white flux. After the assembly was completed, the joints were filed and sanded. All sharp edges were removed from the silver inserts. The inside portion of the ring shank and the outer portion of the setting were semi-polsihed. |
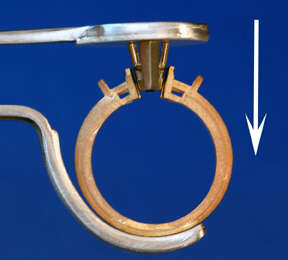 | The shank and setting were filed and fit. The tension of the shank was adjusted so the setting would need to be lightely pushed into the shank to the proper height. The setting was lowered into the shank by squeezing the tweezers until the bottom of the setting slightly protruded into the inside of the ring. The ABI Tack II tack-welder was set at 50 volts on the high energy setting. |
 | The setting has been pushed down and is in position for tacking. A single pulse of energy tacked the parts. They are ready for soldering. Tip: Make sure there is good metal to metal contact and that all edges are clean and free of debris. For this project, the prongs were filed flat and all come in direct contact with the sterling silver plate. The shank was semi-finished and it makes complete contact with the sterling silver curved holding portion of the tweezers. All flashes of metal were removed and there were so sharp edges. Sharp edges, poor or partial contact and metal fragments can all lead to destructive discharges. |
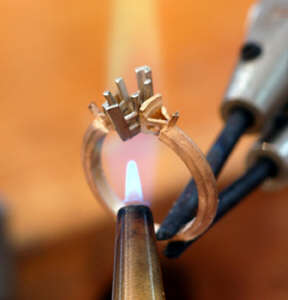 | Next the tacked ring assembly was submerged into fire coating solution. It was preheated and fluxed. Pieces of solder were placed at the joints and the assembly was heated and soldered. There was no shifting of parts due to the tack-welding and no special holding device was required during the soldering process. |
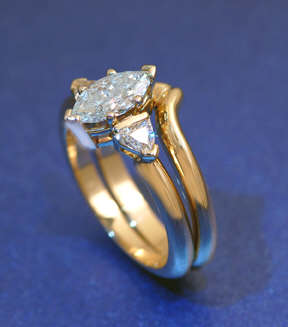 | The rings were pre-finished and polished and the diamonds were set. Tacking the components made the process more efficient because no special holding devices were required for soldering and there was no movement of alignment during the soldering process. If the alignment between the setting and the shank was not accurate, it could have been disassembled and re-tacked. Disassembly and reassembly is time consuming after soldering. |
Important
Tack-, fusion- and pulse-arc equipment settings will differ and are based upon the volume, amount of contact and alloy of the material you are working with. Practicing using like materials will give you a parameter for the settings required for your application. Keep a record of settings and tasks for future reference.
This content is published in a handbook along with other welding applications. To get a copy of the ABI Handbook of Welding Applications for Jewelry Design and Repair, contact Janet Kirk at 401-461-4140
Related Articles

Pulse Shaping: Variable Constants

Laser Welding Full Prong Replacement

How to Repair a Hollow Rope Chain

950 Palladium: Custom Made Components


The All-In-One Jewelry Making Solution At Your Fingertips
When you join the Ganoksin community, you get the tools you need to take your work to the next level.
