
Screen Printing Dry Enamels
I have worked out a way to use screen printing methods so as to print on metal, using dry enamels. It is based on using screens made out of material that is coarse enough to let dry enamel go through it. Designs can be masked into the screens using photo emulsion. Using this method, one can apply dry enamels, and have good spatial control over where the enamel goes.
8 Minute Read
Screen printing is a method that is widely used, particularly for printing ink onto fabrics. In screen printing, a 'mask' is created of a fine mesh material that is called a screen. Usually the screen is a sheet of polyester cloth. Designs are created by masking off certain areas of the screen while leaving other areas open, when you apply ink to the screen, the open parts allow the ink to go through, and it is deposited onto whatever you put under the screen. The mask is applied by various methods, but it is commonly made with a light-sensitive photo emulsion.
While silk screening has been used in enameling, its application has been limited to the use of fine, liquid enamels. This is because the screens used to print enamels are the same as those used for printing with ink, and are very fine. Using liquid enamels makes for several problems. One problem is that you get thin coverage by the enamel. This is because you can only get so much liquid enamel onto a surface before it runs or smears. A second problem is that printing multiple colors, using multiple screens, can be difficult. Printing the first color onto a surface is no problem. However, when the screen for a second color is brought into contact with the surface, the second screen can smear the first color, and you have all the makings of a mess.
Step 1: Create the Artwork
I have worked out a way to use screen printing methods so as to 'print' on metal, using dry enamels. It is based on using screens made out of material that is coarse enough to let dry enamel go through it. Designs can be masked into the screens using photo emulsion.
Using this method, one can apply dry enamels, and have good spatial control over where the enamel goes. Because the enamel is dry and doesn't stick to the screens, it is possible to print many colors, using a separate screen for each color. Therefore, this method allows for using many screens to make elaborate, multicolored designs. Of interest to the impatient enamelist, is that it is possible to apply many separate colors, creating a complicated design, and to fire the resulting piece just once.
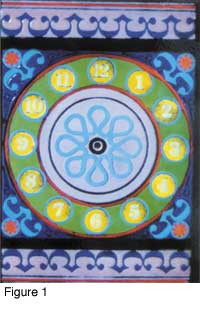
Figure 1 is an example of a clock dial that was created using this method. The design was made using a computer drawing program. Each color in the design was printed onto a separate transparency using a laser printer. Each transparency was used to make a screen, using a photo emulsion process. The resulting 10 screens were used to 'print' the enamels onto the plate. It was fired once. In this article I describe the steps used in this process.
I assume that generating the artwork will not be a problem for readers of Glass on Metal, nonetheless, here are some guidelines. Create your design in black, on a transparent material. Examples of transparent materials: glass, plastic sheets. Whatever part of your design you want to be covered with enamel, draw as black. Examples of suitable formats: draw on your glass or plastic sheets using a black marking pen; another method is to paste black paper cutouts on glass.
Having poor artistic skills, I use a drawing program on my personal computer, and I print my drawings as black, on clear acetate sheets, using a laser printer.
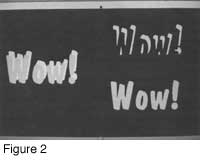
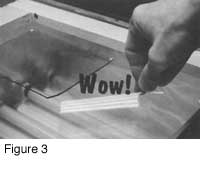
A simple example is shown in Figure 2 (left). The word 'Wow!' was drawn in red, and given a white shadow. The red and white parts of the drawing are separated (Figure 2, right) so that they can be printed out separately. The red part of the drawing is printed on a plastic sheet as shown in Figure 3.
Irrespective of how you create your drawing, there are some important guidelines to follow:
Drawing Tip #1: Avoid fine lines in your drawing. How thin a line you can print depends on how fine the screen material is. You have to experiment to see just how thin a line or how small an area you can successfully print. Note: it is possible to create fine lines using another method; this is illustrated at the end of the article.
Drawing Tip #2: Avoid half tones (i.e. gray areas) in your drawing. They will never work.
Drawing Tip #3: If you want to do multi color printing, you have to do a color separation, as shown in Figure 2. Each color that you want to print has to be printed onto a separate transparency. I do this by printing each color as black, onto a separate acetate sheet, using my laserjet. Be sure to keep all the sheets in registration.
Step 2: Make the Screen(s)
A. Material.
The screen material that I use is a 62 mesh polyester. The holes in this mesh are (according to the manufacturer) 0.0098 inches square.
B. Mount the Screen in a Frame.
The idea is to stretch the mesh over some square frame. You can use a small wooden canvas stretcher, and staple the mesh to it. The frames that you will see in the accompanying Figures, I made from aluminum window screen frame material. The mesh was mounted in them much as you would mount window screen material.
Step 3: Transfer the Design to the Screen using Photo Emulsion
There are three steps here. The underlying principle is that the photo emulsion is water soluble until it is exposed to light. When it is exposed to light, it hardens and becomes insoluble in water.
A. Apply Photo Emulsion to the Screen.
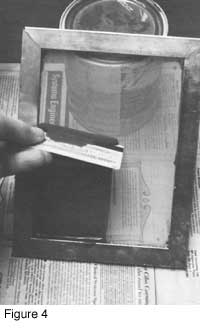
I use a standard silk screen photo emulsion kit, from an art supply store. Follow the instructions in the kit. Mix up the emulsion and spread it on the screen. I prefer to spread it on with a credit card, as shown in Figure 4. The goal is to get an even layer of emulsion - no drips, no holes, and no air bubbles. Then dry the screen. Aiming a fan at it will expedite the process.
B. Transfer the Artwork to the Screen.
I use a light box for this step. You can see the layout of my light box in Figure 6. It is a set of four ultraviolet fluorescent bulbs (15 watts) mounted on the bottom of a plywood box that has a glass cover on the top. I put the artwork on the glass, and then put the screen over the artwork. When the lights are turned on, the clear part of the drawing lets light through to those parts of the screen, and in those places the emulsion hardens.
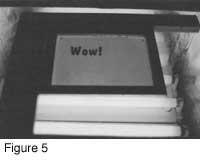
This is demonstrated in Figure 5, which shows the screen (green) over the drawing (Wow!), and the lights on. The light will harden the emulsion in all of the screen except for where the letters are. In contrast (pun intended) the parts of the screen under the black letters are shielded from the light so that they remain water soluble.
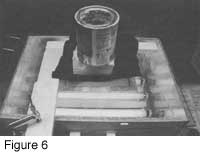
Note: The process of exposure is actually best done as shown in Figure 6. Cover the back of the screen with black cloth, then a piece of foam, and hold the whole thing down with a weight (here, a paint can).
C. Wash Out the Design.
When the exposure is complete, follow the directions in the emulsion kit, to wash the screen. This is done in Figure 7 with a spray of water.
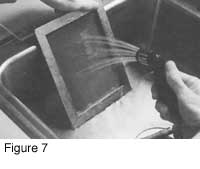
As you can see, the letters (Wow!) that were under the black parts of the drawing have washed out the screen.
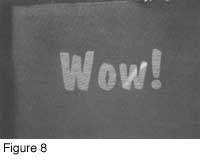
Figure 8 shows what the finished screen looks like. Dry the screen, and you are ready to go.
Step 4: Print

The basic idea here is to put the screen over a metal plate, and sift or brush the enamel through it. In Figure 9, a red enamel is being brushed through the screen.
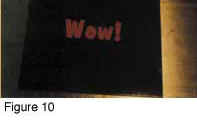
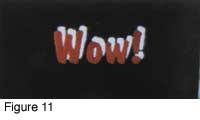
The resulting application of red enamel is shown in Figure 10. The finished product, after applying white enamel through a second screen, and after firing, is shown in Figure 11.
Step 5: Cleanup
When you are finished with a screen or set of screens, they (the screens) can be easily cleaned out and made ready for another design. The instructions with the photo emulsion kit describe it all.
Uses of the Method
The use of this technique should be readily apparent to most readers. It allows you to create almost any design, and to apply enamel with much greater precision than can be achieved using stencils and the like. The method should be popular with those involved in production because of the ability to make multiple copies of a design.
For me, the big pluses come from the ability to redo sections of your work that you might not like. If you are unhappy with the way something looks after firing, you can take the screen and use it to cover the offending area with another color. Thus you can effectively overpaint, and cover up all your mistakes. Also, don't forget how wonderful it would be to be able to create elaborate works while firing just once. The niceties of 'overpainting' notwithstanding, I am impatient enough to consider it a failure if I have to fire a piece more than once.
In addition to the above, spatial control over the placing of enamel makes it possible to use this method to achieve some unique and interesting effects, some of which are described below.
A. Overprinting Enamels.
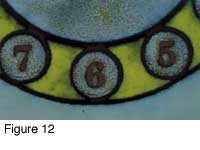
Breakthrough. Many layers of dry enamel can be applied to the same part of the design. For example, print a region with an opaque enamel. Then clean off the screen and apply a transparent enamel directly on top of the opaque. When this is fired at high temperature, it results in a region of controlled breakthrough, as shown in Figure 12.
B. Overprinting Enamels.
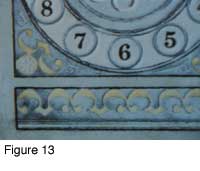
Fine Lines. Objects can be outlined with thin lines by first printing them in (for example) black. Then, overprint a second layer onto the same region, using a light opaque enamel. When fired, this results in a thin dark line around the object, as shown in Figure 13.
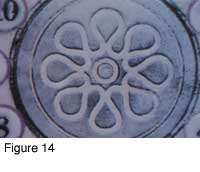
C. Shadows: By applying two complementary patterns that are offset from each other by a small amount, a shadowing effect can be created, as shown in Figure 14.
In summary, I have described a way to place dry enamels on metal, using a screen printing method based on a coarse screen and a photo emulsion mask. It opens up a whole new world of designing with enamels. Try it, you'll like it.D. Textural Effects Resulting from Thick Applications of Enamels: The enamel suppliers of the world will love this one. By printing large amounts of enamel, it is possible to achieve very thick layers of fused enamel, thus creating interesting 3-dimensional, textural effects.
Related Articles

Champlevé Enameling

Intro to Enameling: Cloisonne Pendant

Enameling Tips: Ritual Over Knowledge

Plique-a-Jour Pictorial


The All-In-One Jewelry Making Solution At Your Fingertips
When you join the Ganoksin community, you get the tools you need to take your work to the next level.
