
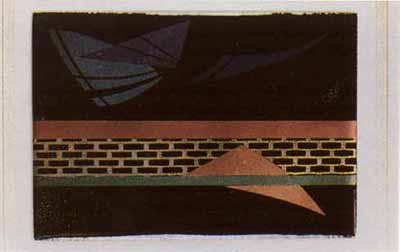
Solid and Patterned Carefree Luster Decals
Carefree Lusters are mica based luster pigments stabilized for glass, glazed ceramic and enameled metal applications. Carefree lusters are now available in solid and patterned decal sheets allowing a new vision and approach to working with luster pigments.
8 Minute Read
Carefree Lusters are mica based luster pigments stabilized for glass, glazed ceramic and enameled metal applications. Carefree lusters are now available in solid and patterned decal sheets allowing a new vision and approach to working with luster pigments.
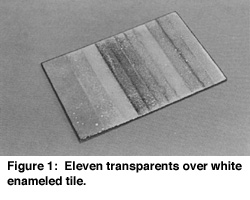
I suggest making a sample color palette. This will aid you greatly in laying out your designs and give you a better understanding of the final results. This material has some very unique characteristics, being both reflective and transparent, to some extent. I would begin by making a test piece with strips of your favorite enamel colors and fire as usual (figure 1).
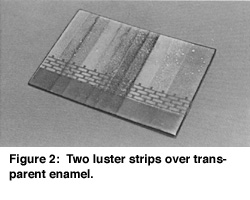
Now run strips of the luster decal material across the enamel colors giving you a kind of plaid effect. You may lay all of the decal colored strips and just fire once to save time (figure 2). This will allow you to view the final results ahead of time and help with laying out the colors of future work.
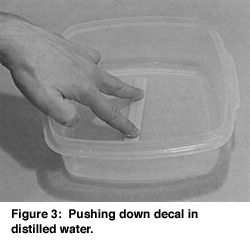
Using a plastic or glass container larger than any section of cut-out decal material, add room temperature distilled water. Place one decal cut-out into water with paper side up (with luster down to prevent excess curling). It will take between 1/2 - 1 minute depending on size. It may curl up a bit, but just push it down with your fingers (figure 3).
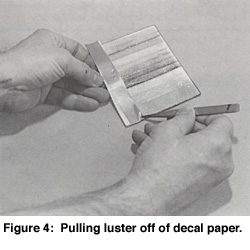
Take it out and test by applying a slipping motion between your thumb and fingers. The luster decal should start to slip from the backing paper quite easily. If not, just put it back into the water again for a while. If you are working with very fine pieces, you may wish to use a pair of fine tweezers or push off paper with fingers sliding it directly onto the area you wish. Place your first decal strip on the test piece of top of the enameled strips at 90 degrees (figure 4).
You may slip it around a bit for position. If it has been moved too much it may lift a bit around the edges as there may be a lack of gelatin. In that case, take a small scrap of decal sheet (without luster) and using a small artists brush, which has been dipped into the distilled water, swirl the wet brush onto the gelatin side of the scrap of paper. Then slide the brush under the lifted edge of the decal to re-wet the decal with some of the gelatin from the brush

How to Squeegee Decal
With a chipboard piece that has a straight edge, begin in the middle of your decal and squeegee outward in all directions until ALL WATER has been squeegeed out (figure 5). When you begin, it works best to drag the chipboard. When you think you have all the water out, start again in the center and push the chipboard gently forward, looking very carefully at the leading edge of the board to check whether there is any slight 'wave' of water being pushed ahead under the decal. It is imperative that all water be expelled from under the decal. Make sure there is no air trapped. You may re-cut the edge of the chipboard as it gets wet for a fresh edge to work with so you can use the same piece many times. You can get this material at most art supply stores or use matchbook covers as that is the right thickness of material to use.
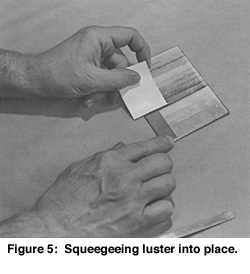
Using a soft tissue or paper towel, dampened slightly with distilled water, hold the decal with a piece of paper on top of the decal as the decal may stick to your finger (see left hand in figure 5). Gently wipe excess luster or gelatin off remaining surface of your glass/enamel wiping away from the decal in all directions. Do not panic if some of the luster has leaked out from under decal. It is just a but of excess and some colors do that. They will fire just fine…
Adding Additional Luster Decals
Let first decal dry a few minutes if the next decal is directly next to the first. You may then add the next color decal in the same manner as above. Now you will have to watch that water doesn't seep under previous decal. If it does, just re-squeegee it flat and continue. You will have to let the decals dry a bit in between additions and be careful not to have too much water on surface which then makes a mess of previous decals. Sounds complex but really it is easy after you practice. The secret is in the touch. Clip some practice pieces and try firing on the back of old work until you are comfortable with it. Remember that you are looking for a plaid effect (like figure 2) when you are placing your next decal strips. This will allow you to see just what the luster will look like over the various colors of enamel underneath.
Test Firing for Enamel
To determine the proper firing temperature, you need to know the temperature at which the surface of your enamel becomes sticky. This is the temperature at which to fire up to with the decal. This material will bond directly to the surface. If the surface is not quite hot enough you will notice a lot of the luster rubbing off, leaving a thin transparent coat of the enamel after it has been fired. If you can't rub your design off after firing, you got it right! There may be some excess that rubs off, however, your design should look solid and even. Keep records.

Actual Decal Firing
After all decal material has been applied to the surface of your enamel, place your piece on top of kiln or other warm place to dry. Your actual firing can be done as soon as all decal material is completely dry. If your edges appear to have lifted off, go back and apply more gelatin and re-squeegee. Dry and fire.
Now You have a Test Piece
This will aid you in visualizing decal colors as applied to your favorite enamel colors. Simply use the test piece to determine where and which luster/enamel combination looks best on your next work of art.
How to Use Decal in Your Designs
Draw out a design to use for your luster decal material. Keep in mind that because of the nature of the material you can not build one color over another. I will explain later how to achieve the look of overlapping colors without actually firing over the other. As I said in the Carefree Luster section of this article, these particles will not adhere to each other. Only to the surface of the glass, and then only one particle thick. Overlapping colors only gives you a patchy area of both colors and quite irregular. It is up to you what look you want.
If you are an artist with your own personal design style, try drawing a design with clear, concise and simple areas for your first attempt. You might want to use all seven colors.
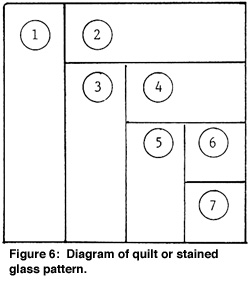
What you wish to achieve here is to develop working knowledge and technical eye/hand skills. Especially if you have never worked with decal material previously. If you have difficulty with planning a design, I would suggest using a quilt type or stained glass pattern which could incorporate the colors you wish to use (see figure 6).
Simpler the better for your first effort. It is OK for design areas to be adjacent to each other as in the quilt pattern.
You may draw your shapes onto the decal with a marking pen, it will just fire off anyway. Use a regular black marking pen. Just cut out your shapes with sharp scissors along your lines, soak, apply and squeegee. You may have complex shapes and you can use graphite paper to trace your design elements onto the decal material if you don't want to try freehand.
You can also draw your design directly onto the surface of the enamel. I use a standard Sharpie permanent marker. Also, you can use graphite paper and trace your pattern if that works best for you. These last two do not work if the enamel is black or very dark, as the line will not show up.
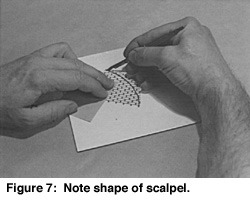
If you choose to work with your design directly on the enamel, just cut out a piece of decal that is larger than the area of design you wish. Apply decal over your drawing. You can see through the decal material and now use a scalpel to cut the final shape.
Cutting on enamel will dull the scalpel real fast. I keep a sharpening stone handy and draw the scalpel across it almost every cut. A diamond fingernail file works well also. Using the edge of the scalpel left up and pull off the decal material outside of your design shape. Just squeegee as per previous instructions. All all colors and shapes of your entire design.
How to Achieve Overlapping Effect in Design
If your design has what appears to be overlapping areas, you may accomplish this by the following method:
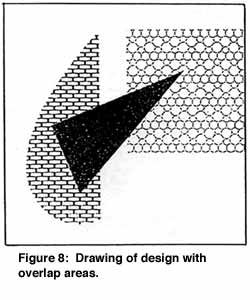
Lay on your work the first color which should include the area underneath the second color. Squeegee. Now lay on the second color-decal material over the first. Squeegee. It must be larger than the area of the overlap design part. Using a very sharp scalpel (be sure to re-sharpen after each cut) cut down through both layers of decal material, holding down decal so that they do not move during cutting. Now remove the areas of the second color (on top) that lay outside of the design line and discard. With a sharp tweezers or scalpel lift the edge of the area with the two colors and slide out the first color which is underneath using tweezers. Re-squeegee the top color after checking the edge alignment. This will give you a very clean edge which will fit together so that it will appear that one color lays over the first. Fire away!
Start Your First Attempt with a Flat Piece
If you want to work on a curved piece you may use the decals if they are cut into small pieces or on the single curve. Compound curve (ball shapes) are at best very difficult and next to impossible. The reason being that the decal must be completely squeegeed flat onto the surface prior to firing. Flat decals will not bend in more than one direction.
Related Articles

English Pictorial Enamels

De-Enameling and Other Myths

Copper Mesh Plique a Jour

Enameling On Ballpoint


The All-In-One Jewelry Making Solution At Your Fingertips
When you join the Ganoksin community, you get the tools you need to take your work to the next level.
