
Millimeter Gauge Layout Technique
Meticulous planning and tedious layout are a big part of a goldsmiths life at the bench. It usually pays dividends to thoughtfully plan gemstone layout for graver setting. If youre off by just 0.1 mm in one direction or another, you can sometimes visually ruin the aesthetics of an expensive project that is near completion, and in so doing ruin your day. But once in a while the time to plan just doesnt exist. Bridezilla decides at the very last minute that she wants those accent stones after all--the ones that you planned for in your design but agreed to add later on the first anniversary. Or maybe you just forgot that project lurking at the corner of your bench. The client just left in a huff and if she cant pick it up after lunch, well...you can just forget it.
1 Minute Read
Meticulous planning and tedious layout are a big part of a goldsmith's life at the bench. It usually pays dividends to thoughtfully plan gemstone layout for graver setting. If you're off by just 0.1 mm in one direction or another, you can sometimes visually ruin the aesthetics of an expensive project that is near completion, and in so doing ruin your day.
But once in a while the time to plan just doesn't exist. Bridezilla decides at the very last minute that she wants those accent stones after all-the ones that you planned for in your design but agreed to add later on the first anniversary. Or maybe you just forgot that project lurking at the corner of your bench. The client just left in a huff and if she can't pick it up after lunch, well…you can just forget it.
Enter my quick-and-dirty layout technique to the rescue. A relatively common millimeter gauge is all that is necessary to quickly lay out a line of gemstones on metal (or wax), and the process is deceptively simple.
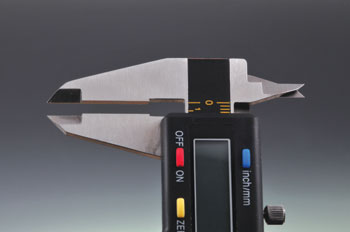
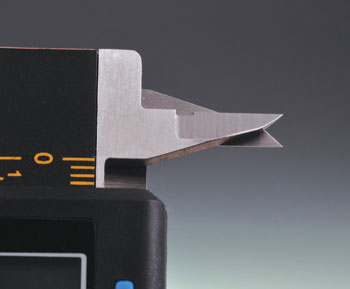
The gauge I'm talking about has two ends; one is for measuring the outside diameter (OD) of an object, and the other is for measuring the inside diameter (ID). The cool thing here is that on many of these tools, the ID side comes to a fairly sharp point.
If the gems are all the same size, the following process is nearly foolproof and very quick. Once you have determined the placement of the first stone, measure one of the stones with the OD side of the gauge and then back off just a couple of hundredths of a millimeter.
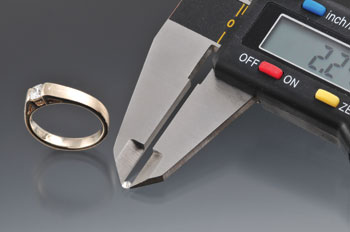
Backing off this tiny distance will allow for some drill drift and slight variation in gem sizes, and ensure that your gems don't overlap girdles. Use the thumbscrew to lock in that distance and then use the pointy ID side of the tool to mark the placement for the next gem.

You can walk the tool down the row using the ID side of the gauge to place each gem. Punch, drill, ream, and set from these marks.
If you are using graduated gems to set a tapered row, you will need to do some simple math. Add the OD of two gems and halve that figure to get the correct placement distance for those two gems, then repeat down the row.
![]()
In association with
![]()
The award-winning Journal is published monthly by MJSA, the trade association for professional jewelry makers, designers, and related suppliers. It offers design ideas, fabrication and production techniques, bench tips, business and marketing insights, and trend and technology updates—the information crucial for business success. “More than other publications, MJSA Journal is oriented toward people like me: those trying to earn a living by designing and making jewelry,” says Jim Binnion of James Binnion Metal Arts.
Click here to read our latest articles
Click here to get a FREE four-month trial subscription.
Related Articles

Debunking Three Myths About Sawing

Creative Uses for Duct Tape at the Bench

Bench Mag Favorite Tips 2002 Part 2

Layout Form / Template


The All-In-One Jewelry Making Solution At Your Fingertips
When you join the Ganoksin community, you get the tools you need to take your work to the next level.

