
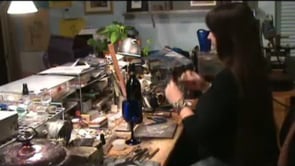
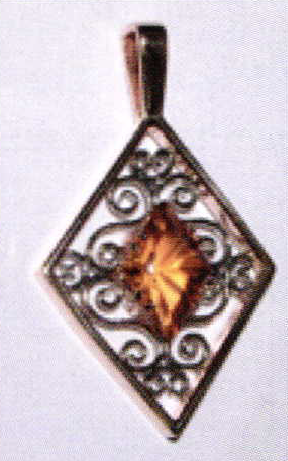
Making an Alternative Filigree Jig
Begin by making a box as described in the last chapter. Cut a piece of wood 1/8 to 3/16" of an inch thick, ¾" wide and 1" longer than your box. Make ready by cutting off the heads of 40 pins. Procure some wide, double-face scotch tape. It is important the tape not be too.
3 Minute Read

Recognizing the problem of making a model plate, another method of making a jig which requires less accuracy and mechanical ability was suggested by Neal DeMoss. I have read every article on filigree jewelry making that I have been able to find in the last 5 or 6 years, and they all use the model plate method for making the jig. The new method suggested by Mr. DeMoss is without a doubt the most ingenious and simplest way to make a jig.
Begin by making a box as described in the last chapter. Cut a piece of wood 1/8 to 3/16″ of an inch thick, ¾" wide and 1″ longer than your box. Make ready by cutting off the heads of 40 pins. Procure some wide, double-face scotch tape. It is important the tape not be too thick and also that it be very sticky. The best kind of tape I have found is made by Scotch. However, try several kinds. Stick a 2½" long piece of tape on the piece of wood, centering it lengthwise. Remove the outer covering of the scotch tape and starting from the center of the tape, place a pin on the tape perpendicular to the bottom of the piece of wood with the pinpoint end projecting ½" - 3/8″ past the bottom of the wood. Now place a pin next to your first one. This time, let the end of this pin only come down to the bottom edge of the piece of wood. Place another pin next to the last one in the same position as the first pin.
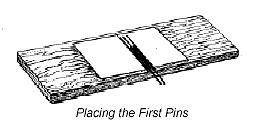
Keep doing this until you have used about 40 pins. As you place the pins in a row, keep moving away each side of center. When placing the pins down, make sure they are in a straight row and perpendicular to the bottom length of the wood. Press them down tightly, squeezing them together as you lay them down.
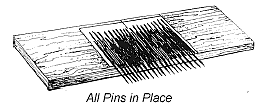
After you have a row of about 40 pins, cover the pins from the bottom to the top of the wood with another piece of sticky tape, carefully pressing the pins and keeping them in line. Don't remove the outer covering of the tape at this time. Now lay the pin assembly aside for a while and mix some cement or dental stone.
If you use cement, it should be a patching type. Get one that does not set too fast or too slow. Try to get one that sets in about 20-30 minutes. Rocktite brand is a very good brand of cement for this purpose. After mixing the cement or dental stone, fill your box, making sure the cement does not touch the piece of wood. Tap or vibrate your box in order to level the contents. Now set your pin assembly onto the box.
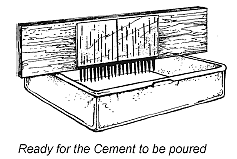
Be sure the length of the projecting end of the pins overhanging the bottom of the piece of wood is slightly less than the inside height of the box.
After making sure the contents of the box have hardened, brush a bit of acetone or solvent, such as paint thinner, over the scotch tape and wood, and carefully peel off the tape. Remove the spacer pins and the wood.
Trim the pins as in the previous chapter. Of course, it is necessary to make the lifter plate as before.
Don't forget to fasten some duct tape to the bottom of the lifter plate. This is necessary to be sure the plate is firmly sitting on the jig when winding the filigree elements. Read carefully page 22 which refers to this.
To save time you can wind an element at one end of the jig and another at the other end. Needless to say elements of different sizes and conformations can be made in this manner.
Only by trial and error can you learn how much heat is necessary to allow you to remove the elements without them losing their shape or to partially unwind. Make certain the finished strip of filigree wire you are using is well annealed. This will allow you to use less heat when removing the just wound element.
Remember, don't dunk the hot jig in the pickle, the jig pins would contaminate it. Always have a container of water always handy for this purpose.
Read also:
You assume all responsibility and risk for the use of the safety resources available on or through this web page. The International Gem Society LLC does not assume any liability for the materials, information and opinions provided on, or available through, this web page. No advice or information provided by this website shall create any warranty. Reliance on such advice, information or the content of this web page is solely at your own risk, including without limitation any safety guidelines, resources or precautions, or any other information related to safety that may be available on or through this web page. The International Gem Society LLC disclaims any liability for injury, death or damages resulting from the use thereof.
Related Articles
brooch.
Necessity Is the Mother
Filigree Soldering Demo part 2
A Crowning Achievement Part 2


The All-In-One Jewelry Making Solution At Your Fingertips
When you join the Ganoksin community, you get the tools you need to take your work to the next level.

Trusted Jewelry Making Information & Techniques
Sign up to receive the latest articles, techniques, and inspirations with our free newsletter.