
Installing an Adjustable Shank
This ring has become so hard to get on and off, but when it is on, it is loose and spins around my finger. My knuckles have gotten so big - another of your middle-aged customers with the same complaint…The fact is that as we age, our hands and fingers change shape, as do other parts of our anatomy. Whether due to injury, arthritis or just getting older, knuckles usually become larger which makes rings more difficult to get on and off. Suppliers offer several different mechanisms designed specifically for this type of situation…
6 Minute Read
"My diamond is gone!" exclaims one of your best customers as she walks up to the counter of your jewelry store. "It happened the other day when I was putting on my coat to leave the house. I didn't realize it until later when I looked down and noticed the gaping hole in my ring. And then I remembered snagging it on the sleeve of my coat." Struggling to take the ring off, Mrs. Glidewell adds, "This ring has become so hard to get on and off, but when it is on, it is loose and spins around my finger. My knuckles have gotten so big"-another of your middle-aged customers with the same complaint.
You reach under the counter and offer a bottle of hand lotion: "Here, this will help you." She applies some lotion which enables her to squeeze the ring over her knuckle. After wiping it clean with a tissue, she hands it to YOU.
1
You recognize the 14k yellow gold and diamond ring which Mr. Glidewell purchased from you a few years ago. You notice that one prong and one diamond are missing and, checking the rest of the stones with a fingernail, you find that others are loose as well (Figure 13. 1).
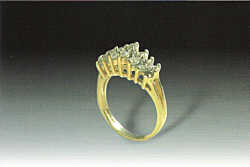 |
| Figure 13.1. Ring before alteration |
"It looks like you caught a prong and lost a diamond all right," you say, "and some of the other diamonds are also loose. I can replace the prong and also put in a new diamond. As far as the fit, I would suggest adding a specially-made ring mechanism which will solve the problem and make it easier to put the ring on and take it off." At this point you show her a sample of the mechanism, which you have on hand. After trying it on and envisioning her ring restored and comfortable, Mrs. Glidewell gives the go-ahead and you enter her information on a job envelope. You quote a price which you add on the appropriate line and tell Mrs. Glidewell that her ring will be ready in a week.
The fact is that as we age, our hands and fingers change shape, as do other parts of our anatomy. Whether due to injury, arthritis or just getting older, knuckles usually become larger which makes rings more difficult to get on and off. Suppliers offer several different mechanisms designed specifically for this type of situation. Ping mechanisms can be ordered in a range of meta-Is, styles, widths, sizes and even with different ways of opening. Some work like bracelets, with a hinge and a clasp, while others have a sliding mechanism like the Adjusto Shank@ which opens up to a larger size yet cannot open completely, thus preventing accidental loss. (Note: This chapter documents only the work on the ring shank, which was completed prior to the setting repair.)
2
Clean the ring in preparation for the shank replacement. Select a mechanism that is the correct size and style. It should be slightly more massive at the contact points than the ring, so that you can blend it to match the contour later. In order to mark and trim the diameter (ring size) of the mechanism to fit, slide the ring onto a stationary ring mandrel which is clamped into a vise or jammed into a bench hole. Place the new mechanism next to it on the mandrel. Holding the ring and mechanism in place, scribe a straight line across both shanks on both sides at the points where you will join them. Use a jeweler's saw to cut through the ring's shank along the scribed lines and then file the ends flat (Figure 13.2).
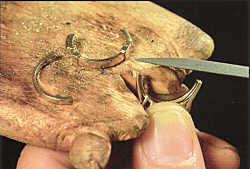 |
| Figure 13.2. Filing the ends |
3
Trim the mechanism so that it meets the ring when placed at the desired size on a ring mandrel. It is essential to position the two components accurately for soldering. A variety of methods arc possible, such as binding the pieces in place with wire or using a third hand (stationary tweezers) to hold the parts in place. The method shown here is using a pair of head and shank tweezers, made specifically for holding ring components during soldering.
Firecoat the ring. Flux the joints and place a snippet of solder on one side of one of the seams (they will be soldered one at a time). Warm the entire ring very slowly to avoid shocking the diamonds. When the solder begins to melt, apply heat on the side opposite where you placed the solder in order to pull it completely through the scam. Be sure you see solder on all sides of the seam, and if needed, add more at the same point and reheat. In this way you can be certain that the solder flows completely through the seam. After re-checking the position of the components on the soldered side and the alignment on the unsoldered side, proceed to solder the second scam (Figure 13.3).
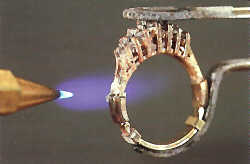 |
| Figure 13.3. Soldering the adjustable shank in place |
4
To prevent shocking the diamonds, allow the ring to cool as slowly as possible. An excellent way to do this is to place the work on a prewarmed charcoal block and cover it with a glass jar (Figure 13.4). When cool, Pickle, rinse and dry the ring.
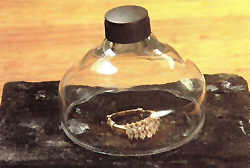 |
| Figure 13.4. Allowing the diamonds to cool slowly |
5
File the joints and carefully blend the contour of the new shank to match the ring. Since a file will not fit into the groove of the shank's pattern, use a knifeedge bur to carve the contour. It is important to secure the work firmly to prevent slipping, so hold the ring from below and pull it against the bench pin. Plant both hands, one holding the ring, the other the tool. Lubricate the bur with wax or oil and use it at a slow speed, just fast enough to prevent grabbing. Burs like this are sharp and aggressive, so use a light touch, stroking the spinning bur against its rotation in a smooth even motion. With each pass, lightly scrape the surface of the metal, until the desired shape is reached (Figure 13-5).
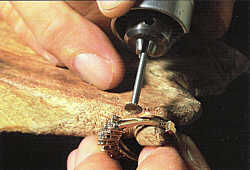 |
| Figure 13.5. Carving the sides with a knife-edge bur |
6
'When it comes to carving metal in difficult-to-reach areas, no tool can beat a graver. Not even a bur permits the delicate carving which is possible with these traditional miniature chisels. Select a #3 knife graver because it best matches the desired shape. In most cases, the work may be secured in a ring clamp or engraving block so that pressure can be applied without the risk of slipping. However, in this operation so little force is required that the ring can be held by hand against a bench top or another flat surface. Bracing the graver against your thumb, gently push it forward at a shallow angle and slowly shave off a sliver of gold. Repeat this action until the desired contour is achieved. Gravers are very sharp and potentially dangerous, so be careful not to slip. The polished sides of the tool leave polished surfaces on the interior of the groove (Figure 13.6).
 |
| Figure 13.6. Finishing the groove with a graver |
7
At this point the setting repair is executed. In short, the steps are to file a flat spot at the break and add a new prong, followed by setting a replacement diamond.
Double-check all of your work and use fine files and/or abrasive paper to remove all nicks and file marks left by your tools. Buff with a soft bristle brush held in the flex shaft. Clean the piece and polish with rouge. Check the sliding motion of the mechanism to make sure it opens fully (Figure 13.7).
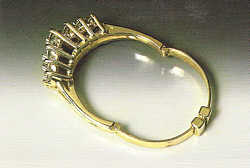 |
| Figure 13.7. Completed renovation with shank open |
8
A week later, Mrs. Glidewell returns for her ring (Figure 13.8). She opens and closes the slide mechanism and then puts the ring over her finger, sliding the shank closed. "This new shank is much more comfortable," she reports. "I like the way it opens to slide over my knuckle and then just snaps closed so smoothly." Another happy customer!
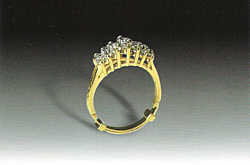 |
| Figure 13.8. Finished ring with shank closed |
Related Articles

What Causes Casting Marks?

Laser Welding Plique a Jour Owl Brooch
Fit to be Sized

Laser Repair: Bangle Bracelet


The All-In-One Jewelry Making Solution At Your Fingertips
When you join the Ganoksin community, you get the tools you need to take your work to the next level.
