
All About Jump Rings
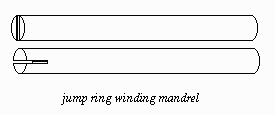
Jump rings may be made most easily by using a small hand drill with various sizes of mandrel. Take a broken burr, old needle file handles or a piece of drill rod and make a slit near the end. (I would use a separating disc to do this). Or one may drill a hole through the rod. Then it may be set into a hand drill or a flex shaft handpiece.
7 Minute Read
Jump rings may be made most easily by using a small hand drill with various sizes of mandrel.
Take a broken burr, old needle file handles or a piece of drill rod and make a slit near the end. (I would use a separating disc to do this). Or one may drill a hole through the rod. Then it may be set into a hand drill or a flex shaft handpiece. By inserting a wire in the hole or slit and feeding the wire onto the rod as the flex shaft is slowly operated one can mass-produce jump rings. The same tool used with a hand drill is safer and requires less skill.
If feeding wire onto a mandrel using a flex shaft handpiece be aware that with most standard ones it is difficult to get the feeding speed slow enough to be useful. One needs annealed wire and also needs to have tension on the wire being fed. Do not feed the wire on by hand as it is dangerous. Instead feed the wire through the jaws of a pair of round nose pliers or other tension creating device.
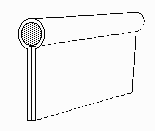
It is important to use a metal mandrel such as steel to wind jump rings on. Winding onto wooden rods for instance leads to loose, sloppy jump rings while on a metal mandrel they wind tight and do not release or spring back when the tension of winding is removed. This is one reason I like to use the smooth part of drill bits to wind jump rings with. One winds short sections, perhaps a centimeter or so long so as to be able to hold them easily while cutting them.
When I make jump rings I wind only a short section and saw them by hand. If the section is long and a little wiggly I will hold them as on the left of the diagram, if short and stiff enough as on the right (fingers not shown). In both cases they catch onto a little wooden nub I quickly cut into the bench pin. I also have a pair of locking, grooved pliers to grip them with while cutting.

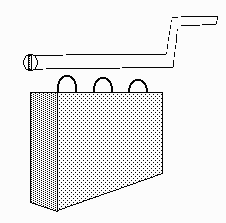
One may take a board and hammer in staples or crossed nails on the top edge. The board is now clamped in a vise. A long piece of drill rod is clamped in the hand drill. A hole or slot has been made through the end of the rod to insert the wire in. The drill rod is now inserted into two or more staples on the board and the drill handle turned to make the jump rings. With this arrangement one can also make different sized drill rod mandrels and bend one end to make a crank to turn. It is important to provide tension onto the wire being wound whether by pulling against it while winding or by running the wire through a leather or rubber clamp of some kind as it is wound on.
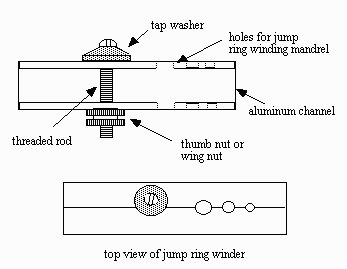
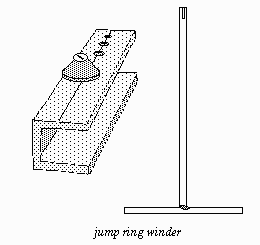
 Here is a jump ring winding tool I came up with. It uses extruded aluminum window channel. The slit in the end of the rod catches the wire and allows it to be wound. The wire is fed under the washer which is clamped tight. This keeps tension on the wire and makes for good jump rings. When one is ready to remove them one turns the mandrel the other direction which disengages it and allow the mandrel to be withdrawn allowing the jump rings to easily slide off it as it is pulled out. The mandrel itself is made from common nails which gives one the opportunity to make different sizes.
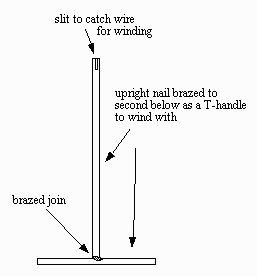
In another approach, one makes a little brass "hinge section", which is clamped in the vise, the drill rod inserted and turned. This is simpler to store than the board and staples version and does not require as long a piece of drill rod. In all cases if one can feed wire up under a faucet washer clamp the winding proceeds much better with the wire under tension.
 Sometimes the drill rod will be sawn up through the middle for some distance in the manner of the emery mandrel to allow the jump rings to be easily cut off. The rod should be well hardened and tempered for this approach.
Some people wrap paper around the drill rod prior to winding jump rings, anneal the whole thing after winding and remove the rings. I find it more useful to keep the rings work hardened for easier cutting, but there might be a time to use it. Carol Campbell in Calgary wraps tape around her wound jump rings to keep them together while cutting them.
When I worked in a factory in Pforzheim we would use a specialized jump ring winding tool which was essentially a kind of fancy hand drill with gearing and a Jacobs chuck. We used copper and brass mandrels in the cross section of the required jump ring, ovals, rounds and so on. To cut them we used a kind of miniature table saw, the same design as for wood working but with metal cutting blades and very small. The circular saw was about 2-3 cm across and could be adjusted so that it projected above the table only the height of the jump rings being cut, perhaps a millimeter or so. An adjustable metal fence provided a straight edge against which one pushed the wound mandrel over the saw. You had to do it right the first time because otherwise the jump rings got really chewed up. It worked very well though it was a little scary and there is some potential for building a home made version with a "captive" mounted flexible shaft handpiece and a similar table and saw. I'd suggest two fences, one on each side of the wound mandrel so you could not cut yourself.
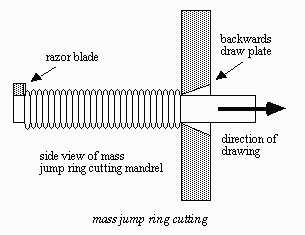
A less expensive method of mass-production cutting of jump rings is as follows: one can cut them all at once by taking the drill rod, sawing into the end a bit, soldering in a razor blade or matt knife blade so that it protrudes on one side only (it protrudes only a millimeter or so) and then putting the drill rod through a draw-plate hole of corresponding size, backwards, and drawing it. The drawplate presses the wound rings onto the blade which cuts them. A bottle may be placed around the drill rod to catch them. I learned this one from Christian Gaudernak from Norway.
For production closing of jump rings one makes a band for the index finger of the left hand (for right handers) and solders a screw head on it. The other hand holds a pair of pliers which hold the ring in place while it is closed. Some factories use plated steel rings and magnetized pliers to speed the work up. The slot head takes the place of one of the pairs of pliers normally used to open and close jump rings.

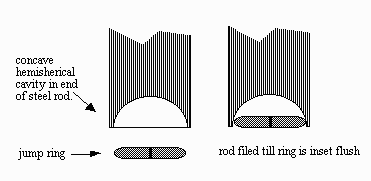
Another factory method of closing lots of jump rings quickly is to use a special punch which is made to fit a specific size of jump ring. One can create a concave domed hole in the end of a piece of steel rod which then just fits over a closed jump ring of the desired size on a surface plate. Just as when making a bezel rocker the end of a round rod is drilled into with a smallish drill bit. When the subsequent concavity is made with the round burr the burr stays centered in the previously drilled hole and the concavity is afterwards polished with a piece of wood and steel polishing compound using the flex shaft. The wood takes the shape of the hemispherical depression while polishing it.
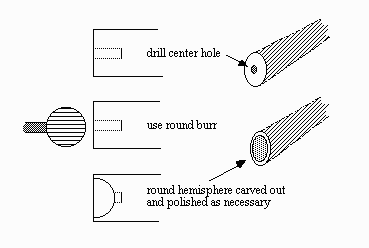
The jump ring size to be closed is chosen and one makes a jump ring. It is set into the concavity and the metal of the rod is filed back until the jump ring lies flush with the end surface of the rod. To close rings in quantity one throws them onto the surface plate or anvil and taps them closed with the punch. Because the punch was made relative to the size of the ring when flush with its end surface it closes them neatly, quickly and securely. The same basic tool form is also used as a setting tool for tube settings and if the edges are sharpened it becomes a "dinking tool" which is used like a punch to cut discs out of sheet metal. In this latter form one tilts it at an angle while hammering it.
Related Articles

Hints on Making Tubing

Green Bench Tips – Part 1

Combining Yellow Gold and Palladium
Multi-Metal Lamination


The All-In-One Jewelry Making Solution At Your Fingertips
When you join the Ganoksin community, you get the tools you need to take your work to the next level.
