
Basic Hinge Making Technique
It is important to pick tubing with an appropriate wall thickness and material strength for the requirements of the piece. Sterling will need thicker material than 14k gold. Nickel white gold is the hardest material goldsmiths generally work with. The hole for the hinge pin must also be appropriate for the material used for the hinge pin.
2 Minute Read
In this article you will learn about the basic hinge making technique. Learn how to cut, shape, solder, wire and more hinges step by step.
It is important to pick tubing with an appropriate wall thickness and material strength for the requirements of the piece. Sterling will need thicker material than 14k gold. Nickel white gold is the hardest material goldsmiths generally work with. The hole for the hinge pin must also be appropriate for the material used for the hinge pin.
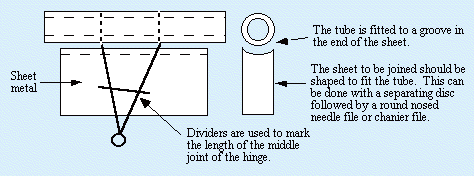
The sheet to be joined should be shaped to fit the tube. This can be done with a separating disc followed by a round nosed needle file or chanier file.
It is usual to use odd numbers of knuckles or joints for a hinge. The hinge tube has been cut longer than the length of the sheet to be hinged. This requires no measuring of the tube; it is simply cut longer than needed. The middle knuckle of the tube is measured with dividers and marked in place. Because of the extra length this too can be approximated and merely marked in place. Any measuring step that can be skipped reduces the time required for the procedure.
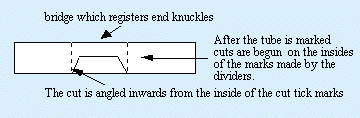
After the tube is marked cuts are begun on the insides of the marks made by the dividers.
As soon as the cuts are begun straight into the tube for a millimeter or so they veer off at an angle to a point half way through the tube when they are joined leaving a bridge connecting the two ends to register them.
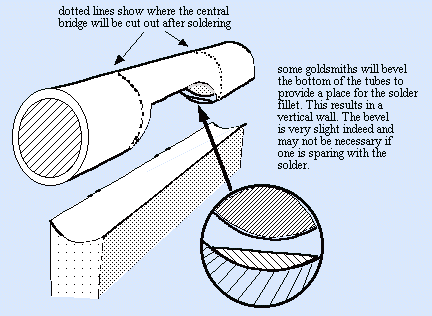
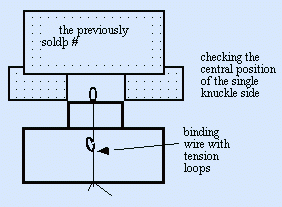
The tube is wired in place onto the sheet with one or two wires neither of which is on the bridge part of the tube.
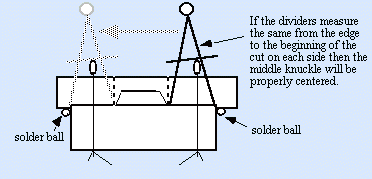
The distance from the edge of the sheet to the gap is checked with dividers to ensure it is centered. If the dividers measure the same from the edge to thebeginning of the cut on each side then the middle knuckle will be properly centered. The whole is fluxed and heated until the flux melts, then it is checked again with the dividers and soldered with a very small amount of solder. The solder may be balled up also to limit spillage.

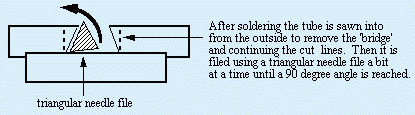
After soldering the tube is sawn into from the outside continuing the cut lines begun before.
It is filed filed with a triangular needle file towards a 90 degree angle with constant checking after each stroke.
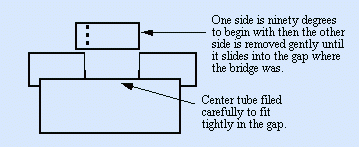
Center tube section filed (in flex shaft) to a ninety degree end and then is filed and checked a stroke at a time until it fits tightly into the gap. It must be tight as it will wear loose in any case with time.
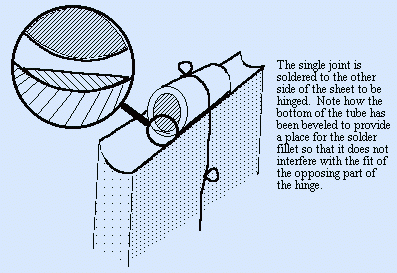
The single joint is soldered to the other side of the sheet to be hinged ensuring the sheets line up well using dividers or checking with the first section.
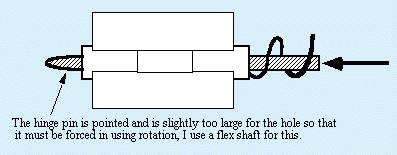
The hinge pin is pointed and is slightly too large for the hole so that it must be forced in using a flex shaft. The extra tube and hinge pin are trimmed together to finish off the hinge. A tight force fit hard hinge pin is best.
Related Articles

Cufflink Hinge Pins

All About Hidden Hinges

Double Tongue Tube Box Clasp

Box Clasp Fabrication


The All-In-One Jewelry Making Solution At Your Fingertips
When you join the Ganoksin community, you get the tools you need to take your work to the next level.
