
Hinges with Bearings
A bearing is essentially tube sections which are attached to the metal being hinged into which the hinge itself is installed. The use of bearings offers us a couple of things. First of all, it offers us a way of increasing the structural strength of our hinge unit.
10 Minute Read
A bearing is essentially tube sections which are attached to the metal being hinged into which the hinge itself is installed. The use of bearings offers us a couple of things. First of all, it offers us a way of increasing the structural strength of our hinge unit. Secondly, it offers us a method of having a stop — that is, unlike a butt hinge, which can rotate over an extreme range, until the two pieces of metal almost touch, you can design a hinge with bearings so that it only rotates a certain amount, and then stops as the bearings collide with each other.
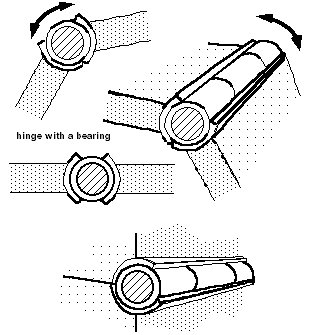
A hinge with a bearing as a box hinge.
The problems of installing the bearing itself will vary according to the actual piece that you're working on, and here is where, wherever possible, we employ a principle mentioned earlier in discussing construction principles, and this principle is: if you want two pieces to be related, make them out of the same piece. So that when we install the bearing itself, we usually do this using a single piece of tubing, which has a slit in it — one pre-existing slit. This will automatically register both parts of the bearing. If you make the tubing yourself, then you simply don't solder the seam, and then you have a piece of tubing with a slit in it. This is soldered in place on both sides of the parts to be hinged, and after soldering, then the tube is cut apart. The hinge itself is then built into resulting bearing. This means that you need nesting tubing for this construction, the hinge tube should be a perfect sliding fit into the tube used for the bearing.
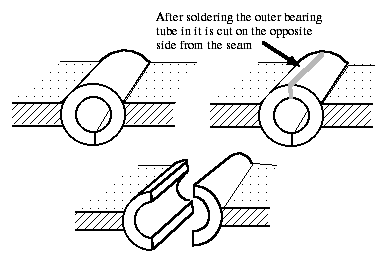
Then a section is removed from the tube, on the opposite side to the existing slit. The amount of the section that is removed will dictate the degree to which the hinge can open: will determine how far the hinge itself will be able to rotate before it stops.
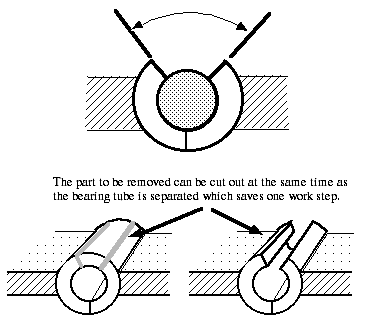
Just as when cutting a piece out of a ring shank for sizing it can be useful when removing the section from the tube to draw the lines you wish to cut on the tube, then cut one of them (with a sawblade or separating disc) 90% of the way through but leave a bit attached, then cut the other line all the way through. This will keep the tube from moving or bouncing around while you are removing the section. Then finish the cut you started with and remove the section.
After having constructed the bearing itself, then we install the hinge knuckles, the hinge joints, within the bearing to finish off the hinge. Bearings are sometimes used on bracelets, and very frequently used on boxes, as well as neck pieces, and again, what they give us is an increase in structural strength, and the ability to determine a smaller amount of rotation than with a butt hinge.
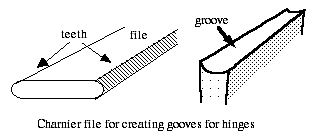
Bearing "how-to": The steps in constructing a simple butt bearing are as follows. We're assuming a rectangular strip of metal, such as you might find on a bracelet hinge, and we will make a cut across it where we wish the hinge to be installed. If there are numerous hinges, then all of these steps are done at the same time, and you just repeat the step over and over again. We have to use metal which is thick enough and strong enough, and I would suggest that one millimeter thickness would be a reasonable minimum for your sheet metal — 1.5 is probably healthier. The ends of the sheet metal are grooved — I'm going to be doing this grooving using a separating disk, and following up with a charnier file, or a round-nosed needle file. Chenier files are rather hard to find these days, and what they are, is a file that has — it is a rectangular cross-section, with the short ends of the rectangle being rounded, and the same width all the way down the length of the file. The long sides of the rectangular cross-section are smooth metal, with no teeth. The narrow edges are half-round files with parallel sides and no taper to them.
The ends of the sheet are so grooved that the tubes fit into them smoothly, and are as good a fit as you can manage. Check to make sure that the tubing is not crooked or at an angle when placed into the groove, and be aware that the natural tendency during filing is to place a bit more pressure near the ends of your filing stroke which tends to deepen the ends of the groove more than the middle, so that you have to concentrate on filing just the middle of the groove: ignore the ends; they will take care of themselves automatically. In other words, the groove has to be straight across, and not have a hump in the middle. Once the grooves are to the correct shape, the tubing chosen for the bearing is soldered in place, preferably onto both sides at the same time. Some people find it easier to solder the bearing tube to one side first, and then the second — it's your choice. I solder them simultaneously to both sides, whether it is a bracelet, cuff link or into a box. Just as with the basic hinge, the bearing tube is cut longer than the join to be made — that is, that it's wider than the sheets being joined. This eliminates a measuring step, and gives you room for mistakes.
Just as with the basic hinge, the solder is applied in the form of balls, and is applied on the outside edge of the sheet metal, in an area where it's easy to clean up later, and leaves no mess. Again, the principle is: always place solder in areas that are going to be cleaned up in any case, or where you can get at them easily. And again, we combine actions. Later on, when we're trimming the bearing ends flush with the side of the hinge, we'll do the clean-up simultaneously. So, any time we can combine an action in a construction sequence, we do so. The bearing tube is now trimmed fairly close to the edges of the sheet — not back all the way yet, just fairly close — probably half a millimeter or a millimeter wider than the sheets being joined. Once the bearing tube is installed on both sides, then it is cut apart on the opposite side from the existing seam, thus separating the two parts of what will be the hinged unit. It is at this time that you decide how much of the bearing tube should be removed, in other words, what the degree of rotation of the finished hinge will be.
At this point, the hinge itself is installed into the bearing, using the same methods, if possible, that we used for the basic hinge. Sometimes in a bearing, the walls of the bearing come up so high that it is not possible to use the central bridge method, as was described for the basic hinge, and so you will have to install the knuckles as separate units. We'll install the two outer knuckles first, and we will have to check, measure, use our dividers to make sure that they are evenly spaced and correctly positioned relative to the sheet. Just as with the basic hinge, we determine their placement — assuming a three knuckle hinge here — by measuring the distance with our dividers from the inner edge of the knuckle to the side of the sheet metal. When this distance is the same on each side of the hinge, then you know that the middle knuckle is centered.
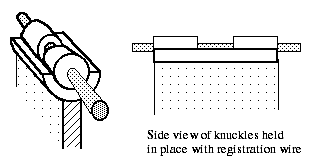
The outer knuckles are soldered into the bearing, using an absolute minimum amount of solder, and, again, placing the solder on the outside. Just as with the basic hinge, it can be a good idea to bevel the bottom surfaces of the outer knuckles to provide a place for the meniscus of solder to go, so that there will not be any interference during the rotation of the hinge, no solder spillage. When Linda Chow solders her outer knuckles into the bearing, she will place a broken drill bit of an appropriate fitted size through the holes in the tubes to help maintain registration. You can use titanium wire for this, graphite pencil lead or iron binding wire as well, as long as it is a pretty good fit to the hole in the tube. It needs to be a good fit to register the tubes properly. My favorite is titanium. You should not have any solder spillage freezing things up, because the registration wire is somewhat distant from the joins that are occurring.
After having constructed one side of the hinge, then we install the center knuckle, and this is done in the same manner as we did for the basic hinge: we begin with one side flush, ninety degrees, the length of the knuckle a little bit larger — perhaps a millimeter larger — than the gap to be filled. We then reduce it a stroke at a time with the file or a separating disk, until it fits very tightly in the gap. Once it fits tightly in the gap, the hinge is assembled, and tick marks are made on the opposite bearing so that you know where the central knuckle should be located. Then the central knuckle is soldered into the opposite bearing, using, again, a minimum amount of solder, arranging for no solder spillage, and working very cleanly. You will not need to worry about registration quite as much as with the basic hinge, because in addition to the registration wire through the knuckles the bearing itself will register the knuckles in position during soldering. After soldering, you would then install your hinge pin — your choice as to what approach you would use; my personal preference is a force-fit hinge pin. The final step would be trimming off anything sticking out the sides of the sheet metal.
A Bearing in a Box
Now we will deal with installing a bearing into a box, such as we might come across for a hinged box or a teapot or coffee pot lid. As with all box construction, construct the entire box first, then install the hinge. I will normally construct the walls, attach a floor, decide where my cut is going to be for the lid, and make a small sawblade cut there. At that point, I will attach the roof; the sawblade cut allows air to escape during the soldering step, and after having soldered the roof on, I will continue the cut, separating the top and the bottom of the box.
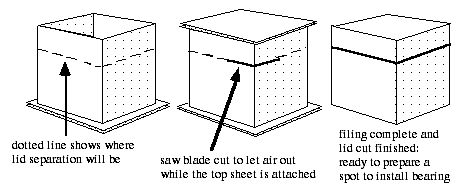
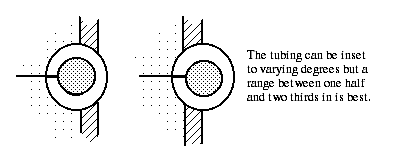
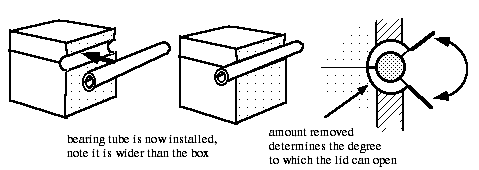
At this point, you decide where the bearing should be placed into the box — that is, how far in you're going to file and saw and cut to install the bearing tube. In general, this is to the halfway mark, and possibly as far as two-thirds the diameter of the tube.
The tube that we use for the bearing has a slit in it, pre-existing, and this slit is placed facing the inside of the box. It is important in shaping the hole to receive the bearing tube, that it be as parallel and as even as possible.
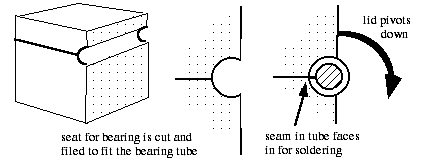
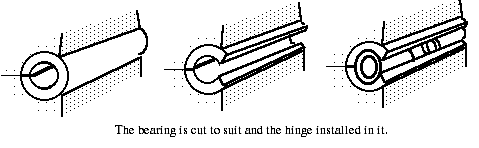
The bearing tube chosen is actually a little bit wider than the box. Once it's all fitted together we solder the bearing tube into the top and bottom of the box simultaneously. If you are worried about freezing the box together, you can place some solder flow retardant, such as White-Out, at the potential seam in between the lid and the bottom of the box. After having finished the solder job, the bearing tube is cut apart, and, as before, we now remove a portion, a section of the outside of the bearing tube, and the amount that we remove determines how far the hinge will open.
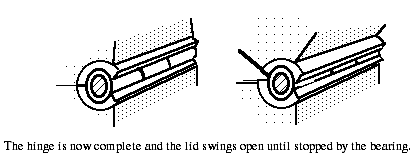
Once we have done this, we trim the bearing tube back to the sides of the box and then install the actual hinge knuckles into the bearing tube, just as before.
A note about boxes, and hinges used for silversmithing applications is that, quite often, this is where a tapered hinge pin is used — that is, there's a slight taper to the hinge pin, it is force-fit in, and this allows for rapid disassembly for repair and cleaning. In determining the amount of the bearing tube to be removed, consider the weight of the lid of your box, as if it opens too far it can topple over, not enough, and the lid doesn't open wide enough for it to be a useful opening.
Related Articles

Superfit’s Hinge and Latch System

Double Tongue Tube Box Clasp

Hinge Pin Installation Options

Basic Hinge Making Technique


The All-In-One Jewelry Making Solution At Your Fingertips
When you join the Ganoksin community, you get the tools you need to take your work to the next level.
