
Flexible Shaft Tricks
A good selection of burs may be had from your dentist. Dentists often throw out burrs which still have a reasonable life left in them for a jeweller. The same goes for the probes and other tools. Some dentists are nervous about giving tools away.
10 Minute Read
This article offers some very helpful flexible shaft tricks and tips. As with all machinery wear eye protection at all times.
A good selection of burs may be had from your dentist. Dentists often throw out burrs which still have a reasonable life left in them for a jeweller. The same goes for the probes and other tools. Some dentists are nervous about giving tools away (fear of litigation). They do however have excellent sterilizing solutions so infection should not be a worry. A good procedure is to soak them in laundry bleach (Javex®) for twenty minutes and follow by baking in your oven at a very low temperature (200o) for about half an hour or so. This is supposed to kill all the nasties one might encounter.
Your dentist also has a selection of diamond burrs. These are excellent for working and drilling stones, especially the harder ones. They should be used with water as a cooling agent. These are extensively used in the industry for texturing gold surfaces. When the dentist thinks they are worn out they are usually still fine for goldsmiths to use. I usually contrive to use them just under water or with a constant drip.
'Heatless Mizzy Wheels®' are small coarse grinding wheels that seem to generate a fair bit of heat despite their name. They give a good texture on metal similar to the diamond bur effect but much more coarse.
The flint wheel from an older style disposable Bic® lighter or a knock off is made of carbide steel in such quantities that they can be made incredibly cheaply. When the lighter is empty the top can be knocked and pried apart and the flint wheel placed on a standard screw mandrel for the flexible shaft thus making a carbide bur for texturing metal. It works like a rotary file for filing edges and coarse metal removal. Get your remaining smoker friends to save dead lighters for you. Some of the newer ones have a coiled spring rather than a wheel and they won't work. The cheap lighters you see in flea markets usually have the wheel still.
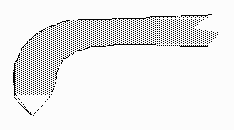
A tradesman's trick is to make an imitation of a diamond flywheel for the flexible shaft. A diamond flywheel creates extremely high polished grooves or cuts in metal surfaces. You may have seen similar cuts on certain wedding bands or on some Asian work. A manufactured one costs over a hundred dollars and Zaruba says you should buy two because one tends to break the first one quickly. The imitation works as follows. One takes a piece of metal, probably steel about the size and shape of a nickel and drills a hole through the center, mounts it on a screw mandrel and turns it true with a file while it is rotating in the flexible shaft. Then one Gypsy sets two very small, very cheap diamonds upside down (with the culets in the air) on opposite sides of the disc as shown in the diagram below. When spinning they cut bright shallow grooves into the metal surface. Wayne Mackenzie in Edmonton gypsy sets or tube sets a small diamond upside down at the end of a bent burr for a similar effect.

Another tool for creating grooves can be made by breaking the end off an old bur, heating and bending it sideways and then filing or grinding what is essentially the front end of a bevelled graver onto it so that as it spins it cuts into the surface creating short nicks or grooves. It must of course be hardened and tempered. Always temper carefully. I've heard of a flex shaft tool made so that a small piece of carbide lathe tool bit is clamped into it and this functions like the one previously described.
Yet another tool for grooves, this time by making long, controllable furrows. Take a carbide wheel from an old or broken pipe cutting tool and it threads neatly onto a heavy flexible shaft screw mandrel. This makes deep grooves if pressed hard. Note that it generates a lot of heat. I think the wheel from a can opener would also work though I have not tried it.
Anything that can be mounted on a screw mandrel or placed into a flexible shaft chuck has some kind of use from wooden matches (takes the shape of what you are polishing) to pins (good for drilling into wax). A square of watercolor paper on a mandrel can be quickly trimmed into a disc while rotating with a sharp X-acto® blade (be careful!). This with a little polishing compound then becomes a great tool for polishing in hard to get at places like between prongs on a ring.
Clear plastic spring water bottles make excellent cheap disposable see through hoods and are easy to cut to shape and attach to the end of the vacuum hose for use with flexible shaft tools. They keep the dirt down from polishing.
If a lever and collet type handpiece will not handle the tools I am using I sometimes change handpieces rather than burs. I have several handpieces each with a different tool in it. One pulls the handpiece off and then mounts the next with a gentle pressure and a little rotation on the shaft. It clicks in place quickly and is faster than switching burs.
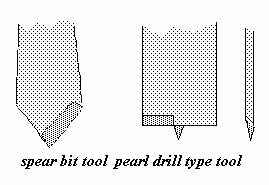
By taking a broken burr, annealing it, forging it and filing, then re-tempering to a light yellow on the tip and blue everywhere else, one can make a nice tool to bore holes for stone settings. It functions like a 'pearl drill' and looks like a miniature carpenter's spade bit. It cuts a flat bottomed hole. Remember to use care when tempering and always use safety goggles when using machinery. Another antique drill style is a 'spear bit' and like the pearl drill it is still available from European tool dealers. Both are quite fast cutting and offer some advantages over normal burs for some operations. In China goldsmiths take umbrella spokes, forge and shape them as spear bits for pump drills (bow drills). I actually learned stonesetting with a pump drill-the slow speed has advantages in fostering understanding of the process.
Silicon carbide separating discs are unequaled as a construction aid, cutting the time needed for installed hinge constructions to 15 minutes and box catches to an hour from start to finish. They also serve wonderfully for scoring and bending, both standard straight lines and for curves of all types. Such scored lines need soldering later to gain strength. One scores until one sees a raised line appear on the far side of the cut. If an exact bend is needed then pull scoring tools, needle files and the needle file-graver combination can be used.
Silicon carbide discs can be stacked onto a mandrel to make ploughed surfaces (such as into hammer faces to produce large stamping surfaces on old hammers) or they are available in various thicknesses including really thin ones. If you need to thin one out hold another one against it while it is rotating.
One can slit into a separating disc with another one to create three or four thin slits that run two thirds of the way to the center. This allows one to see through the disc while it is rotating.
When you break a drill it is not necessary to discard it. It is possible to resharpen drills, even the small ones, by using an oilstone or grinding wheel. For the proper technique see your local machinist. There is a much easier method available however. Small and larger drill bits can be sharpened easily by breaking off about a third of a mounted separating disc with a pair of flat nosed pliers, placing it in a flex shaft chuck Use goggles! and then while it spins one can see through it (like a split lap) so that one sees what material is being taken off as it is removed. One can put a little magic marker on the ground faces of the drill bit so that one can more easily see as the steel is ground away by the disc. Test the bit to see if it bites into the metal and if it does not adjust the angles you grind it to. Sharpening drills is relatively easy. Compare with a new bit as a starting point.
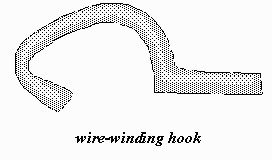
One can easily wind wire and cables for binding during soldering by using a hook in the flex shaft made from coat hanger wire or some equivalent.
Tubing can be cut very quickly and accurately when placed in the flexible shaft. See the section on cutting tubing for more details.
One can use a pair of side cutters or snips to cut tubing while it is rotating in the flex shaft. It simultaneously deforms the tubing inwards and makes beads with tapered ends. One can even close one end off completely by first cutting the tube with snips to bevel them inwards and then holding a piece of steel against the rotating tube end to close it, or hold it against a piece of steel. Round nose pliers held on work well. This is useful when making stick pins.
When mounting an abrasive disc or similar tool onto a flexible shaft screw mandrel, let the rotation of the tool mount it itself for you. Place the mandrel shaft into the chuck. Unscrew the retaining screw and insert it through the buff or disc being mounted. Place the end of the screw into the receiving hole on the mandrel and slowly press the foot pedal on the flexible shaft. Hold your thumb on the screw head while the shaft rotates. It quickly screws itself in. This rapidly mounts the buff or disc. Then one tightens it with a small screwdriver. It is sensible to have such a small screwdriver placed close at hand to the flexible shaft. We either drill a hole into the side of the bench and insert the shaft of the screw driver so only the handle sticks out ready to grab or use two eye screws for loops as a holster for the screw driver. As always you don't want to have to hunt for a tool or do any work to put it away.
One can place one's thumb on the cog teeth of the chuck and press the foot pedal to close the jaws quickly on a tool held between them. The moment the cogs start moving slide your thumb off them to avoid friction burns on it. Some people widen the opening over the chuck gearing so as to better place their thumb on it. I don't bother. This trick really cuts time from placing a tool into the #30 flex shaft handpiece chuck.
There are two flexible shafts hanging to my right at the bench so I don't have to change bits frequently. The handpiece and foot pedal on one of them is painted blue so I don't get mixed up when using them. I also have two Mini-Mites® on the left of my bench (rechargeable small Dremels, you have to buy a smaller collet for them to use standard 3/32 (2mm) burs). They have high speed but low torque and are good for drilling holes, sanding disc and separating disc work. Having all these tools loaded and ready to go really smoothes the working process on a piece.
Here's a rotary burnisher that you may already have that can be used for upsetting edges and filling pits in castings: use the jaws themselves as a rotary burnisher, when they are closed up tight with nothing in them. The gearing teeth of the jaws of your (#30 handpiece) flexshaft chuck can also be used in the same way .
The small screwdriver which lives just to the right of my bench pin (mainly used for flexible shaft screw mandrels) slides into a hole in the bench right up to its handle so that it is easy to get at and return to its place without being in the way too much. Close to the front of the shaft, just behind the blade I have ground two flats onto the shaft which form a scraper edge so the screwdriver can also be used as a hand-held scraper.
Ganoksin Staff Note: Finding The Best Flex Shaft Tools & Accessories
You can find up-to-date reviews and recommendations for the best flex shaft tools and accessories in our Buying Guide section. Our guides include expert advice for jewelers of any skill level and budget. Make sure to check out the best rotary tools here!
Related Articles

Gold Alloys Using X-ray Fluorescence

The Neo Five Axis Mill

How to Handle the Flexshaft

Pulse Shaping: Energy Over Time


The All-In-One Jewelry Making Solution At Your Fingertips
When you join the Ganoksin community, you get the tools you need to take your work to the next level.
