
A Metalworking Hand Tool List For Beginners In Jewelry-Making
Making jewelry is sometimes seen as a difficult or an expensive proposition. In reality a basic metal working shop can be set up quite inexpensively. Cutting (separating materials), soldered construction and finishing are the three main things that jewellers do and what follows is a list of basic tools for doing these things. One should be able to set up a basic shop for less than a hundred dollars.
10 Minute Read
Making jewelry is sometimes seen as a difficult or an expensive proposition. In reality a basic metal working shop can be set up quite inexpensively. Cutting (separating materials), soldered construction and finishing are the three main things that jewellers do and what follows is a list of basic metalworking hand tools for doing these things.
One should be able to set up a basic shop for less than a hundred dollars. Remember safety and make sure you have ventilation and use eye protection when sawing and performing other potentially dangerous tasks, it's not worth getting hurt because you took a short cut or didn't think.
Suggested Reading For Beginners In Jewelry Making
There are numerous books one can start with depending upon the level of jewelry making skills one aspires to, Theory and Practice of Goldsmithing by Prof. Brepohl and Tim McCreight's the Complete Metalsmith are excellent as are many others that one can find at the library. Your local lapidary club will often offer introductory classes in basic jewelry making far more cheaply than any other route to learning.
An approach which is less hobby oriented and more of a professional pretraining is to use Alan Revere's Professional Goldsmithing book as a text and go through it step by step, taking no account of time spent, just concentrating on doing the best and most accurate job you can. If you go through the projects in sequence and as carefully as possible one would get a pretty good basic training. Revere's video series is also good for those wanting slow, real time step by step tutoring on projects-you could set up the DVD and (starting and stopping a bit) go through building the items shown.
Creating Your First Workspace
In any case the tools listed below should be readily obtainable and affordable. You don't have to have the best to start out with. If you want to by all means go all out in purchasing equipment but the tools mentioned will get you rolling without breaking the bank. I am a firm believer in fleas markets, second hand stores and lapidary clubs as sources for used tools. Keep a tidy work place and organize from the start to make your life easy.

"Keep a tidy work place and organize from the start to make your life easy."
You could begin by using an ordinary table (if you use your kitchen remember to clean up and not mix food and metal working dusts and residues!). If you want to set up a special place in your house for jewellery working you will need a sturdy bench or table to work at and a good desk lamp over your work place. The ventilation is needed primarily for soldering and pickling. If you use an alum or vinegar pickle for cleaning metals after soldering they put out far less noxious fumes than the normal jewellers pickling cleaning solutions.
Advice On Ergonomics For Beginners
Things to remember include that you don't want to have to move out of your way to get a tool when working. Understand your work space in relationship to your body. Move your body and arms around while sitting in your favorite comfortable chair to work in. Usually when seated in your chair your arms when straight out should rest on the table top. You can of course start at another type of table-just don't set yourself up for neck or back problems because of the height you are working at. Get a feeling for how you are comfortable in your work space. Then tools get positioned around your body space for maximum accessibility in order of frequency of use.
"you don't want to have to move out of your way to get a tool when working."
Watch how you move when you work. Notice the natural paths you and your body take in space as you move at your work. Position your tools along these paths in order of frequency of use, ie when my right hand drops naturally down and hangs comfortably by my side that is where my most used file is, about at palm height, nearby are other tools. To put the file away the hand goes to its natural rest position and lets go of it and it falls into a hole or slot in a piece of wood attached to the bench to receive it. Kitchen magnetic strips and old stereo speaker magnets attached to the wall or desk can be useful holding devices.
"keeping a tidy work space pays off in ease of working over the long run"
Again, getting organized and keeping a tidy work space pays off in ease of working over the long run and is best learned as a habit from the moment you start making jewelry - once you are used to it it will be automatic and you will save hours of messing about by doing so. Labelled plastic drawers for parts, tomato paste cans for files and so on help to keep things where you can find them.
Jewelry making can be fun and even profitable once you start. My best wishes to those starting on the adventure of jewelry making!
A list of useful tools follows.
Cutting, Piercing, Rough Finishing Tools
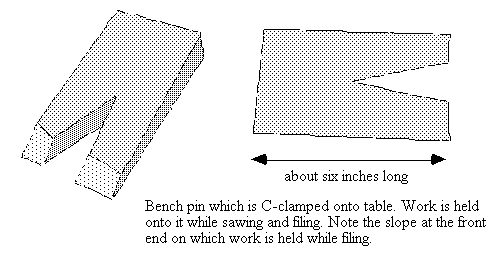
- A jewellers sawframe and a selection of blades; # 03, 02, 01, 0, 1. A wooden bench pin (a piece of 1″ board with a V-cut into it to clamp onto a table) and a C clamp are good.
- A beeswax chunk for sawblade lubrication (slide it onto the blade to make sawing easier). One each 6″ flat and half round files, flea market versions are fine; remember to put handles on them so you don't hurt your hands. Keep your files from banging other tools for best results.
- A set of needle files: if you look around you should find a set for under four dollars these days.
- A selection of emery papers, fine and medium grits at least.
- A piece of medium emery paper is scored and tightly wound about a rectangular cross sectioned wooden lath. The ends are thumb tacked tight. Different shapes of lath and various grits are useful. Aluminum oxide holds up well. This becomes a sanding stick which is used like a file to finish surfaces, an extremely important finishing tool. Some people use a paint stick for this.
- A selection of drill bits and tools to drill with. A flexible shaft or Dremel® like tool is best. An ordinary home electric drill will do to start with. It helps to C-clamp metal so it can't move while drilling it. A cardboard pad under the C clamp will protect the metal from damage from the clamp.
- A centre punch to start drill holes with; always start with a dent, then use increasing sizes of drill bit until you get to the hole size you want. Make it a habit to always take a larger drill bit in the hand and take the burr off the edge of the drilled hole with it by twisting it, this prevents all kinds of problems later. Also useful is a large reamer for enlarging and tapering holes, it is found at the hardware store.
- A pair of hand or aviation snips - if it is easier to use snips instead of a jewellers saw then do so!
- A small piece of flat steel (bottom of iron) to use under centre punch and as an anvil surface.
- A small ball peen hammer.
- Some peel and stick white label stock, permanent marker, thin felt tips, pencils etc for layout of drawings on metal. Photocopying and spray adhesive work well for this kind of thing.
- A large darning needle to use as a scribe for laying out lines for cutting and so on.
- A cold chisel if thick metal is to be cut. A hack saw is nice to have around as well for such things.
- A steel edged ruler is most useful. A plastic protractor and templates for circles are nice to have.
- A pair of dividers and/or Vernier callipers. Professionals have several dividers on hand.
- A machinists try square or an accurate small window frame brace (this latter is a really cheap option) to measure and check right angles with.
- A small vise can be useful.
- Safety equipment like dust masks, eye protection and hearing protection wherever necessary.
The Best Cutting, Piercing & Rough Finishing Tools
Buy List
Soldering (Brazing) Tools
- Some ceramic kiln firebrick (the light porous kind-not the heavy kind) to solder on. Check with local ceramicists for used bricks you can file or grind off to use for this.
- A Bernz-o-matic® type propane torch from the hardware store (approx. $12.00) it is controlled by the angle it is held at. When the tank is near vertical the flame is small, near horizontal it is larger. With a little practice this is a great torch. These are great and very cheap.
- Some white paste high temperature brazing flux (welders supply).
- Several cheap watercolor brushes for painting flux on with for soldering.
- Papermate® white out as a solder flow retardant to keep previously soldered joins from coming apart when performing later soldering operations (let air dry for 15 minutes before heating!)
- Some high melting temperature silver solders for jewelry making, hard and medium. Easy is generally used only for repair work.
- Some low melting tin Stay-brite® solder and it's special flux from a hardware store is useful for repairs and simple constructions where you have a good contact surface area on the join.
- A hot plate or crock pot for pickle to clean off oxides and flux residues. (Pickle is an acidic compound which removes flux glazes and oxidized surfaces from metals after soldering).
- Sparex® jewellers pickling compound or swimming pool acid from the pool store (approx. 1 teaspoon per 500 ml). The swimming pool acid is the same chemical more or less; sodium bisulfate. Note that in a pinch a cup of vinegar and a tablespoon full of table salt makes a very good cleaning pickle as does pickling alum from the supermarket. (1 teaspoon of alum to a quart or so of water).
The Best Soldering & Brazing Supplies
Buy List
Finishing Tools
- A hand brass brush is used with a soapy water solution for satin finishes. The soapy lubrication is essential for good results. You could try steel wool too but I don't personally like it .
- Some dishwashing liquid and household ammonia in hot water is used for a degreasing solution to remove polishing compound residues and general greases from fingers and so on. This is the jewellers secret formula for cleaning jewelry; soak the piece in the hot solution a while, then scrub with an old toothbrush to clean it. Don't clean emeralds or opals like this as they may be damaged.
- A stainless or Corning® pot and hot plate to warm the degreasing solution in is good.
- A spoon or a printmakers type burnishing tool is used for burnishing edges and surfaces.
- A Scotch-Brite® pad works for a satin finish (Janitors throw away the centers of floor polishing pads which are the same type of material - ask and they are free!)
- A buffing wheel on a mounted electric hand drill or on a polishing motor (a washing machine motor and tapered spindle) are great if you want the bright shine one expects with jewelry.
- Some tripoli and rouge (or Fabulustre® polishing compound instead of the first two).
- Some toothpaste or Old Dutch Cleanser® for satin finishes, perhaps some commercial polishing pastes for brightness.
- Some people like turtle wax or an equivalent for surface protection, particularly on brasses, transparent auto enamel is good sometimes if patinas are used.
- Access to a sink or bucket or water and paper towel or dry hardwood (not oak or pine) sawdust in a plastic container is used for drying metal in after washing and rinsing it-dip the metal in alcohol, place in sawdust, shake around and brush off. This results in spot free drying.
The Best Finishing Tools
Buy List
The Most Important Advice
Don't put a mark in the metal unless you want it there. Measure twice; cut once-half an hour of planning, layout and checking saves two hours of repairs
I hope this gives a good starting point for those who have been nervous about working metals and encourages you to try out making your own jewelry - it can be most rewarding especially when combined with your own gemstones that you have cut and polished.
Safety Equipment For Metalworkers
Buy List
Related Articles

Useful Bench Tools

Creating Equal Divisions in Stone Setting

Jeweler’s Saw Blades: All The Different Sizes And How To Choose Correctly
V Prong Setting


The All-In-One Jewelry Making Solution At Your Fingertips
When you join the Ganoksin community, you get the tools you need to take your work to the next level.
